Friday, May 31, 2013

That's how we roll...


Hey!  Something fun from Chessex!  This is the sample which Chessex sent me yesterday.  The pictures were obviously quite small, but they did a nice job shrinking down the design.  I sent them a 6 x 6 inch version, so that they would have lots of resolution to downsize it.


The choice came down to 3 of the Gemini colors, and we ended up going this way, since it seemed the most "painterly", and conflicted with the design less.  They really have a vast selection, which is great.  Of course, the design is printed on the '1' side, since all the dice I roll seems to have them on every facing!

If you don't believe me, just ask anyone who has ever watched me roll one of these random cubes of doom.

In any case, they are now in production, so I will post images when they arrive!!


This is a new image that Raging Heroes just posted today, along with info about their own imminent kickstarter.  It just keeps getting better and better!


Thursday, May 30, 2013

How to keep the line moving...


When you have the kind of insanity which went on this week, it can be very hard to keep a production line going at all, much less at full tilt. This is a conversation about ways to keep the train on the rails, and to maximize any time that you have.

While very few of you will have to paint vast numbers of commission minis and keep a kickstarter program going,  there are long term army projects that all of you do, like armies!

One way I try to maximize time is by working on tons of projects at once.  This allows for a lot of flexibility.  For instance, when I am working on bases, I will make a few bases for my army miniatures.  That goes for times like yesterday, when I am running around cleaning floods and sealing basement walls.  Or even during the allergy attack, when I could not speak and barely see!

Instead of giving up completely on miniature related stuff, I do those "simple" grunt work tasks like filing mould lines, making bases, priming figures, and so on.  While my brain is useless for high level tasks, I can at least sleep walk through those parts of the hobby.

I think most folks tend to just say the heck with it, and prefer to wait until they are 'in the groove'.  Well, even for someone who does this 12-19 hours a day every day, you are seldom in that groove.

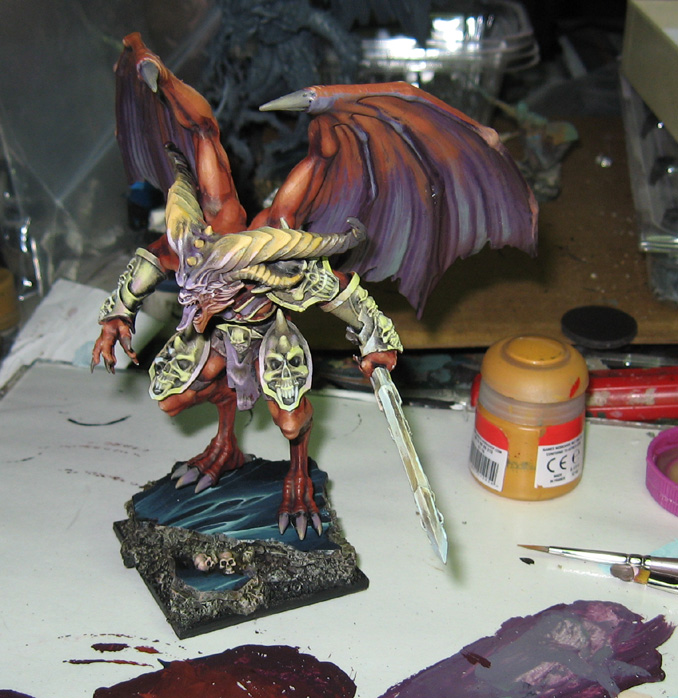
Another way to help get that army painted in less than 10 years is to have other figures on hand that might be using the same colors you already have on your palette.  I have an example here.  Over the last few days, one less demanding task was putting the initial 'shaded basecoat' layers on the color test Ultraforge Demon Prince.


In these images, you see him just about at the point where I start glazing and tinting darker.  That is another less intensive task, which I will be doing at the same time as the darker glazes on the Abbadon / Loki project.


The whole time I was painting this, I was also putting colors on the Abbadon / Loki set... such as Loki's cloak...


Some of the colors that I used on the base were also applied to some bases for more Dark Eldar Kabal warriors.


And here they are!  As I was assembling the second Ultraforge Demon, I brought out these extra Warriors that were never used for Adepticon.  The goal is to make more boots on the ground, and what better way to start by getting back to the most basic infantry?

I already had all the basing material out for Abbadon and Loki, so why not make a half dozen more bases for these guys at the same time?  You would be amazed at how much time that saves in the long run.


The base color I used on the Demon just happened to be the same one I used on the Dark Eldar, so guess what... yes, I used it on them as well!


This gives you an idea of what was under way...


As I applied lighter colors to the Demon, I did the same with Loki's cloak and the Kabal Warriors.


In this way, I kept a minimum of 3 major projects going during a week of hell.  There was no risk of 'messing up', since these were tried and true tasks which were either very fresh in my mind, or done so often that I could practically do them in my sleep.

That was good, since there was more than one occasion where I just about fell out of the chair as I was working.

There are even more colors I can put on these guys as I continue with other projects, which will help keep the line moving!!!


Wednesday, May 29, 2013

Getting ready for Chaos...


As the clean up and repairs continue after the storms, we have the finished images of the 50mm bases.


I kept the colors on the cooler side, since the flesh tones will have a reddish look.  The armor will also be on the warmer side.  I was hoping to use the cooler colors of the base as a foil for the interior of the demon wings.  Trust me, you will see what the heck i am talking about when the first demon pictures are shown. :-)


It was fun to paint these bases.  I will be doing the same scheme on the bases for the Raging Heroes Blood Vestals.


And now for a nice image of the beasties!  This is the new Demon Prince from Ultraforge.  You saw an "unboxing" post on him a while back.  That showed how easily he went together.


While these types of marble bases are relatively simple, they give a very solid footprint anchor for big guys such as these.  It holds them very well with a pin in each foot!


Well, looks like someone found the new box of Fruity Cheerios.  I hope they leave some for me!


More bases...


Well, my plans for last night changed rapidly when water decided to find a whole new way into the house.  Nothing of value was messed up, but it was a huge mess to clean, and that clean up continues.  So, it has done a number on my work schedule!

Here are some 50mm bases for the Ultraforge Demon Prince that is being used for the "Painting Demon Flesh" video.  It started out as the usual cork and baked sculpey, with a few Secret Weapon skulls added as well.

The first coat of paint was that brown craft paint which I first used on the big Basilica Canus army board.  That stuff is perfect for the initial layer on super absorbent surfaces such as the cork and sculpey!

I mixed in a greenish grey to get a color shift away from the brown...


And continued to shift it to the green and lighter end.


I even added some very pale flesh tone to that mix in some areas so that the colors were not too monotonous.


The marble surface began as a deep blue and purple mixture.


You can see that some of the green was added to that color to create the marble veins.


More and more of the green was added once the patterns were established...


Even brighter still in some parts of the veins.


Now it's time to glaze the rocky areas!  I put out a series of washes that would allow me to get a nice range of darks.  It is even more important on large bases such as these to vary those dark tones!


You can see the first layers of glazes and washes here.  I would do 3-5 Layers of washes in some places.


This really illustrates the effect the dark glazes have.  I also continue some of them over the top edge of the marble to age that as well.  You could also use weathering powders on this edge as well.


Now the dark marble top does not look so out of place with the darker colors toning down the rocks...


The warm colors glazed into the darker areas still offset the cool colors of the top surface, however.


The last bit of work was doing the more detailed piece, like the skulls!


When the Photo area does not have piles of drying clothes and other items, I will take some pictures of the finished bases with the primed demon figures on them... stay tuned!!!!


Tuesday, May 28, 2013

Sorry, Charlie :-)


I don't think that many people will get that reference, but here is Charlie from Raging Heroes!!

He is part of the Kurganova Sisters set.  I will have those images later.


He's a very fun little mini, and fiercely loyal!  And he likes a good smoke.


The Raging Heroes kickstarter draws ever nearer.  They have put up some more information on their site about what is coming!  Go check that out.


Who's afraid of the big bad wolf?


OK!  The wolf mini for the "Painting Fur" video is complete.  It's always fun to paint critters!


I used several Secret Weapon washes in combination with some Vallejo glazes, with very fun results.  


I was putting down glazes, and then wiping away parts of them with either a clean brush or some tissue, just like my old watercolor days!  I really enjoy that. :-)  I had a blast mixing in greens and even purples onto this figure...


This is a wolf from Gamezone, normally used for goblin wolf riders.  


It worked very well for this video, which made me happy!!


Painting the base set for Abbadon and Loki


These Primarch sets from Forgeworld have some very interesting stuff going on with the bases.  Each one seems to be more 'interlocking' than the next.

Figuring out how all these bases were supposed to go together was much like making a puzzle.  They have to slide into the slots, which means you can't have any sort of basing material around that back edge.

Also, the main base section is much smaller than the giant flying base.  I filled in that area with oxide paste, some sculpey pieces, skulls from Secret Weapon, and even some razor wire!


Here are a few pictures of the base as it was yesterday morning.  I had done lots of dark glazing and tinting with many washes from Vallejo and Secret Weapon in combination.  The rust and corrosion was also applied.


My next stage will be to add some middle tones and then the final highlights


There are some parts of this where I will be using powdered pigments, since I think this could be a perfect laboratory for the effects I want.


This image shows those separate base elements...


And, finally, to a blog that frequently shows links to my own blog posts.  They peruse the blogosphere each week, and post "Gems of the Week".  This can be painted minis, sculpts, terrain, and so on... even tutorials.

They have been kind enough to feature something from my blog almost every week, bit every so often I get the main picture, as happened this week with the Raging Heroes Dark Elf!