Friday, March 22, 2019

Army Painting... a New Series!


The latest Army Painting series has been completed for the Patreon Page!  I have been eagerly awaiting this Morghul Knights unit for my Middle Earth SBG collection, and now it is well under way to the table.

My next Lord of the Rings series will feature my new Rohan army!


I used the Mig Ammo Oilbrushers as well as standard oil paints throughout the process.  These have a number of advantages, as the consistency is the same as acrylic miniature paints right out of the container.  They also have an unbreakable container, and a handy brush to get that out on to the palette.


I used a number of Green Stuff World products on the bases, which were also covered in Episode 1.  The new Texture Sheets were outstanding, and I also created a few flagstone bases.  

Once the figures were painted, I concluded the series with adding static grass and cut leaves.  You can see the Green Stuff World leaf cutters in the image.  They are really amazing!


I tried to cover a number of topics during the 4 part series, including weathering, NMM, and how to get as much color variety in "black" as possible.  This series allowed me to do a lot more glazing of the oil paints, since I was able to let some layers partially or completely dry.

This is something I have not done very often, and never had a chance to capture on camera.


The Army Painting tutorials are only a part of what is offered on my Patreon Page.  I also have a number of basing tutorials, terrain, and other "general techniques".  I am now filming the 14th Painting Dark Sword episode!  All of these are available for you to see when you sign up for that pledge level.


I have a few live sessions that are more of a conversation about the approach to using the oils, including this recent episode on the Song of Ice and Fire Flayed Men:  https://youtu.be/IkrM2b7xl7E


When you look at the cloaks, metals and horses, you will see that each one is a slightly different shade.  Some have more of a greenish tint, others more red or even turquoise.   These subtle differences create a much more interesting unit, and the oil paints make it a LOT easier to create those kinds of gentle shifts in color.

Even over a layer of dried oil paints, it is still easier to blend in a fresh layer of oils than to do so in acrylics.

Series 8 will also feature some brand new elements, as I work on the Mountain's Men.


The Army Painting series is available at the $15 pledge level, and all previous series can be viewed.  Many more are already in the works!

Here's a link to the page: www.patreon.com/JamesWappel


Wednesday, March 20, 2019

Marble Factory: Adepticon 2019


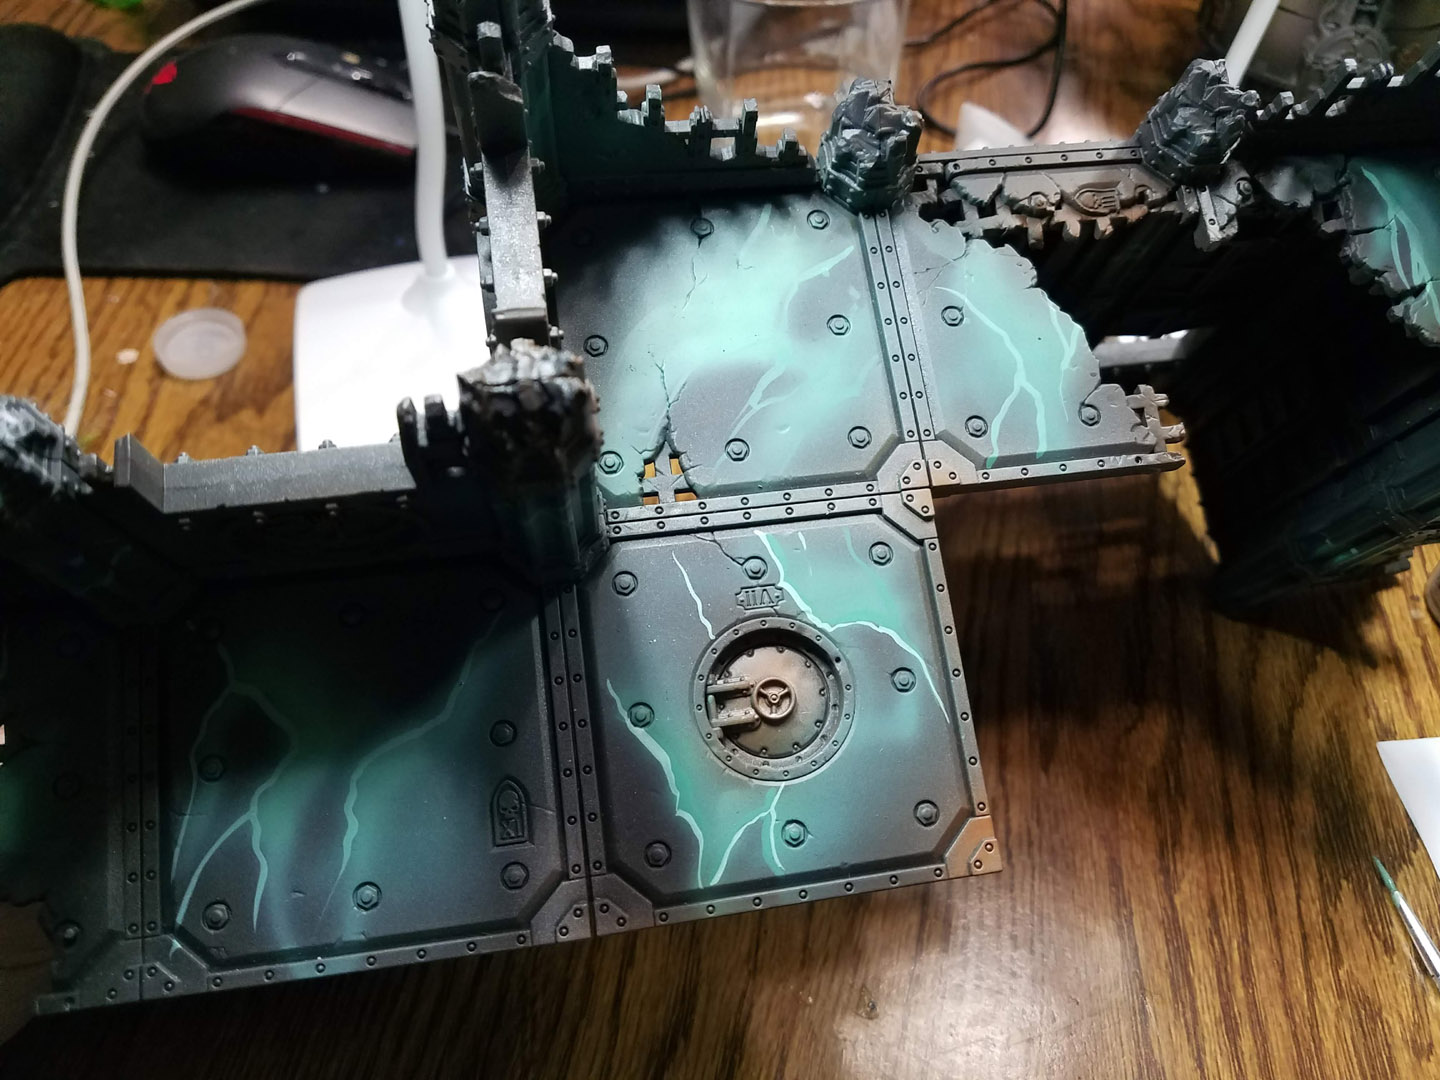
I was able to snap a few shots while I did the marble effects on one of the Adepticon terrain pieces.  Each one started out with some initial layers of Badger Stynlrez primer, and some regular paint colors too.  In this case, I used an interesting teal green to get some 'starter' marble pattern.

I have done some previous articles on using torn paper towels as masks when the lighter tones are airbrushed on.  This gives you an idea of where to place the 'veins' of the marble later on with a regular brush.


I tell people all the time that we used to brush on Badger Stynlrez primer with regular brushes... and the Badger paints too!


I started to make a sharper delineation of the marble veins by brushing on the color of Badger paint which was used in the last airbrush layer.


I did the same on the columns, which was trickier due to the shape.  I was using my normal #8 round craft brushes, but holding them on their side, so that they were almost parallel to the surface.


You can see more of that here.  The idea is to 'push' the brush across, making a more random pattern.


The inside of the wall section was even more difficult, as it was harder to see.  You can tell by the massive shadow that getting light there was no easy task!


I started to add some lighter colors to the mix, working on one "side" of the veins.  I usually chose the side where my sharper brush stroke just up against the darkest color.  You keep adding broken lines or veins on that side with progressively lighter tones.


Again, this is not so easy on the fluted columns!


When I add those lighter colors, I also draw in additional (but thinner) veins.  You don't want to go overboard with these, as they will ruin the effect.


Once all the marble was done, I started to do some weathering washes with the Secret Weapon Miniatures paints.  I started with an Old Rust, then to Orange Rust.


You can see some of that weathering over the painted areas and the metals.  I will be posting some more images of the finished buildings soon!  Adepticon is just a few days away now!


Tuesday, March 19, 2019

Twiggy and Squiggy


These cute little guys from Malifaux might spoil your camping trip!  The personality of these was definitely more unique and characterful than the typical GW Dryads.

They don't look terribly aggressive, you never really know...

I think that Twiggy and Squiggy get up to all kinds of hi jinx in the woods, messing around with hapless humans, putting out campfires, etc.


They are definitely more "whispy" than the GW versions, so assembling them can be more of a challenge. However, it was well worth it, as it was very fun to work with greens, oranges and other interesting tones in the mid tones and even the shadows!


Saturday, March 16, 2019

Desert Storm


As we prepare for our desert campaigns, we revisit a few of the vehicles painted for that theatre.  One is a Rubicon Crusader, and the other is a Shapeways Panzerjager.


The Crusader was painted with Mig Ammo Oilbrushers, while the Panzerjager was done with regular acrylic paints (Secret Weapon weathering paints and Reaper miniatures).


If you want to get a peek at how the Crusader was done, it was quite similar to this Panzer 3:  https://www.facebook.com/james.wappel/videos/vb.1056181987/10211564190874477/?type=2&video_source=user_video_tab


I just filmed a new video showing how to paint a very unique desert theme vehicle... this time a sci-fi APC from Victoria Miniatures!  That will be published soon, once the vehicle is released.  That is painted very much like the Crusader.  I used the Secret Weapon Weathering paints in a similar method as I did on this Captured and converted Char B1 Bis: https://youtu.be/ce_sOQ2KCUQ


When weathering desert vehicles, it is important to keep a few things in mind.  Sun bleaching is going to be far more prominent than any kind of streaking, and the old reliance on rust and other such methods is either non existent or kept to a minimum, for obvious reaons.

By the way, the crew figures of the Panzerjager are from Perry Brothers.  I really prefer to have some kind of crew figures for open topped transports and SPG's.  They don't have the same kind of look on the table when they are empty.


There will be a number of new vehicle painting tutorials coming to the Patreon Page once we return from Adepticon... they will be available to the patrons here:  www.patreon.com/JamesWappel


Thursday, March 14, 2019

Bloody Knights


One of the units that I want to have for my Adpeticon tournament army is the Flayed Men, and I have been working on them along with the rest of the Lannisters.  I am painting the unit using oil paints, and the Mig Ammo Oilbrushers.


Those are especially helpful in working on units like this, where there are a lot of muted colors, but you are still trying to get a lot of variation in those tones.  For instance, all the 'skin' they are wearing can be made a wider variety of tones, instead of just one level of 'pink' or red.

I was able to have a wide range of cooler reds, lighter tans, and everything in between, because the oil paints let me blend colors together in a very simple way.  Just place a few blobs of paint on the surface, grab a fresh brush, and blend them together!


I also added some blood effects using the Badger Airbrush Fresh Blood Ghost Tint.  It is very glossy, translucent and extremely vibrant.  You can see that I also added a few drops to the snow, which I was really looking forward to doing.


I am also recording a "hard copy" tutorial video for the Patreon Page.  This will show how the process plays out, including the snow and blood effects.  That should be up before we head off to Adepticon:  www.patreon.com/JamesWappel


Here's a link to the live session!  Be sure to subscribe so that you get notifications the next time I do an At the Workbench live tutorial... https://youtu.be/IkrM2b7xl7E


Tuesday, March 12, 2019

The Making of a Tutorial series


I am returning to Middle Earth once again for Series 7 in my Army Painting tutorials with some Morghul Knights!  This is the first Lord of the Rings unit that I have painted with the Mig Ammo Oilbrushers, and it has been a lot of fun!


As I have mentioned many times, oils really excel at painting multiple figure all at once, because the miniatures themselves become the wet palette.  It can be as simple as placing a color onto some wet paint, grabbing another fresh brush, and blending all those tones together.  There is no such thing as "layering up", or even basecoats.  You are working on all surfaces at once.


Episode 1 of the series focused on basing, as usual, so once the Color Test figure was completed, I could put that on the base and do a quick little demonstration on the Green Stuff World leaf cutters.

These bases were also a first time experiment, where I used those resin texture sheets along with my normal tree bark.  I loved them so much, I went on to use them for my Song of Ice and Fire Free Folk.


Here's the result of Episode 2.  Keep in mind that all the weathering, NMM, and so on was done in one sitting, while the paint was still wet.  Yes, it can be done, and it is not very difficult.  Keeping that advantage of the wet paint going can really help you get all those nifty color variations which will take a lot of glazing and other extra effort with acrylics.


Of course, the drawback is that the paint does not dry quickly when you need it to.  As I say in the videos, I do not try to make it dry faster by any of the means suggested, since it runs counter to the whole purpose.  It just means that I have to plan a few moves in advance just as you would in any tabletop wargame ;-)


If you want to see some examples of oil painting in action, I have a few YouTube live sessions that can give you an idea of how it works, like this one:https://youtu.be/IkrM2b7xl7E


With each Amy Painting series, I try to tackle as many new techniques, mediums and basing themes as possible.  I also vary the genre as much as I can.  Each series is usually 5 episodes, and runs 10-12 hours total.  All stages of the process are covered, from the initial unit basing to the color test figure (such as this one), and then to the rest of the unit.  Any special added effects such as freehand, flock, snow, ices, etc are usually covered in the final episode.


The Army Painter pledge level is $15 per month, and it gets you more than just the Army Painting series.  You also have access to the rest of the videos made that month, such as the Dark Sword Videos, Basing and other general techniques.  You can check that out here:  www.patreon.com/JamesWappel


Monday, March 11, 2019

The Lion Rolls On


Some of you might be familiar with my previous Warhammer armies like the Lizards and Tomb Kings, which had movement trays with ruined marble of various designs.  Here's a link to those older armies:  https://wappellious.blogspot.com/2012/05/skirmishing-movement-trays-for-skinks_28.html


Those movement trays were relatively plain compared to the Tomb Kings:  https://wappellious.blogspot.com/2013/04/more-views-of-chariots.html

Instead of having to carve in all the texture by hand, the Green Stuff Word texture rollers make creating all those amazing designs as easy as rolling the pins over some Sculpey clay!  I have a number of articles on how to do that process... here I wanted to show the new Song of Ice and Fire figures on their movement trays...


Once the sculpey sheets are broken up into the pieces you need, you can take the pinned figures and attach them to the bases by drilling a small hole the size of your pin (in this case the size of a paperclip).  For the smaller bits of broken sculpey, I can squeeze those in around the feet of the other figures that I did not cut from the original base with my razor saw.


The selected figures and bases are now in place.  You can see the Lion design featured on the bases quite easily!  Each texture roller has a number of great designs on it, so every last inch of it has something you can use.  You might even be able to spot the words "Glory" and Strength" here and there.


The parts of the sculpey sheets that were broken away to make the base for the figures are perfect for those interior places around the movement tray.  Since they were the parts of the design next to the Lion imagery, it makes sense that they would be right next to them on the tray.


I used some of my sandy paste to fill in the gaps around the sculpey pieces, being very careful not to make the surface too built up.  I wanted to be able to get the bases into their slots easily, and a few had some tiny overhang.


After sprinkling some light gravel and sand into place, I could start drilling the holes for the figures.


Here you go!  The entire unit ready for priming!  I think this speaks to the Lannisters, having the wealth to make such structures and abandon them for something even more grand.


I am doing a tutorial video on this style of multi basing for my Patreon Page.  This will be for the folks who have signed on to the $10 basing pledge, as well as those who are part of the $15 Army Painting pledge level.  Here's a link to the Page:  www.patreon.com/JamesWappel


All of these units will be part of my armies at Adepticon, so come out and see them!  Here's a link to the Green Stuff World webstore:  http://www.greenstuffworld.com/en/22-textured-rolling-pins