Showing posts with label Secret Weapon products. Show all posts

Tuesday, May 14, 2019

Tip of the Spear


This wonderful miniature is part of the Game Night 2 set for the Song of Ice and Fire Miniatures Game.  This is an alternate sculpt for the Spearwives, and it works so well in adding flavor to the unit.  I will be doing a special tutorial on that just like the Lady Val from a few months ago:  https://youtu.be/DAU3njr2Qc8


The snow and ice technique is a favorite of mine, using the Secret Weapon Miniatures crushed glass method on the snow, and the Liquitex heavy gloss gel for the icicles.  You can see that on most of my Song of Ice and Fire videos, like this one on the Savage Giant: https://youtu.be/1LvJv3dyjEw


I will be painting up a Spearwives unit for the Patreon page, most likely in oils as I work on other Free Folk units.  The goal is to have as many of these completed as possible so that I can begin my Battle Reports!  You can sign up on the Patreon Page here: www.patreon.com/JamesWappel


Saturday, May 11, 2019

Dog Food


One of the latest new releases for the Song of Ice and Fire miniatures game is the Stark Heroes 2 set, which contains some interesting miniatures.  I knew right away that I was going to have a lot of fun basing the Shaggy Dog figure.

It all started out with my usual bark and branch method of basing.  Here's a peek at how that works: https://youtu.be/INPfPLCTZcE


However, between the dog itself and the pose, I thought that I could use some of the nifty body parts from Secret Weapon Miniatures!  The sprues have heads, torsos, arms, legs and even feet!  I chose the bit that has one arm still attached to the torso.

Keep in mind, I was positioning this to take advantage of the movement tray.  I would place the rest of the body parts on the corner of the tray.


The rest of the tray had the "branch" bit, which will give me the opportunity to create some icicles, which you can see on the end of the previous wolf painting tutorial: https://youtu.be/dB4qtag5r9g


You can see the rest of the body parts placed in strategic areas on the base and the movement tray.  I will be doing some really fun blood effects with the snow, where the blood will be seeping into the snow.  I think I also did that effect at the end of this live session: https://youtu.be/3dpSONjJGQw


All of the pieces of bark were placed and angled so that the wolf would appear as if he were up on a rise.  The leafy material that you see is actually loose leaf tea that I had collected for my terrain pieces.  When it is crushed up, it makes some very nice ground cover texture.


I also did the rest of the characters in the box with a similar method.  These will be painting tutorials for the YouTube Channel and the Patreon Page!  ShaggyDog will be an exercise in painting black, just the opposite of Ghost.  The rest of the characters will be painted during live sessions and other one off tutorials


Basing is such a vital part of everything that I do, it even has its own pledge level on the patreon page!  You can check that out here: www.patreon.com/JamesWappel


Monday, April 22, 2019

Ghost of the North


I have another tutorial up on the YouTube channel... this time covering a subject I have been asked to talk about dozens of times. That is, painting white.  So, I thought that Ghost from the Song of Ice and Fire miniatures game would be a perfect example!  Here's a link to the video: https://youtu.be/dB4qtag5r9g


There were not a lot of colors used, but mixing those few together created an endless array of options to create subtle transitions...


I even finish things off with another round of Crushed Glass basing from Secret WeaponMiniatures


Here's the final result!


I have 3 other Song of Ice and Fire wolves prepped and ready for more videos.  Those will be available to the patrons on my Patreon Page.


People have a lot of trouble getting interesting tones in white... it tends to be very bland.  With wolves in particular, "white" fur often has a lot of yellow in it.  Also, the blue sky reflecting off the snow can make the fur seem blue, or even purple!


If you join the Patreon Page, you will be able to check out (especially at the Army Painter level), there are close to 100 different videos to see... covering terrain, Oils, Acrylics, NMM, OSL, TMM, you name it!  Here's a link to the page:


Wednesday, December 5, 2018

Heavy AAA: Scratch Build!


I think most of you have been seeing this Anti-Aircraft support vehicle appearing in the Round by Round posts for the Operation Sting tournament.

To try and accentuate the Anti-Aircraft theme of the Fallschirmjagers at Monte Cassino, I wanted to have something like this in the tank slot.  While there were many SPG's available (and certainly better all around choices), I went with this.

There were a few minor details, however.  Foremost among them was my lack of having one!

A few mix ups in timing meant that I would not have one in time for the tournament... which meant a final alternative...


I would have to build one from scratch!  Yes, that's right.  After gathering as many reference images as possible (and I mean several dozen!), I decided to give it a go.  Sculpey, plasticard and other random bits of junk were going to be utilized as rapidly as possible.


Here you go, and it certainly looks like a right mess indeed.  There's plasticard, resin sprues, Sculpey, Apoxy Sculpt, Green Stuff, plastic brush protectors, and even a left over metal chunk from a Gates of Antares kit!

This is certainly not the first time I have scratch built vehicles and monsters.  I have a video showing how I painted a few scratch built objective markers on my YouTube channel.  Here's a link for you!  https://www.youtube.com/watch?v=F2GrlbpDT0o


All of the crew for my artillery support teams were made using the figures from the boxed set.  I accidentally used the second crew member here for something else, which is why you see the kneeling figure behind the gun.

As you can see, the gun was removeable so that I could paint it and the crew.  It was also pinned, so that it could rotate.  I had to choose from a number of different reference images, since there was no definitive version of this. No manufacturer produces this exact vehicle anyway, which meant I was going to have to go this route.


I will be doing more late war vehicle painting videos now that I have a late war army.  Up until now, I have been focused on France 1940, which you can see in my battle report videos:  https://www.youtube.com/watch?v=2LgWEoymVQw


I also have a number of painting videos on my Patreon Page, including a 12 hour, 5 part series on painting my Winter Soviets.  This is something I will do for my Italians, DAK and Desert Rats.  Here's a link to the page: www.patreon.com/JamesWappel


Thursday, November 29, 2018

Round 1: Operation Sting


Operation Sting was really an amazing event!  Two days, 5 games, and lots of action... Bolt Action.  As I had mentioned in a previous post, many of the players brought their terrain tables so that it spread the work load and created more variety in the types of terrain.

This is my Ardennes board which I brought along, with the TableWar mat.


I played virtually all of my games against US armies, and that was the case for Round 1.


This seems deceptively open.  Keeping in mind that forest are dense terrain, as are ruins and buildings, I knew that the anti aircraft based weapons would not be doing very much.


This turned out to be the case.  Most of the time the Quad AA was in ambush, and the mobile heavy autocannon was in reserve off board.


I knew that for the tournament, I would be relying on the Fallschirmjager to come in from reserve, even though there were not very many of them!


When the heavy autocannon did arrive, it could dictate where the Sherman would pop up.  Again, the ambush game applied.


The scenarios were out of the book, but with a key twist.  Each game, you had to choose a "Secret Mission" and attempt to accomplish it.  You had 8 to choose from, and each time you made a choice, that was no longer available for the tournament.

Each mission also had 3 levels... a 5 point, a 3 point, and 1 point.  In effect, these were the critical tie breakers.  You would get 20 points for a win, 12 for a draw, and 5 for a loss.  So, getting the full 5 points could really help with a draw, and even a loss.

As the missions were secret, it was very difficult for your opponent to prevent you from getting them, unless you were very obvious!


My secret objective was to hold a few pieces of terrain, and keep the enemy away.  There were more obvious missions, which will be covered later.  Also, I can say the aligning your secret mission with the Table, Scenario, and Enemy force was a challenge!  

For instance, if you choose to go after the enemy commander in a giant Soviet horde in an urban setting, you are very unlikely to make that happen.  Also, two of the 8 Secret Missions were impossible for me to accomplish, since I had no medic and no tank...

Speaking of scores, Round 1 ended as a draw, and I did manage to get my 5 points.  That meant 17 for the first game.  I may have mentioned once or twice that I was totally unfamiliar with this army, with no time to play test it at all.  In fact, I had not even played a game in months.  And that was my usual early war!

I had to make cheat sheets for the army, so that I could identify each unit easily.  Most of the weapons that I had seemed like science fiction compared to the basic rifles which I had been using all along.

Stay tuned for more, as I take you through 5 rounds of action!!

Here's a link to one of my early war battle reports.  I have 4 of them set in France 1940:


Tuesday, November 20, 2018

Launch Angle


While the challenge of matching the basing of the weapon teams to the display board was fun, it definitely presented a challenge.  For those of you who have seen the Monte Cassino display board, you know that the shattered arches were a big part of it.

However, they did present a great opportunity to do some dramatic basing!  All the little nooks and crannies allowed me to create additional story telling moments, with ammo cases and other items scattered about.


I used Apoxy Sculpt to make the sandbags, which I thought might make the position look that much stronger.  The arches and most of the broken marble/stone were created using baked Sculpey clay.  The advantage of the baked Sculpey is the ability to break and carve it after it has been baked.


I have a number of basing videos available to my patrons right now, including a series on working with the Sculpey clay!

More to come on the individual infantry, and how they were based, so stay tuned!

A link to the Patreon Page:


Tuesday, November 13, 2018

Stark Choices


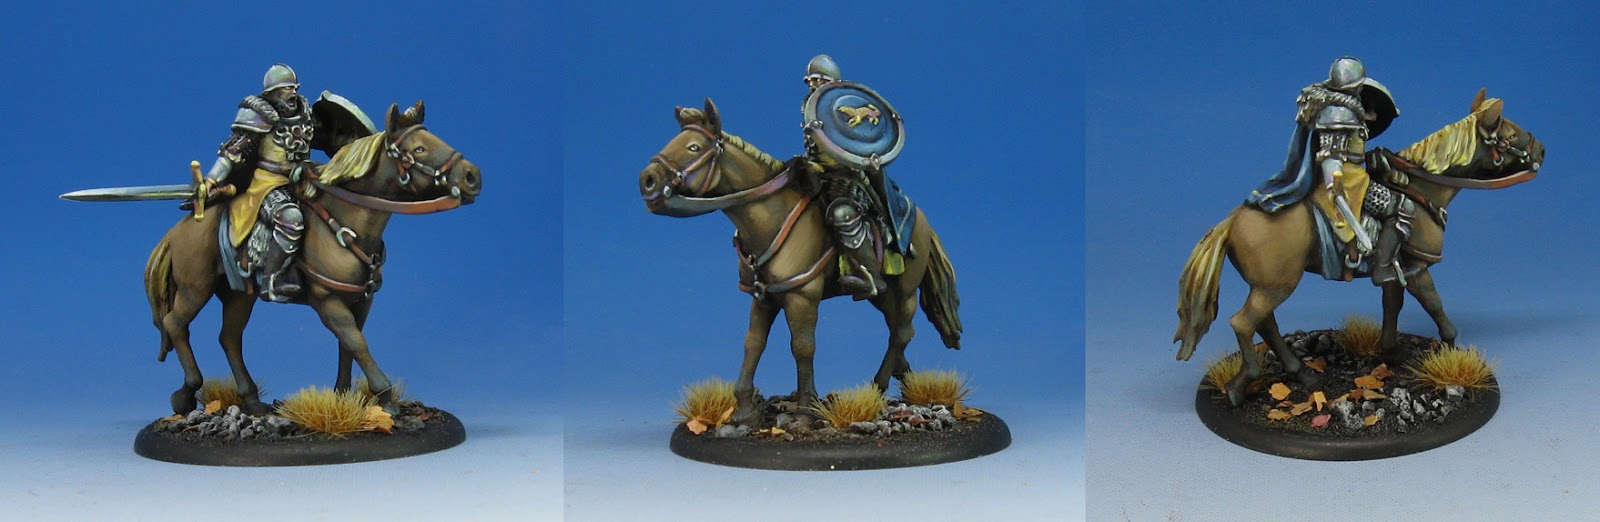
I think most of you know that I LOVE painting horses!  So much, in fact, that I did two different painting tutorials as part of the Painting Pyramid series.  One covered Appaloosa and the other Dapple Grey. 

I love painting horses even more when they are sculpted this well, and the Stark Outriders from the Song of Ice and Fire miniatures game definitely are!

With so many nicely sculpted muscles, I was able to do some very fun color shifts in the shadow areas.  I am not sure if you can see it, but you might notice that the shadow colors are not merely a darker tan shade.  In fact, they are green!


Because there is such a predominance of blue, along with yellows, having that green in the shadow areas is not very noticeable, and registers as grey to the eye instead.  This is not the only place where the green was used.  I also placed in on every metal piece as well.

These fun subtleties in shadow and mid tone areas are not very difficult to work out, ad adding them creates so much additional depth to the piece.

As the Song of Ice and Fire miniatures are a slightly larger scale, this also means you have a bit more surface area to work on.


I will be doing a number of Cavalry tutorial videos for the Patreon Page.  While some will be for the Army Painter series, you will also be able to get access to some for the $5 pledge level as well!

These would also cover specific breeds of horses, such as the two Painting Pyramid videos that are already available to the patrons... here's a link for you!


Sunday, November 11, 2018

Travel in Style!


It is time to start showing you the army that went with the Operation Sting Monte Cassino display board.  It was a big challenge to tackle this army, as it was so different from the Early War periods.  The equipment, the uniforms, and the vehicles.

I tried to make things seem a bit more Ad Hoc, and cobbled together from various sources.  This is why each vehicle is a different camo scheme.


I tried to make this seem less like a "stock" kit as well by sculpting stowage, and converting a standard infantry figure to be the gunner.


I did not use an airbrush to paint any of the camo patterns, and each was done the "old fashioned" way with my hairy sticks!  I used Secret Weapon weathering paints and the Reaper liner paints to create all the shading and weathering effects.


Here's a peek at the interior.  Hopefully I will get a chance to do some video tutorials on new vehicles as I expand the army.  I have a number of video tutorials on my Facebook page, as well as on my YouTube channel:


This view shows you the sandbags that I created, using some apoxy sculpt.  Again, the effects all had to be applied rapidly and dry quickly, as the tournament was fast approaching.


I also have some historical painting guides on my Patreon Page now, including an entire 11 hour series on my Winter Soviets, using oil paints.  Check that out here: