Showing posts with label Terrain building. Show all posts

Wednesday, March 20, 2019

Marble Factory: Adepticon 2019


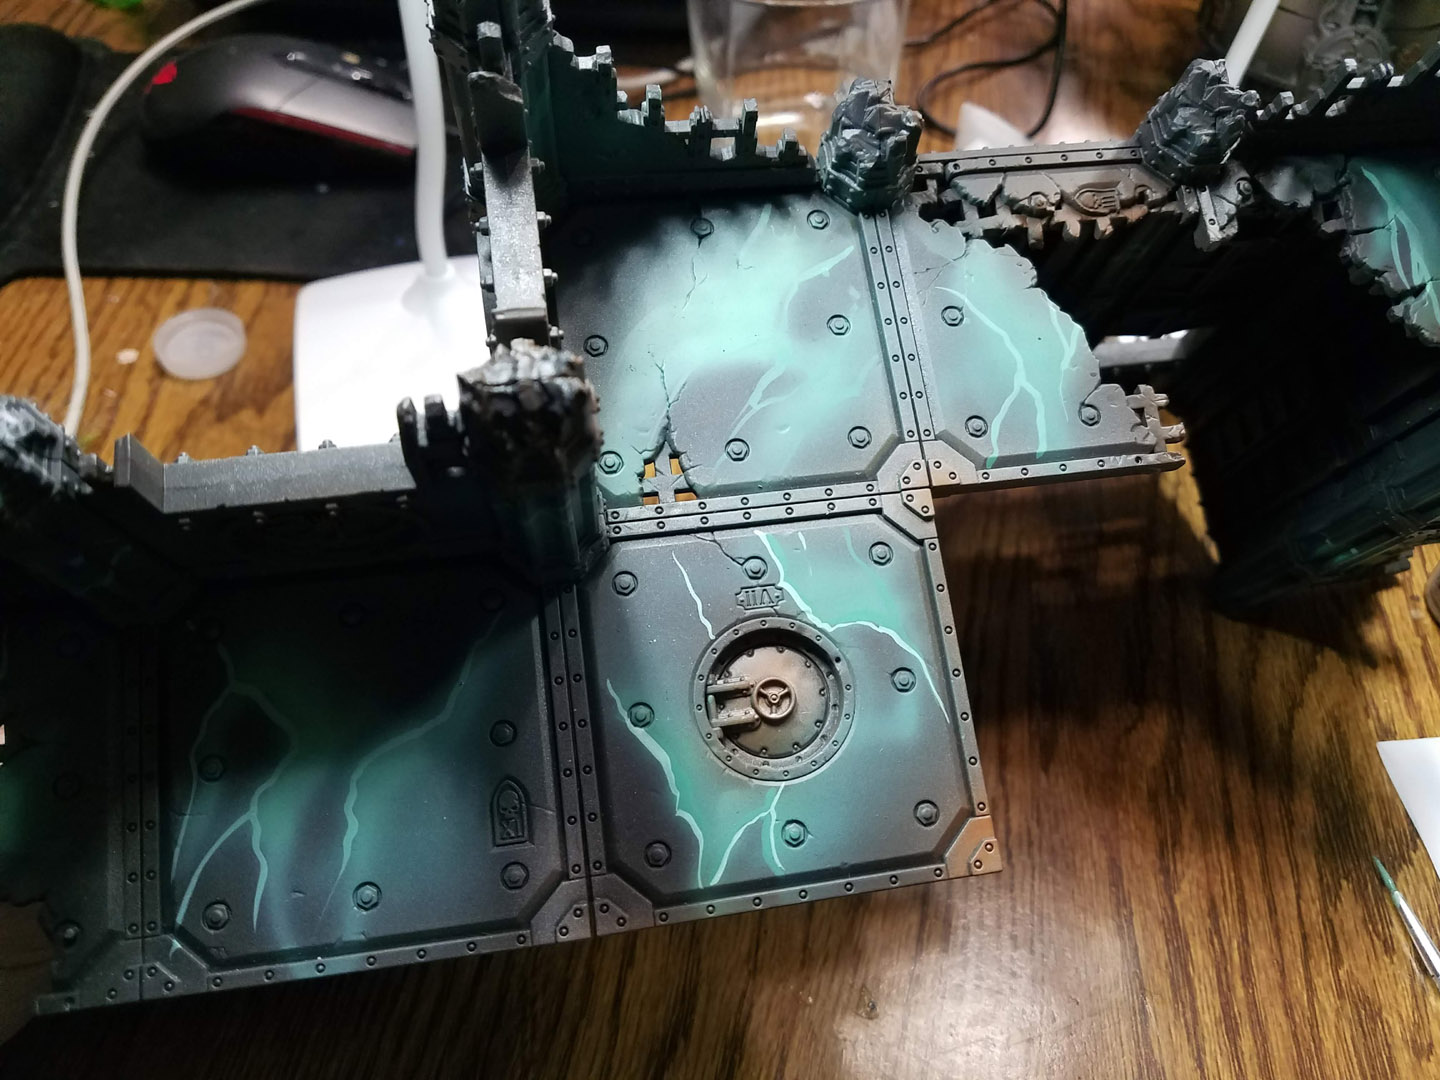
I was able to snap a few shots while I did the marble effects on one of the Adepticon terrain pieces.  Each one started out with some initial layers of Badger Stynlrez primer, and some regular paint colors too.  In this case, I used an interesting teal green to get some 'starter' marble pattern.

I have done some previous articles on using torn paper towels as masks when the lighter tones are airbrushed on.  This gives you an idea of where to place the 'veins' of the marble later on with a regular brush.


I tell people all the time that we used to brush on Badger Stynlrez primer with regular brushes... and the Badger paints too!


I started to make a sharper delineation of the marble veins by brushing on the color of Badger paint which was used in the last airbrush layer.


I did the same on the columns, which was trickier due to the shape.  I was using my normal #8 round craft brushes, but holding them on their side, so that they were almost parallel to the surface.


You can see more of that here.  The idea is to 'push' the brush across, making a more random pattern.


The inside of the wall section was even more difficult, as it was harder to see.  You can tell by the massive shadow that getting light there was no easy task!


I started to add some lighter colors to the mix, working on one "side" of the veins.  I usually chose the side where my sharper brush stroke just up against the darkest color.  You keep adding broken lines or veins on that side with progressively lighter tones.

Again, this is not so easy on the fluted columns!


When I add those lighter colors, I also draw in additional (but thinner) veins.  You don't want to go overboard with these, as they will ruin the effect.


Once all the marble was done, I started to do some weathering washes with the Secret Weapon Miniatures paints.  I started with an Old Rust, then to Orange Rust.


You can see some of that weathering over the painted areas and the metals.  I will be posting some more images of the finished buildings soon!  Adepticon is just a few days away now!


Tuesday, February 26, 2019

Forest Rangers


Here's a little preview of terrain that will eventually appear in the Song of Ice and Fire battle reports (and some Lord of the Rings reports as well!).  It was originally created for y Bolt Action games.

The mat itself is from TableWar, and one of several fantastic, durable game mats that I am using for all my battle reports.  While I like to use 4 x 6 mats, they do have 4 x 4 versions of each.

Here's a peek at one of several terrain building articles I created for this terrain:


I am also working on a few different winter terrain boards, which would be more appropriate for Free Folk vs Night's Watch:


I can't wait to see my own Song of Ice and Fire armies on their movement trays negotiating this type of battlefield.  These were painted as a commission army for someone who is using them for his own system.


It is pretty interesting to see this view with archers instead of an artillery piece or mortar crew!


I have a number of YouTube live tutorials on how these guys were painted:


I was really looking forward to the scene of these wonderfully sculpted horses charging along the bank of the river!


As you know, I really love how the horses are sculpted for this range.  Not only are the muscles and proportions done well, but the movement achieved is amazing!


These horses really do look as if they are running, instead of a merry go round horse stuck to a base.


Imagining these units on this board with the activation banners and other extras that I have planned is definitely inspiring me to work through all the armies that are being worked on at once... the Free Folk, Starks, Lannisters, Boltons and Night's Watch.


My own Night's Watch are in the "official" color scheme, and they are the subject of my Army Painting Series 6.  Here's a look at the basing episode, which is how every series begins:


I will probably have fewer terrain pieces on the board than I normally do for my Bolt Action games.  That will likely be placed along the edges of the board, but I definitely want to have some slopes, rivers and so on, to create a more realistic setting than tossing out a few cardboard terrain "pieces".  


This central sloping hill is an example.  I think it will be really dramatic to have units heading up to the top of this hill to duke it out in close combat!  In my other games, it tends to be a line of sight blocking piece.  Now it should be the focus of many an objective marker grab.


I have a number of tutorial posts on how the terrain was made, such as this:


To get a peek at how the terrain looks in a battle report, check out this Bolt Action report:


Monday, January 7, 2019

Shopping Spree


Here's the newest building that I have added to the Nouvion terrain board.  Just like the rest of the buildings, it is made out of pink underlayment foam.  This is a quick review of how I go about making these: https://wappellious.blogspot.com/2016/06/houses-in-hurry.html


The pink foam has many advantages.  It is ultimately a lot cheaper than foam core, and easier to work with.  You can cut it very easily, and texture it as well.  Cutting it into thin 'detail' pieces such as those around the windows is very handy for adding more levels of that detail to your buildings.


It does not take much to make the "ruined" look on the buildings, and it is very easy to measure out the various sections.  Once I work out the measurements of a structure, I make a template of the different pieces so that I can make more of that same building.  


The biggest advantage of the pink foam is that I can paint them without having to worry about the walls warping.  Foam core has the paper backing, which absorbs the moisture and makes things warp.  The pink foam takes the Stynrlez primer quite nicely!  Here's an example:  https://wappellious.blogspot.com/2018/08/terrain-time.html


Here's the painted version, which is now featured in the town of Nouvion!  Battle reports on this new table are imminent :-)  https://wappellious.blogspot.com/2018/12/building-nouvion-part-2.html


Thursday, December 20, 2018

Interior Decor!


Here's a quick follow up episode to the Nouvion board series.  While it is not the step by step that I will be making in the future, it will still be useful!


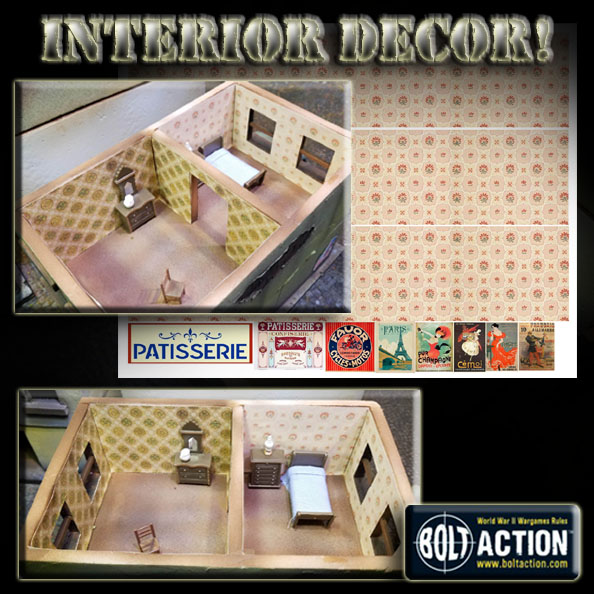
I had hoped to make the interiors of the buildings look more 'lived in' as opposed to the usual blank wall interiors.  In the past I had printed out wallpapers for MDF buildings for our Wild West table, and I thought it would be just as nice for Bolt Action...


This meant doing a LOT of Google image searches, and then some work in Photoshop.  I measured out the floors of my buildings, and then patched together strips of the wallpaper which could be printed out.

You can see the small posters which take up the unused space on the page.  These were meant to be general advertisements, specific signage on various stores, and even propaganda posters.


Some patterns were more easily spliced than others.  I think I did six different types of wallpapers.  I also continued my sign/poster collection!


Each of these strips matches the height of my individual floors, so all I have to do it cut out the windows, doors, etc.


These were printed on printer paper which is also has an adhesive backing.  Basically, each 8.5 x 11 sheet is a gigantic sticker!  I have noticed that it is still a good idea to hit the surface where you are placing the paper with a glue stick in the corners for extra adhesion.  


You will be seeing these wallpapers and posters in a few new video battle reports in January, so stay tuned to the YouTube channel and subscribe!  https://www.youtube.com/watch?v=2LgWEoymVQw


Tuesday, December 18, 2018

Building Nouvion: Part 2


More images of the Nouvion terrain board which I have been working on to continue my France 1940 series of battle reports.

In case you have not already seen the articles on how the buildings were created, I have a number of previous episodes:


In the last episode, I talked about the 1/48 scale furniture and what that added to the scenery, as well as the scatter bricks made from the Das modeling clay.


I also made these sandbag emplacements out of that clay, and they have proven to be even sturdier than expected!


The idea was to make sandbag emplacements that could cover any of my weapon teams, and even a squad of 10 infantry!


Here come the reinforcements for the next battle!


I will have to find ways to make mailboxes and other small street items.


The 75mm gun also fit behind the sandbags, as did the heavier 105mm.


As I look at the images of the streets, I definitely want to make some destroyed tanks... along the lines of these scratch sculpted objective marker/terrain pieces:  https://www.youtube.com/watch?v=F2GrlbpDT0o


The Citroen car in this image was part of a 1/48 scale airplane kit... perhaps I will get lucky and find some more!


All of my previous video reports have taken place in forests and hills, so this urban environment will be quite different!  Here's a link to one of those earlier reports: https://www.youtube.com/watch?v=78AWDqiSgH4


The higher sight lines of these buildings will offer some interesting sighting angles, and there will be a LOT of blind alleys.


I also look forward to seeing what difference the roads will make, and the use of barricades to cut them off!  At this point, I am still trying to compile the equipment needed to make tutorial videos on my terrain.

As I have mentioned in other articles, some of the equipment has been acquired.  However, the more costly items remain, which is one of the reasons I have the Patreon Page.  A much larger filming area is required, as these terrain pieces are pretty big!

There are already a lot of painting tutorials available on the page, including the Army Painting series on the winter Soviets!  You can check that out here:  www.patreon.com/JamesWappel