Showing posts with label Airbrush. Show all posts

Monday, October 16, 2017

Working in the Shade


As most of you already know, I like to use a version of my Shaded Basecoat technique with the airbrush, that that this is done with the Badger Stynlrez primers.

In this case, I will be doing this on some French infantry from Warlord Games, one of the last units for the army.  Since they will have to match all the other previously painted figures, the colors used would be very simple.  The idea is only to establish where the lights and darks would be. 


The first Stynlrez primer was the dark brown Ebony.  All I am doing is covering the entire surface, setting up the next primer color.


I really like how this deep brown color works.  It is relatively neutral as far as being a warmer or cooler, but still have more interesting tone than gray.


Some black primer was sprayed near the bottom of the base pointing upwards, so that it would also hit the bottoms of the figures too.  This would be the darkest areas of shading.


You can see that even with this one addition, there are already some nice value gradations established.


Since I will be using my normal glazing techniques once the priming is complete, I only need to provide a hint of greenish brown.  This is the next layer, which is mixed with a little bit of the brown primer.


The image on the right shows one figure with the green primer and a little yellow primer added. By spraying it from above the figure, you can immediately get a sense of how the overall figure should be shaded.


It must be remembered that I want these colors to be a few shades lighter, because I am doing many glazes over the top of this primer set.  That's going to darken everything down significantly.


The final layer is a mix of the yellow with some white.  Not only is it important for getting the last highlights on the upper surfaces of the figures, but highlighting the base as well.  

This can really be seen with the kneeling figure on the left.


At this point, the unit is basically ready for the rest of the painting process.  I may use acrylics or oils at this stage, depending on what else is being painted at the same time.


The view from above shows off the base too.  If you want to get some of these excellent primers (these are the some ones you have seen me using on vehicles and even terrain), you can get them at webairbrushes.  If you use the discount code "wappellious", you get a 42% discount:


Wednesday, July 27, 2016

Some New Stripes


The 5-6 hour marathon demo session also included plenty of experimentation.  It can get pretty interesting doing things for the very first time under such circumstances! :-)


One of my goals for that day was to see if I could do some quick camo pattern masking on a T-34, using only the materials at hand.

The tank had been getting coats of the primer painting along with everything else, working up to white primer.  I got that shading as light as I could go, setting up some darker green stripes later.

Some final highlights were also applied to the CAV mechs at the same time.


Panzer and T-34 together... oh my!


I had seen this very wonderful pattern on a Flames of War version, and it seemed more unique.  I really liked the deep greens running through the pattern, and I knew that the warmer rust and mud weathering would be a fantastic contrast to the cooler blueish greens.


The only masking stuff I had available at the moment was the blu-tac that I use to hold vehicles in place inside my travel cases.  This would have to do for the time being!

It was pretty new, so I figured that it would not be too sticky.  There certainly was not any embedded paint in it.


It is hard to show in these images, but I intentionally concentrated the spray closer to certain edges of the masked sections in order to create harder or softer edges.

I didn't want it to be completely uniform.  Also, I attempted to get a bit of shading by hitting those parts with more green (the advantage of having the white underneath!).


It wasn't only myself who eagerly awaited the removal of the blu-tac... an anxious audience wanted to see what would happen as well!

Lo an behold, it was exactly what I had hoped for!  You can see the distinctly different types of edges... some soft, others sharper.


The 'crossbar' stripes were added afterwards.  Some of the thinnest will probably be done with a brush.


So, a few simple cross strips really did the trick!


A good deal of weathering will be added to this, as well as snow.  I'm really looking forward to that process.  I will try to show you that as it happens.

This is where things get interesting, as I will be testing out some new materials from AMMO.  I have a host of different products to test and experiment with.


To add to the experimentation, a number of decals will be used.  Most of you probably know that the AMMO products are oil based, and that is a major departure from what I have done for so long.

Many of these materials will be similar to existing techniques that I have been doing with powders and acrylic paints, but it's going to take a while to get used to them.

It is very likely that I will discover all kinds of crazy and unintended uses for them. :-)


Here's another peek at what I was trying to match.  While the picture does not show it, the two greens are actually the same.


I was working on a number of things at the same time, as you can see from this image.  When I am at my own home studio, 3-5 times this amount will be under way at once. I have found that it is the best way to utilize these new tools and materials.


In the hours after the demo, I did additional painting and detail work on the Laffly trucks and the Hanomag too.  Decals will be placed, and then all the weathering experiments will take place!


Stay tuned, as I want to share this big new journey with all of you.


Friday, July 22, 2016

A new day dawns


While we were down in Peoria, I did some extended demos using new Badger airbrushes, and a new compressor!


It would be nice to have a quieter, more regulated compressor again, like the one I had years ago.  I also wanted to test the various types of brushes, since there are a host of projects that should be ideal for each of them.


This first test was conducted with the Sotar 20/20.  I had no idea what to expect, but I decided to start in with my usual primer-painting technique.

Here are some links to a demo that I did with the Badger Patriot brush


Just as I did with the vehicles you saw in the links above, I started out with the "layer cake" of primer.  That is, I put orange in first, followed by a layer of black.  

Once you start spraying, the orange soon turns into a fantastic shade of brown, which can be rust or red lead primer.  Basically, you are "pre-weathering" the vehicle!  This also goes for standard miniatures, especially when painting their bases.


This closer view might give you a better idea, as you can see the difference between the turret and the hull.  The turret is still in that orange to black transition stage.  The hull has moved on to the next stage of the layer cake, which is adding grey primer to the black.

Keep in mind that there is NO MIXING in the cup.  The layers must be separated, and allowed to mix on their own to get that transition.  Even shaking the cup is enough to disturb the delicate layers :-)


A similar process was done with the Opel Blitz truck.  You can already see the areas where the original brown was left in place, despite subsequent layers of lighter colors.

The advantage to having your first several layers of paint as primer is obvious.  Something like this will see a lot of rough handling, and there is no base or anything "safe" to grab.

This is how I am painting all of my miniatures lately.  I first came up with the idea a few years ago when I had to start painting a lot more vehicles without bases!


This is where I advance the next stage of the layer cake.  As you saw in the previous images, I had introduced grey primer to the mix.  Once I see that I have lightened areas up to that grey, white is added.

Just as with the orange/black mix, the grey will slowly transition into white, all by itself.


I think you can also see that I have a number of items out on the table at once.  This is the key element that makes this strategy work.  In fact, I normally have 3-4 times as many figures and vehicles on the table.  

Doing so allows me to take advantage of all the primer mixing together in the cup.  If I was only working on one thing at a time, I would be cleaning the brush constantly and having to move on to the next color.

In this image, you can see that I have a few Bolt Action vehicles, a CAV mech from Reaper (they have a new kickstarter campaign under way, BTW!), and even an artillery piece from Victoria Miniatures.


On each vehicle or figure that might need a given shade or color, I have that nearby so that I can advance some part of the shading.  At times that can be minimal, or most of the figure.  This is what makes it so important to have all these options out there in front of you!


Once I get through the primer stage, I can start adding the more traditional paints.  In this case, I started adding greens to the Laffly trucks.


This is a good illustration of using what is left in the cup on something else besides the original target.  Holding the brush far away from the drive wheels on the Panzer 4, I was able to give it a dusting of color that once again pre-weathers the vehicle.


I added this yellow mix to a number of other pieces, such as the CAV mechs, the Opel Blitz and even the French infantry.


I should also mention that I was not masking anything.  Shading was achieved by turning the figure and the brush in such a way that the paint would only spray where I wanted it to go.

This is also like a chess match, as I plan multiple moves in advance.  Keep in mind that I am doing my usual "shaded basecoat" technique, where colors begin lighter, and are lightened further by glazing, shading and tinting.

I am also planning for all the weathering which will occur, and that will darken the appearance further.


 I don't want to have to go back into the highlights and mid tones too much after those later stages, so I have to compensate for that in these early rounds of painting.

Those of you who are familiar with my Shaded Basecoat technique will certainly recognize this pattern, and how light everything seems to be.


In this instance, I have simply exchanged one brush for another.  Instead of jamming a filbert brush filled with primer into all the nooks and crannies, I used the airbrush.

The tools are interchangeable.  When I did my 2D art, I used an airbrush for at least 40-55% of all my paintings.  Most people could not even tell I had used and airbrush by the time they were done.


Sunday, October 12, 2014

Messing around with the air brush


Joe and Jen were kind enough to have Cathy and I over to their Hobby Palace once again.  We had fun participating in the 72nd Screaming Heretic Podcast!

Later on, Joe set up his airbrush stuff and said that I should try out the new Vallejo Airbrush paints.

Here is his setup.


As I have mentioned in the past, I spent many years working with an airbrush on my 2D watercolor paintings.  This would be very interesting, since it had been over 11 years since I last held a working airbrush in my hand!


I only had a few things ready for painting that had not already been well under way, so I grabbed a few things.  I decided to paint over the big gun thing from a Thanatar that's also got a good amount of paint on it.  I wanted to see what kind of lighting effect  I could get in a timely manner :-)


This is after about an hour of spraying.  I began to recall how fun it was to put one color in the funnel, and then add another one on top of it.  As you kept spraying, you would eventually get a color that was mixed together by default.

So, I kept adding new colors into the funnel as I would go along, following a rough plan of attack


The idea was to see what kind of shaded basecoat I could achieve as opposed to my normal hairy sticks.  For all intents and purposes, it was not all that different.

I knew all along that I was going to go back in with my usual glazing process.  You can see them here with some initial glazing and tinting.


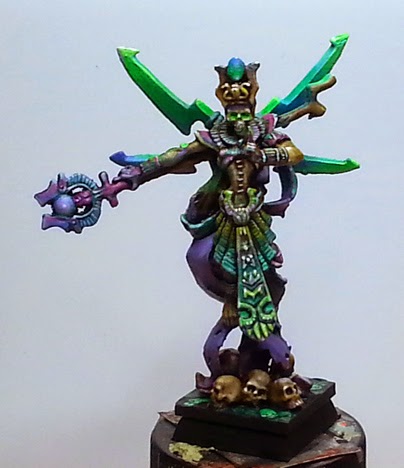
There was a lot of activity going on around me, so I chose a Reaper Bones figure which was going to be painted in my Tomb Kings color scheme.  Out came the fluorescent paints!


I kept working the mid tones, altering colors here and there, going more purple, and then more magenta... transferring to teal and cyan...


 I wish I had a few of my actual Tomb Kings minis with me, but I had to basically go from memory.


I think this was meant to be the new Heirophant, which would be situated in the new Tomb Guardian.


Once I get him home, I can get some dullcoate on him and some nice shots on the backdrops with the other Tomb Kings!!