Monday, November 6, 2017

A Larger Scale


As most of you know, I have been at this blog thing for quite some time... well over 5 years.  There have been thousands of posts, nearly 1 every 24 hours over the life of the blog!

I have also tried to create as much variety as possible, with every possible manufacturer and genre, also including all important basing, which you know is my favorite :-)

I try to blend how to posts with introduction to new materials and tools, so that folks who play with their minis have a great setting for them too.


As you can imagine, this takes a considerable amount of time.  Between the photography, image processing, writing the articles, etc., it can take 2-3 hours every single day.  Now that I am doing the facbook live tutorial sessions, that can be 5-6 hours in a single day of blog/tutorial maintenance.  

This is on top of the normal work that I have to do, which is a 7 day a week job all by itself.  For almost a year, it had become very evident that I needed to find some way to fund these projects.  I didn't want to 'monetize' the blog or you tube pages, because those ads are very irritating!

The Patreon route seemed to be the least obtrusive, and the most flexible.


The Patreon page has now gone live, as a basic framework with 1 pledge level.  It is $1, because I wanted to keep things as simple as possible at the outset.  There will NOT be exclusive content, because I have also found that irritating on other web pages.  If you feel like you can pledge more, it will help a great deal. I wanted everyone to have a chance to see everything.

I have one 'reward' thus far, and that is the chance to win a raffle of this Nocturna miniature.  All patrons who pledge their $1 have a chance to win this figure.  Should the page grow, I will add more of these raffle figures.

Hopefully the patreon page will do very well, so that I can make the raffle figures larger scale figures like this one from Nocturna!  I really love these, and it would be great to paint more like it.


I want to say thanks in advance to anyone who contributes, as it will be a tremendous help!  I really enjoy doing the blog, the facebook live sessions, and answering questions on facebook, etc.  This will just make it a lot easier for me to reach a greater number of folks!

Here's a link:

https://www.patreon.com/JamesWappel


Sunday, November 5, 2017

Drumbeat


Here's something that I was able to work on during a podcast recording with the folks at Models Workshop.  I had originally worked on it over 10 years ago when I first started up my Lizardman army!


It was interesting to do this, since at that time, I was just starting to develop the Shaded Basecoat technique.  While that has undergone many alterations since, the essential idea is the same.  Start with the light middle tones and work lighter as fast as possible to cover the entire surface of the figure.


Once all the surfaces have been covered, and the lights and darks established, I can do several series of glazes.  The aspect that has changed the most is what I use for those glazes, and that I do more color contrasts in those mid tone areas.

These days, I use a lot of the Reaper Liner paints and Clear paints, along with the new Secret Weapon weathering paints.  All of those are fantastic for glazing, and better yet, they are just as effective for the mid tone work that follows!


He's also here:


Saturday, November 4, 2017

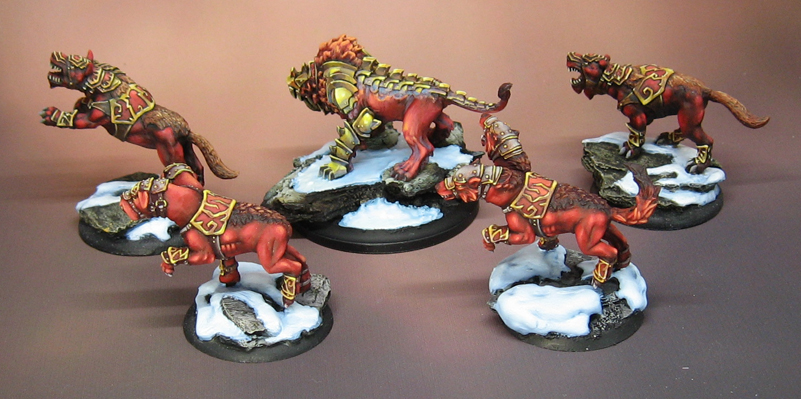
Kennel Klub


This set of doggies had an interesting juxtaposition of colors and tones, balancing the deep reds, golds and blueish tint of the snow.


These had to match some previously painted units, which emphasized the hell hound theme.


I had to draw on a number of the techniques that I describe in a few of my painting videos, especially the Raging Reds and Painting Gold NMM.  It seems that people have a lot of trouble with reds, both making them lighter and darker.

Making them darker by adding a very deep blue helps to keep them from becoming a 'dead' brownish red.  This also sets up your lighter version of the reds, where yellows are used to lighten it.  The yellows keep the reds from becoming a chalky pink, and now that warmer tone is set against the 'cooler' shadow reds.


The bright yellowish golds are handy for accentuating the darker reds, and form even more of a contrast to the darker blues that were added to the reds for shading.


Finally, the lightest, blueish snow helped to make the reds seem even warmer, but still there is a hint of commonality in the colors, since blues were added into the shadow parts of the red.


This was certainly an interesting set of figures to work on!  If you are interested in the videos that I mentioned, you can get those directly from me on a USB drive.  I have many other colors that are covered as well, along with several NMM videos and lots of basing too!


Friday, November 3, 2017

On the Road Again


One of my favorite army projects back in the day was my Easterling/Khandish force which was focused on cavalry and chariots.  I especially liked the chariots, because they were far sturdier than they were in Warhammer, and seemed to act more like chariots should.


I only had one of the actual metal chariot kits, so I set about finding ways to create some more (there were 4 in total).  Rohan horses and Tomb Kings chariots were just the thing to make those extra chariots!  Here's a link to show how they were made:


I had a few extra Khandish soldiers, which were perfect for crew.  In this case, I had a metal Khandish flag, but for the rest I made my own.  Hopefully you can see the extra trophy heads, which were placed after each battle!


As I mention in that linked post, I had to manipulate the chariot in two places... I had to cut the cart itself and remove about half and inch, and the same for the running pole.  That combination was just enough to allow it to fit on the 60mm round base.


The view from above shows those bases, which also had to be extended a little bit.  If you look at the army board, you will see just how those bases related to the terrain of that board.


Thursday, November 2, 2017

War Priest


As most of you already know, I really loved that Easterling army!  Part of it had to do with the very different look of the figures, but also fact that it was the opposite of Gondor in many ways.  They all had heavy armor, cavalry, archers, etc.


Unlike their Gondor counterparts, they had very nifty elements such as this War Priest.  He was particularly effective when added to a cavalry unit, because it increased their speed.  That doesn't sound like much, but when it makes your armored cavalry faster than a lightly armored version, you can do some real damage!


I tried to keep this in my own alternate color scheme as well.  I had seen plenty of red Easterlings up to that point, so I wanted to create something different.  That is usually my favorite challenge of starting up a new army.


This was probably my favorite of all the Easterling cavalry... I really liked this pose of both horse and rider.


Wednesday, November 1, 2017

Tiny Tiny Tiny


While I forgot to include a coin to show you how small these figures are, I think you can get a sense just by looking at them.  Their bases are not even as large as a penny!


This was definitely a new challenge for me, which is saying something since I have been at this for almost 18 years.  I had done some 10mm historical figures, but that is a different animal.  These are meant to be 28mm scale, so it was very important to keep the scale of the basing and other elements the same as the rest of the army.


These guys are part of a large goblin army, including those massive trolls that you have already seen.  So, I had to take the same bark and branch basing materials (along with the flock and grass), and make tiny versions of those very large bases that I made for the trolls.


The bark is the ideal material for them, but getting pins into those very tiny feet was not easy!  If I had thought of it, I could have used one of my tiny drill bits and used florist wire instead of the usual paper clips.


I thought that particular tip might be useful in case you ever run across the same kind of challenge!  In the past, I have used the smaller bits and florist wire to pin skinny arms onto delicate figures.


Tuesday, October 31, 2017

Evolution of the Gods


Whenever you have interesting lines and shapes on a pose/character like this, it seems like it is always a natural candidate to play around with lighting effects.  


While there are areas of very nice detailed shapes, there are also more "open" areas that allow you to try out some fun and creative color combos, especially where there might also be metal surfaces.  That allowed me to get into serious reflected light and colors on the back sections of the figure.

I loved getting those prussian blue hues into the metals!


The base was made with the usual sculpey and cork method, along with a piece from Sci-Bor Miniatures and leaves made with the Green Stuff World leaf cutters.  Now that fall is in full swing here, I am trying to stock up on my leaf supply!


This figure is from Demigods Evolution.  As you can see from the coin reference in the above image, he is pretty large, at least 54-60mm tall.

He's also here: