Tuesday, April 4, 2017

Making a Nest


Next up for the winter Americans would be a little fire support in the form of a machine gun nest.


These are the new winter figures from Bolt Action and Warlord Games.  The wall and street textures were created by pressing sculpey into the Happy Seppuku moulds.  More texture was added with Secret Weapon Miniatures weathering powders and crushed glass for the snow.


This article is a review of the basing technique for the winter Americans:


Monday, April 3, 2017

Creator of the Fall


I had a lot of fun with this Heirophant conversion that was done for my Tomb Kings army.  Using a bunch of chariot bits and green stuff, I was able to make him look more impressive than a standard skeletal cavalry figure.


I couldn't resist giving him a sceptre and a skull too!  Of course, he had to have a number of cartouches as well.


For those who have seen the story of my Tomb Kings, they know that this Heirophant was the source of the "First Fall", playing around with sorcery best left untouched.


I had him on the skeletal horse to make him more mobile, but also allow him to attach to the unit of cavalry for protection.  None of these things really worked out, as Tomb Kings tended to die from a random stiff breeze!


Sunday, April 2, 2017

Arena Rex


This Medusa figure from Arena Rex was the first that I have painted from this wonderful line of figures.  She is mounted on a 50mm base, which was created using the Green Stuff World texture rollers.


The transparent cloth effect is always interesting to achieve.  While there are a few basic principles involved in translating the effect, it can be more difficult depending how the figure is sculpted.

If the cloth has a lot of heavy folds, that can make it more difficult to paint the lighter skin colored areas in the 'gaps' where they would show up.  The high points of the folds get the brightest 'cloth' color.  The trickiest part is that darkened zone in the middle, which helps to show those two areas of lighter tones.  One must have dark to show light!


The shield presented a nice opportunity to do some gold NMM.  That was done in my normal way,  including the use of the Vallejo fluorescent yellow to infuse into the burnt sienna and even purples.


Here are a few better images of that mosaic tile base.  Again, the texture was made by rolling a Green Stuff World texture roller into the unbaked Sculpey clay.  This was  broken into shape once it was baked, and placed on a piece of cork.  Sand and gravel were added around the sides to finish off the texture.


One more set of views, which also show the veiled face a little better.  

As a final note, this was entered into the Arena Rex painting contest, winning second prize!  Many thanks to the good folks who create so many fantastic miniatures :-)


Saturday, April 1, 2017

An old time Classic


This ancient Hydra is quite old, in more ways than one.

Not only is this a long out of print figure, but I hadn't touched it in several years.  It's interesting how much you learn in that intervening time!  Among all the principles I had learned since then, the notion of having lots of subtle color variations (even in something with a similar value scale),  can make a boring surface texture wise far more interesting! 


He's also here:


While this seems like one shade of grey from a distance, there are many tints to it.  I used a variety of greens, pinks and purples to achieve that variety.


I even used some slight glazes of burnt sienna in deeper crevices and around the protruding scales.


The view from above shows another new element added since the last time I touched it.  Using the new grass tufts and Green Stuff World texture rollers provided the vines and the rest of the base with much more texture.


The shield with the dragon eye was another fun element to add!


Using the Reaper clear red combined with the realistic water effects also enhance the slimy look of the teeth and tongues :-)


So, I hope you have enjoyed seeing this blast from the past!  I often work on very old figures, and it can be very satisfying to see these ancient pieces treated with "modern" paint jobs and techniques!


Friday, March 31, 2017

Wappelville Lives Again!!


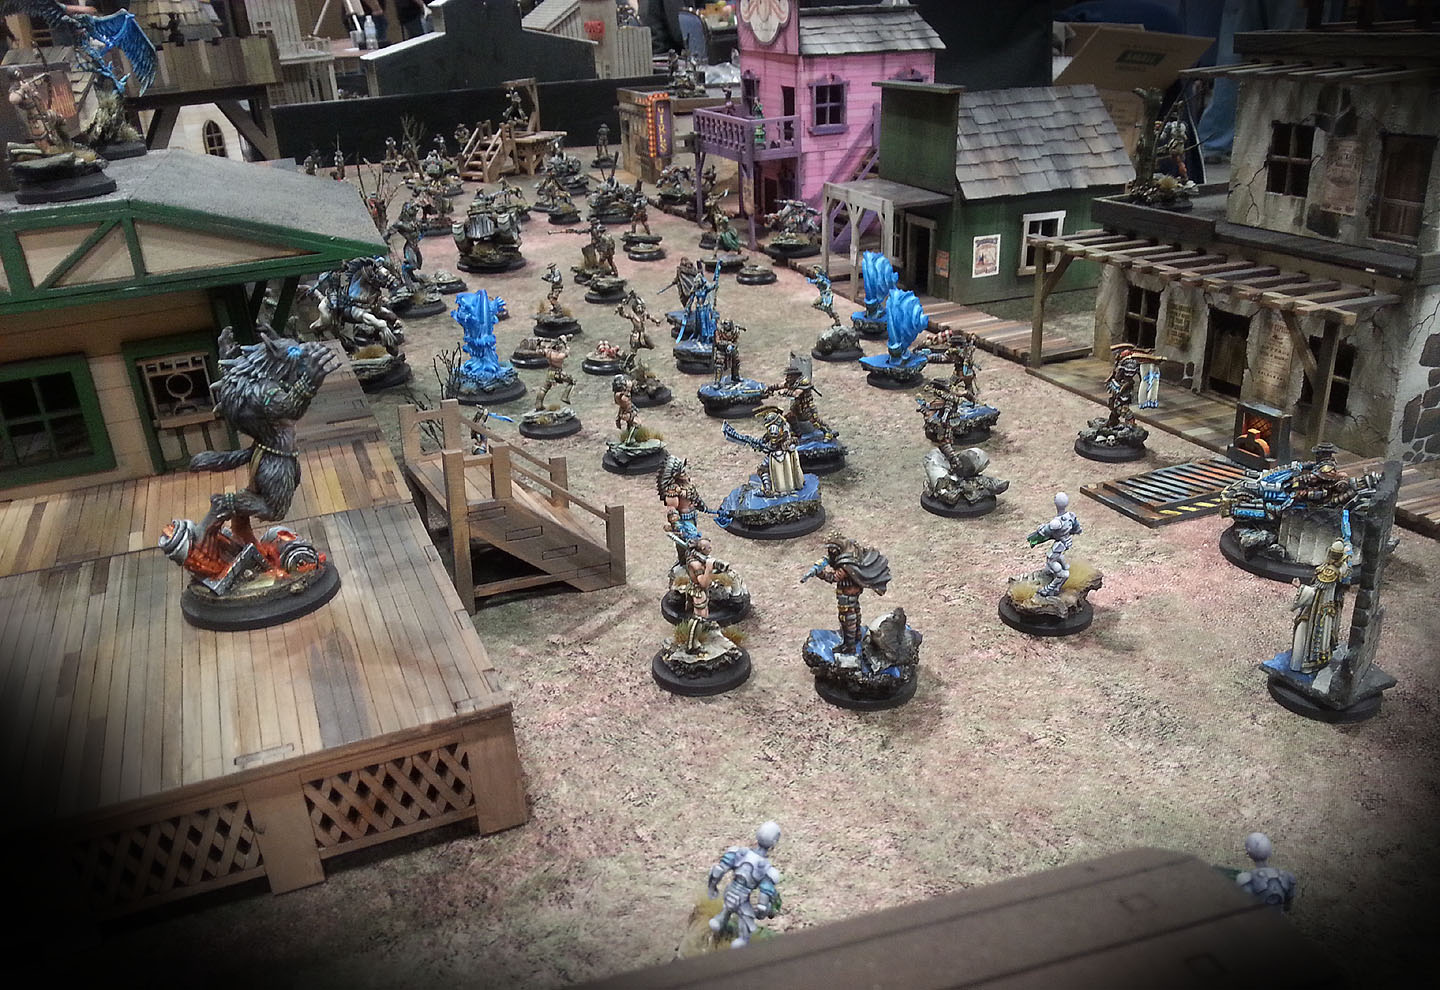
Something that was a huge and pleasant surprise this year at Adepticon was the discovery that Wild West Exodus remains alive, and is being rejuvenated!


For the first time in over a year, the town of Wappelville, and all the painted Wild West Exodus miniatures were out and on display!


Even with a few of the bigger beasties left behind, you can see quite the horde of figures creating chaos in the streets!


The buildings are all provided by Burn in Designs.  I have several blog posts showing how I painted those:


There's also the bank, bar and church:


Here's an article on painting the Jail:


I've done a number of Battle Reports, and more adventures will be on the way!


Powered by the deadly RJ-1027 energy, Lawmen and Outlaws duke it out at high speeds over the Badlands:


There's no shortage of fantastic minis!!


Division abounds in the West, as even the Free Nations struggle in deadly conflicts!


Wednesday, March 29, 2017

Side by Side Demos!


There were too many fun things at Adepticon to count, but one that was entirely unique beyond any experience for me was doing a side by side painting demo with Paul in the Trenchworx booth!


They had all their resin beasts of doom on the table, along with a few that some guy had spilled paint all over!  Some of you will remember those as test subjects for a variety of Facebook Live broadcasts.


Late Friday night, a plan was hatched where we would each paint one of Victoria's new Matilda tanks.  Trenchworx did the sculpting and printing and casting, so the action would take place there.

Victoria nervously awaits whatever mischief  that might be about to take place!


Our supplies were limited, because there was no power to tap into.  So, we would have to go "Old School" on these, using brush on primer for the bare resin and metal.


It didn't take long to discover that the cold temps in the room, along with all the bodies, would make it difficult for the primer to dry.  I am very used to that, since I have painted entire vehicles and miniatures using just the Badger Stynlrez primer!


We had roughly two hours to go from bare resin to finished, so the challenge was certainly high.  We each picked a classic desert camo scheme, with mine on the right hand side of each image.  My camera died early on in the painting, so I don't have any of those pictures for you.

Also, that wiped out my reference source, so I had to lay out the pattern right off the bat when I saw there was only 10% power remaining!


I loved doing that camo scheme, so I will definitely have to try that on a "conventional" Matilda.


I did a number of "spot demos" as the painting moved along, using Mig Ammo products to get the specialized effects.  I was even able to use the heavy mud to smush tufts of static grass into the mud guards in the side assembly!


I could not resist freehanding a few ID numbers on the vehicle, of course!


This was a very fun experience, and it is something that I hope we could do again!!  One never knows...


Tuesday, March 28, 2017

A Fortress Shall Rise


This post begins a series on what went on during this year's Adepticon.

On Wednesday morning, we headed out to the convention with a vehicle filled with all manner of paints, brushes, minis, lights... even a presentation camera!  

That afternoon, the great staff of Adepticon appeared, and in no time at all, Fort Wappel was created out of nothing.


I tried to create my own setup to maximize the potential for "spot demos", where someone (or a few someones) could watch what I was doing.  This would be the case several times.


Primarily, I figured that I would be demonstrating how to use oils, such as the Mig AMMO paints and the Wilder oils.  I had prepped some Counterblast figures from Patrick Keith to show how you can get dramatic color combinations very easily with the slow drying oils.


These were also done as a bit of a step by step preview that I was going to do for Lyn Stahl, but they were helpful in other demos as well!


After a few minutes of discussion about the use of the oils, in terms of what acrylic techniques would have to be left behind, etc., and a few minutes of painting myself, Lyn put some colors on the palette and went to town!


Right off the bat, she liked how she could blend right there on the miniature, with no worries of something drying, or water marks.  She began taking advantage of all that oil paints can offer...


And POW!  In a mere 25 minutes, she proudly displayed her new superpower!


Here's a few quick images of her Libby by Hasslefree Miniatures.  Congratulations to Lyn for doing some amazing things in no time flat.

It's not easy to take on a brand new medium, especially one that is essentially the opposite of acrylics.  I have the advantage of years of 2D oil painting, but she did not, many kudos!!!