Tuesday, February 24, 2015

The business end of the Judgement


Time for some more views of the Death Wagon... the Lawmen Judgment Heavy Support.

I have a few views from above in this post...


This perspective shows the stuff going on with the rail gun and the freehand.


I am very glad I went with the darker color roof.  I knew that it would be a nice contrast to the orange glows, but it helped to make the metals of the sides appear a little lighter.


It's also fun to see the turret turning in these views!


As I have mentioned before, there's more freehand going on the sides of the vehicle, right above the wheels.


I look forward to seeing this vehicle in huge group shots with the rest of the posse.


Of course, we have the part about the Judgement that I love the most!!!  Get the hangin' crew ready!


All right Jesse... we have a spot reserved for you!!


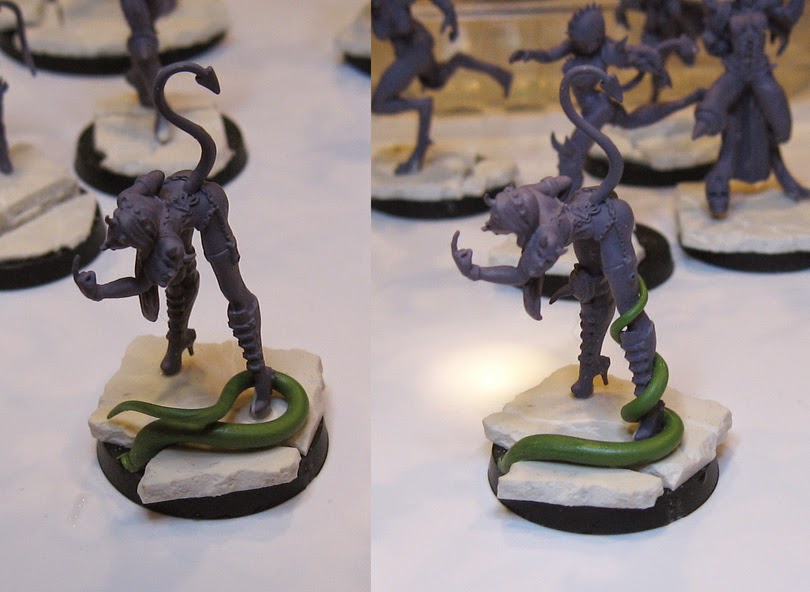
Get a grip... tentacle time.


With the Sukubus Studios fabulous Blood Bowl team prepped and primed, I wanted to do something fun with the bases.  Yeah, you know me and bases. An addiction to the extreme.

I decided to make some broken marble bases, so that I could either paint demon faces into it, or glowing runes... or both!


I thought I would put a few Secret Weapon Miniatures skulls and torsos on a few of the bases to create even more variety between each one.

It's VERY important in Blood Bowl for each figure to be easily distinguished from each other.  Otherwise, it gets very confusing, and you start forgetting skills, etc.


The tentacles are going to be a bit more simple here, as I wanted them to fit in with what some of the miniatures have as hair, and so on.


The Secret Weapon parts made a nice base for extra tentacle arms!


What would Chaos bases be without a few random orifices. I will be adding more of these once the tentacles have set up.  That's a hard lesson we learned years ago with green stuff.  Do a little section at a time on a lot of figures, so that you avoid the temptation of messing around with the next step.

This usually leads to you destroying whatever fantastic thing you just sculpted.


Cathy found out years ago that if you manipulate the mixture of the green stuff, you can make it more sturdy, such as having a higher percentage of blue in the mix.  While you can't sculpt as many details into this, the very thin tentacles will be more likely to hold their shape as it cures!


I did this on the more "free standing" tentacles, such as this one.


In contrast, having more yellow in the mix makes it softer, and far easier to get nice details.

It's also a lot stickier than the predominantly blue mix, and that can serve as a 'glue' to anchor a tentacle or two!


I did that here, as I wanted to sculpt a few fine shapes on the marble, which would be a nice anchor for larger, free standing tentacles.


While wrapping the tentacle around a leg works very nicely for the theme of the basing, there is a practical side to this method.  There were a few miniatures that I could not pin to the bases, like this one.

So, the tentacle is providing a lot of extra stability for a miniature that will be knocked over many times... making it less likely to snap off the base.


I will be doing some eyeballs as well on the other bases when they cure!


What we have so far... tentacles curing, waiting for the next layers!


Monday, February 23, 2015

The Great Figure Forest and the Great Elk.


We continue with the Elk from Wild West Exodus.  With the general value pattern established, I want to get into certain areas and see which ones I want to emphasize more with a variety of contrast methods.

I also want to see how I should render the fur on the haunches.  Usually, I want to paint in some kind of subtle hints of fur strands, even if the sculpted surface is completely smooth.


This is where one of the more pristine of the #8 round brushes comes in!


I will use that to paint in subtle fur marking of various lighter colors.  These will also be "directional strokes", or brush strokes that follow the grain of the fur.


Again, I am not trying to make them too obvious... I just want to have an indication, especially since the mane has such an intense texture.


Working my way around the figure, adding a hint of warmer tan here and there...


Since he glows with the blue energy of the Great Spirit, it's time to break out the Vallejo fluorescent paint!


They are very transparent on their own, so you have to mix other colors in with them if you want them to be lighter.


Since I will be using lots of cooler blue colors on the face, making the horns more of a warm color is a great way to get some contrast without having to make them too bright.  So, some yellow, auburn and blue are mixed together.


The horns will be built up lighter than the final version, as usual, for the Shaded Bascoat.


Getting lighter.  Once the darker glazes have been placed over this, I will make more additions of greens and such...


The glow on the face is now as bright as it can be... so it's time to add darks around it!


Makes a big difference, that's for sure!  Instant contrast :-)  A blue/brown glaze mixture.


This is carried all around the mane, until it reached the shoulders.  At this point, I added some sepia into the glaze mix.


Set aside and left to dry out so that I can do the same process on the lower legs and horns!!


The Great Figure Forest.  All of these pieces are essentially in the Shaded Basecoat phase.

Wanna be scared?  There are three more "forests" just like this which I had to leave in the home studio.

And seedlings have been planted, which have already become hundreds of little saplings!

Be afraid, be very afraid.


The Great Elk begins!


You've seen his base (or is that a pedestal?).

Now it's time to paint the Great Elk, a Heavy Support choice for the Warrior Nation.


A quick reference image.  The Elk from the game is horribly distorted as it channels massive amounts of native energy, a bit like the warp for the Gael heroes in Slaine.


The Brushes arrayed for battle.  These gigantic pieces present all sorts of challenges.

When you have a lot of rougher surfaces to cover as we do here, it will take its toll on your hairy sticks.  Not only are mine quintessentially economical at less than 50 cents each, they have several stages of life.

The more pristine versions on the far left have nice watercolor style points which means that I can do a lot of precision stuff with them... even eyeballs.

As you move to the right and you notice the worn out versions, those are the ones I use for initial layers of paint, where I need something I can jam the paint onto the surface with!

Then you see the Filbert brushes and finally the liner brushes.


Some paint out on the palette.  As usual, an array of lights and darks, warmer and cooler colors...


Once more, that pre mixing takes place, as I am creating new colors to use right here... no need to be squeezing paint out of a million different bottles when I can make most of it right here.

This concept also helps with color unity overall.


The process begins!


Not only am I jamming paint into every crevice, I am switching and mixing the colors little by little as I move across the surface.


So, working quickly has now provided me the chance to do some wet into wet blending!


Let the wet blending begin!  It's so much easier than trying to remember a bunch of color formulas!


As I get progressively lighter, I try to infuse a few different shades into the mix.  In this case, some of the warmer tan... the lighter colors I was using involved a light greenish gray.


This lighter shade is a bit more reddish than all the other tones.


With the general shading and value pattern set, I used one of the more worn out craft brushes to 'scumble' lighter colors.  This is a way to mix a color application onto a surface that is already dry.


I did add some blue/gray to the shading of the torso area so that the glow from the eyes and mouth would not be a 'foreign' color element.  Instead, it would be repeated in some small amounts all over the figure.


You can get a sense of how everything is shaping up!

Stay tuned for more exciting episodes of As the Elk Turns.