Tuesday, November 18, 2014

Cold winter, hot stove...


It's a fine day in Wappelville.  The sun is shining, it's 13 degrees and snowing, and planes are crashing into houses down the street!  What more could you possibly ask for?

When it gets cold outside, Chef Babo gets things going in the kitchen!


Wage has a new helper.  He washed a million resin parts a few weeks ago (this is only half of them).  More just arrived yesterday, so he's going to be very busy!


Babo decided to make some Parmesan Cheese biscuits.  They smelled so good while they were baking...


Voila!  Golden crusty cheesy goodness!!!


Uh oh, things are getting hot at the Wappelville Jailhouse as well!


I guess a few campfires got out of control.


Smokey says, "Only you can prevent Forest Fires".


Hmm... maybe it's bacon.  Who wants to hang those dirty Outlaws on an empty stomach?

This, by the way, is the small gallows from Burn in Designs.


Those Grey Knight bases got a few rounds of paint, as you can see.


Not quite finished, but moving along!!


A tuft in time saves...


Since there have been a number of questions regarding the grass tufts that I use on my bases, I thought I would feature that in a post, so that it can be referenced more easily in the future!

I absolutely love the Army Painter tufts!

For years and years, I went with a more typical static grass.  You know, the kind in the big old plastic spice containers?

That was fine, but it definitely had limitations.  It wasn't always handy, since I would have to wait for the glue to dry before taking pictures.  Also, it was all the same height.

There are many different colors available for the static grass, but they don't necessarily stand out all that much.

Later in this post, you will hear about another advantage of this form of grass tufts.

Meanwhile, the variety in the Army Painter tufts is fantastic... including some of these new sets which I just purchased:


These are some tried and true tufts that have found their way onto my Wild West Exodus Lawmen bases.

When you look at these two images, the color differential between these is immense!


These specialty packages are great as well.  I have been using the poison ivy on my Memoir figures.

The Meadow flowers outperformed other similar products.  It's much easier to tear these away from the mass than the other types you will see.  The 'flowers' on those types tend to fall off as you rip the tufts from that primary mass.


Unpackaged.  A nice variety of heights and shapes!


Let's compare this to another unnamed company's version.

While you have the different shapes, the height is still more like regular static grass.


This is the other issue.  See that white opaque paper on the bottom?  I guess that is supposed to make it easier to glue to your base, but it really just gets in the way.  To make matters worse, on any base that is not white, that paper shows through!!

The Army Painter tufts are very flexible.  They can be shoved into just about any space between rocks, etc.


Let's use these bases as an example.  It would be almost impossible to use those other tufts on such dark, rough hewn bases as these!


Not a problem for the Army Painter tufts!!!


Ready for action in no time at all!!


I am really looking forward to using the new colors that I purchased... the Tundra Tuft in particular.


Monday, November 17, 2014

Keeping the trains on time


We return to the Wappelville train station from Burn In Designs.

The original station of 50 years ago was white with green trim, so this one would be as well!

I had to do the window and door trim first, which was unusual.  Normally I would paint that the other way around, but there were many textures to deal with.

Also, I wanted to do the window trim while the interior was still wet.  This way I could take a brush and blend in any over bleed.


I mixed a deep green and a dark brown for these initial layers.


I also used a brown and gray mix on the roof panels.


The green trim areas are pretty much set!


The outer walls were done using an off white mixed with a few different brown colors.  Keep in mind, there will be posters and then weathering powders added once all this is set!


Lighter greens were added on the upper surfaces of the trim panels...


Did I mention posters?

I did a few searches, and found lots of fun stuff!

Some of these posters will be used on other buildings, such as the general store, the hotel, and so on.

I was very glad to find the SouthSide rails image...as well as the maps.  Those are going on the interior.


A little close up on some of the posters...


Printed out, and ready to glue in place!


Reclaiming the Webway: Tron Style


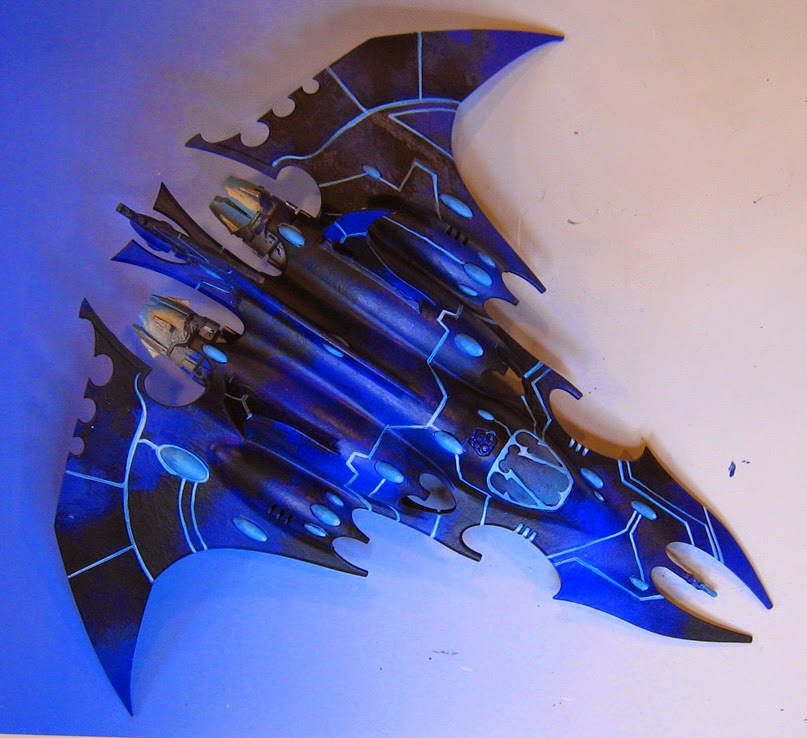
Yet another reclamation project for you all.  It's Dark Eldar once again, but this time the theme is TRON!

This was the general concept...


I had to do some experimentation, seeing what combinations of colors might work best, as well as what to do with some of the details and other effects.

That meant the cockpit, spirit stones, cowlings, and so on.


In the end, I chose a few high chroma blues... one lighter, one darker, and mixed them with a few metallic paints.


The idea is to use the larger filbert brushes, and work very quickly across the surface, so that I could mix the colors right there on the surface.  These color transitions are not supposed to be very noticeable from a distance. 

In fact, they are meant to be overwhelmed visually by the final lighter freehand colors.


Once the various blues had been established, I mixed some black in with the darkest blue, and put in the darkest accents.  These would hopefully make the lighter lines pop out even more!


I mixed in a little fluorescent Cyan with a sky blue to put down the initial lines, as well as the glowing stones.


I enhanced the lines in certain places by adding progressively more white into each layer, but only in a few select 'contact points'.

I was playing a lot of "connect the Spirit stones" here. :-)


Much more will be added to this.  In effect, this is like a 3D sketch... I am testing out certain things, painting over what I feel does not work, etc.

Never be afraid to do that!


After about 90 minutes of roughly blocking in the colors, this is where we are at.


Many more hours of refinement will be required to get to that final result, but this was all about experimentation for right now.

I will be doing more on the various stones, as well as adding requested stars.  

Scorching will be added to the weapons and engine cowlings, and more tiny freehand details.


There will also have to be some decisions made on the style of basing.  It will have to be one that works across an entire army.

This could be done in TRON style as well... or as something completely the opposite of this very sleek and shiny color scheme.  Perhaps very dirty, rusty vehicle parts or destroyed Imperial structures. 

Such a style would certainly yield a lot of contrast!!


Sunday, November 16, 2014

All aboard!! Heading to Wappelville station


No, not the Petticoat Junction... that's the town of Wappelville and its glorious train station, provided by Burn In Designs.

Here we see the station with its component parts assembled...


At first I was going to put shingles on the roof, but I decided to cover it with Valllejo black lava flex paste.  Since I wanted to put a sign on the roof (and allow minis to stand on it), I thought this was the better plan.

Also, if a train is sitting there potentially spewing ash from the stack, you might not want a bunch of flammable wood shingles there. :-)


The painting of the wood planks is done just like the Jail.  I had a few basic browns and yellows on the palette (even a gray), and used a large brush to apply the paint.

This meant that it stayed wet, and I could blend the planks together.  This meant that I would get all sorts of fantastic weathered wood colors very easily!

Once all the surface was covered, I could then pick out certain planks to be lighter or darker.


The Badger airbrush paints were excellent for this, as the wood absorbed them nicely, but they are already so thinned down, they flow across the surface with ease!


The basic outer planks have now been covered, I can pick out those individual planks now.  If I have worked quickly enough, the paint is still pliable... thus allowing me to blend those lighter or darker colors easily.


Now you can see that some darker and lighter planks are added.  Just a few accents here and there... don't get too crazy.  They are also varied in color.  The darker planks were done with a dark brown/gray mix.


Don't forget the stairs!!!


The interior floor planks are done, with a slightly different set of shades.  These didn't have to be quite as weathered.

Speaking of weathering, there will be additional aging done on the outer planks with Secret Weapon weathering powders.


The color choices for this station were set many years ago when the first Wappelville station was constructed for our model train set sixty years ago.

The building was eerily similar to this structure.  It was also in "S" scale (American Flyer), which is pretty close to 28mm.

The building was white with green trim.  So, that's what I wanted to do here.  I decided to make the walls a light green, because I want the signs and posters on the interior to have some color other than white to provide contrast to those pieces.


I had to paint the green sections first, since they were quite heavy and deep.  It would be easier for me to go back in later with the off white for the wall planks.

It was odd to proceed that way, but that's necessary sometimes!

In the next episode, you will see the painting of the exterior, and all the signage! Stay tuned...