Thursday, March 7, 2013

This Olde House, Part 1


Here is a much smaller version of the house that I constructed a while back.  This one is a bit more simplified as well.  There are no dormers or anything.  It was also limited to the size of the plasticard roof sections that I had :-)

I cut out the sections of foam core to the correct size. I had the benefit of my matt cutterm but you can also do this with one of the metal rulers that has the cork backing.  That keeps it from sliding as you make your cut.  When it comes time to film the video of this project, I will have to use that method.


I started gluing the pieces with a strong elmer's glue (wood glue is ideal)


The sections are now set, as well as a support bar in the crest of the roof line.  I used some painter's tape to keep the pieces stable while the glue dried.


Once all the sections had been glued together, it was time to start making the strips of wood that would   give the house that wood and stucco feel.  This was thin balsa wood.


I measured the various strips and cut them to size...


It takes a little while to get all them in place, but it will be well worth it!
When you do the corner pieces, make sure that you cut one side a little shorter than the other.  This way they will look even once they are attached.


The Tudor look requires some cross bars, etc...


The angles pieces need to be planned out carefully, but they look very cool!


The windows were done with some of the left over cuts.  If I wanted to get more details, I could have used some really thin strips of plasticard for the interior frames of the windows.  But, the idea was to keep it simple!


I decided not to make a chimney for this bulding, since it will see a lot of rough use at the Dragon Shoppe, and I didn't want them to have to worry about not breaking that!


With all the wood planks in place, we need a door!  I will be making one from sculpey that is very similar to what I did for the watchtower.  That and more is coming in the next episode!


Completing the fortifications!


There were three final tasks remaining to finish off the fortifications.  The first was to glue all the rivets in place, which takes a lot of time.  However, it always looks neat!


For the parts that are not metal, I had to make some pock marks.  This would be the second element that I needed to add.  
I took that same very sharp exacto blade and chopped out some chunks of various sizes.  I also added some bullet holed by pressing a ball point pen into the foam.


I added a few chipped out areas to the walls, using that same super sharp exacto blade to that I would not tear away the board from the foam.


This gives you a nice view of the rivets on the walls.


The last task.  Out comes the trusty Oxide Paste.


The oxide paste does far more than just fill in gaps.  I allows me to create a rough texture on what will be metal surfaces to create a rusty, encrusted look.


It also lets me hide unwanted texture, such as the painter's tape.  I learned that on the Tomb Kings army board project.


So, I will be painting this thing up, which is actually going to be another kind of experiment.  Stay tuned!!


Working on that modular cover save... fortifications part 2


OK!  We get back to the modular 40k fortifications.  When we last left this project, I was waiting for all the glue to set up on the various elements.  In this image, you can see the door that I had ready to go...


A platform was created to guard the entrance...


Now the gate and the pillbox are all set.


I put foam core on the tops of all the elements to give them just a bit of extra height.


I added some corner pieces, as these will be platforms for optional weapons such as heavy bolters, etc.  I believe that when you purchase bastions with your points, you can choose from a few weapons.

For more story driven games, I was going to make some communications arrays that might go in those corners or even teleport homers.


I added a few more elements to the walls.  I wanted these to be metal struts, to which I will be adding those rivets...


Speaking of rivets, here is the part that I hate the most... punching out the rivets!  It takes forever, or at least it feels that way.  Very tedious, but they are very important for the desired effect.

This is a sheet of relatively thin plasticard.  The hole punch is from an archive/scrapbooking store.


I tried to gather all the little rivets into one container, and got a new, sharp blade for my exacto knife, which I would use to place the rivets.


Here's some of those rivets in place!  Stay tuned for the final construction episode!


Wednesday, March 6, 2013

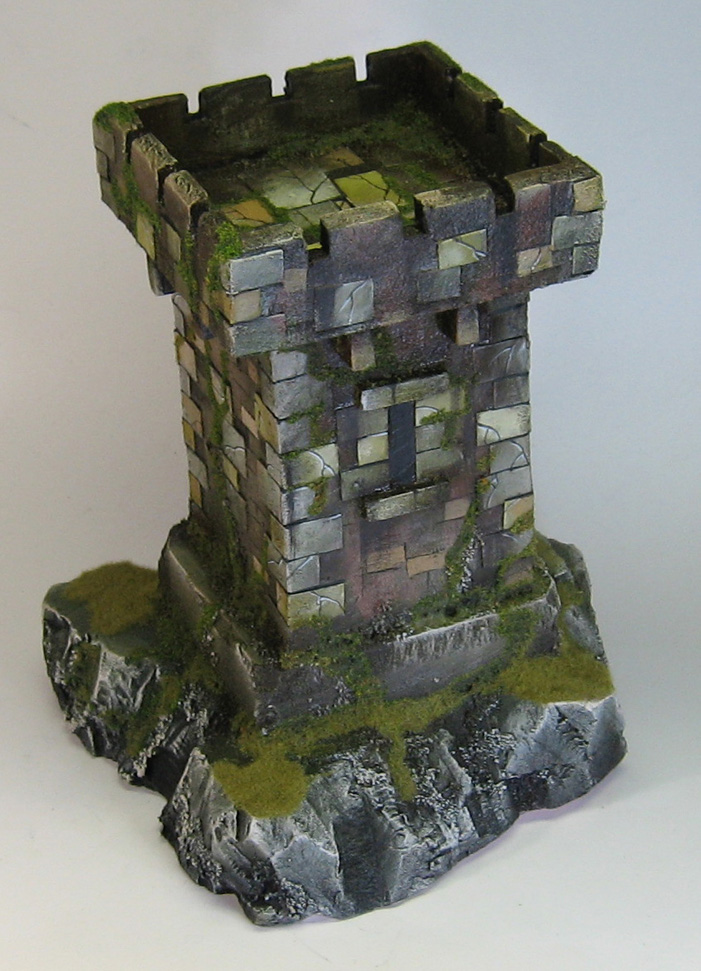
Above the watchtower, the Sisters do some house hunting...


I've got some views of the platform level of the watchtower.  

This part really benefitted from the flock, as it helped to create an extra sense of texture.  It also let me create the appearance of cracks and gaps between stones that were never there to begin with. :-)


It was also important to have as much of the mossy stuff as possible on this level, being so exposed to the elements.  Just as with the rest of the tower, it also gave me a bit of extra color.

If this were for my own gaming table, I would have used my magnetic paint so that my figures would really stick to the upper level.  I do this with all of my terrain, since all of my miniatures have magnetized bases!


I put the Konigsberg Sisters on the upper level to see what it would look like with some minis on top!


The bases were taller, so they stuck out above the parapet a little more than most minis would.  However, given the line of sight rules that are in just about every system, that means you won't be able to 'hide' attacking figures at the base of the tower, out of sight from the folks on the top platform.


The Watchtower painted!


Well, it was a pretty crazy day with the snow and the shoveling, etc., but in between rounds of snow clearing, I did the painting and flocking of the watchtower!

The colors were very simple.  I stuck to the Liquitex acrylic paints, using a little bit of black, Titanium White, Sap Green and Cadmium Red.  I also added a bit of tan and a few other colors of regular miniature paint for some of the smaller details.


By mixing the Sap green and Cad red together, I got a nice brown.  I could vary the hue as needed (more green vs more red) whenever I wanted. 


For instance, I knew I wanted the interior wall color to be a reddish brown, with the corner stones being lighter and cooler.  The reddish brown would be a nice contrast to the eventual flock and grass treatments.


By mixing in some of the white into those color variations, I could make them more or less saturated.


You can see that I painted in some cracks on the stones.  That was to save time, but still create a nice effect.


Once all the painting was done, it was time to put that flock and grass onto the tower!  I had a few colors of flock... a green, and a yellowish tan.  Those were placed in alternating patterns on the ground and along the walls.  That put a nice mossy texture on the stones, and added some great color contrast to the reddish browns of the walls!


Some static grass was placed on the upper surfaces of the rock base.

One thing to note:  I was not able to take WIP images of this part of the process, since I was in and out of the house all day.  I wish I could have snapped some images of how I used thin lines of glue in the 'gaps' between some of the stones for the flock.  This made stone texture where none had been, which was very cool!

I have some more top views coming tomorrow!!!


Tuesday, March 5, 2013

Honored Dead for the Kukulkani


Here are the rest of the minis from the Kukulkani starter set.


You can read all the fluff on them in the previous post on this starter box., which is now in the Coolminiornot shop


This faction has allowed me to do some interesting flesh tone colors. :-)


There is a wide variety in colors from one flesh color to the next.  All of the war priests seem to have the blueish coloration of the warrior in the right corner of this image.


That was fun to try out some new color schemes!


More than a snow fort: Part 1


On a day where 6-10 inches of the super heavy (and ideal fort building) snow is falling, it's time to show some pictures of a 40k fortification I have been working on.

The idea is that this would be modular, so that it could be placed on the table several different ways.

I began by cutting out some pieces of 1 inch pink foam, as this would be just about high enough to cover most of a typical space marine.

The multi level pillbox was relatively easy to create with a few key beveled edges to reflect the design of the walls.


I cut the longer pieces in half so that each piece could be placed around the pillbox and the gate (which you will see in the next post.


I carefully cut out the opening for the pillbox on the lower end, and made a platform on the top which would also be just tall enough to cover most of a space marine.


Here you can get and idea of how the various pieces will be fitting together.  Since the angled cuts almost always leave a rough edge, I had to use something to cover that.


So, I used some of those cereal boxes to make some nice flat pieces to cover the rough areas.  Note: once those are glued on, you will want to use some painter's tape to hold down the edges as the glue dries.  The paper will want to curl as the moisture evaporates.


I cut out a piece of deck plating for the platform on the pillbox.


A strip of foam core was placed on top to complete the height of the pillbox.


Stay tuned for the next exciting episode!!!