Tuesday, November 20, 2012

Dark elf or Drow... which would you choose?


Well, you won't have to, since I will be doing both!

In between many other tasks, I primed those Raging Heroes Blood Vestals.  It is always fun to see figures get to this state (especially when they are heavily converted/kit bashed) of one color!


I will be doing a few color tests on these figures, as they are intended to be the subject of a few painting DVD's


As I mentioned in a previous post, I will be doing a dark flesh tone Drow, and a lighter skin tone Dark Elf.


I will also be experimenting with tattoos and other free hand designs. Who knows, they may be the subject of one of those painting videos as well!


Next I will post some images of my converted Incubi, which I also primed.  They look so different now!


Kickstarting Kickstarter!!! Testing 1,2,3...


OK, I think many of you have noticed in these recent posts that I have been throwing out the hint that we are working on a potential Kickstarter program!  Nearly all of the posts lately have been 'how to' articles, as I attempted to train myself for breaking down all these techniques into information that could be more easily absorbed by you, the viewers!

Many people have asked us for videos and DVD's over the years of our painting techniques, but we never had the time or even the means.  Until now!

We have been planning and researching for many weeks now what would be involved with such an endeavor. It takes a lot, let me tell you!  So much planning, endless lists, etc., and we are still formulating a proposal.

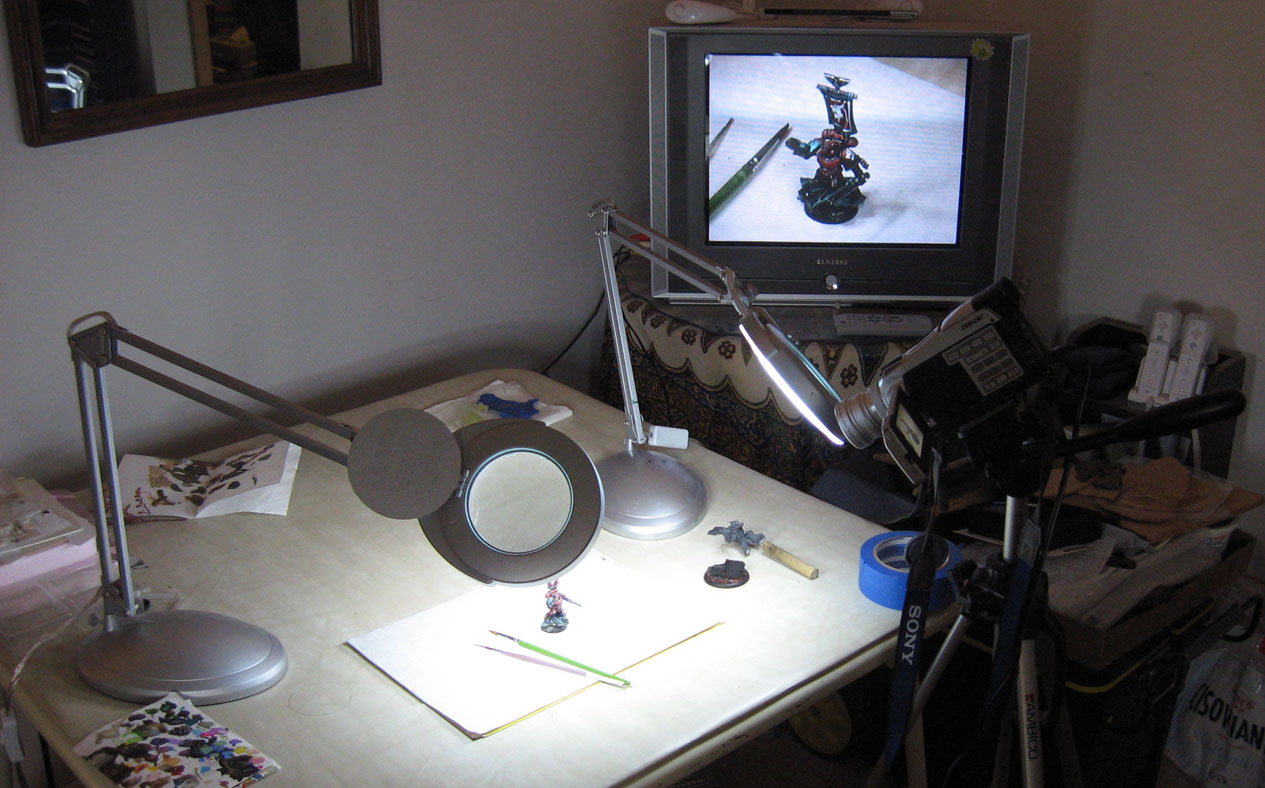
Obviously, the photography element is the most crucial.  Rich was kind enough to drop off the camera yesterday despite not feeling all that great.  We spent hours looking over the camera, checking out lenses, etc.

I had set up a crude studio with lights and outlets, etc.  In a happy accident, or Wii TV happens to make a fantastic video monitor!  This is exactly where it normally resides, if you can believe that..

Rich, and Cathy watched closely as I tested to see how close we could get to the miniature, would things stay in focus... centered on the screen, etc.


I will be adding one more light to this set up.  There was even a happy accident, as I discovered that this set up could be very handy for painting very large monsters and vehicles.  

Normally, those do not fit under my magnifier light.  I noticed that the miniature is even bigger on the screen than what my magnifiers can do!  So, I am tempted to do some painting using the camera as my magnifier.


Anyway, there will be many more tests.  Some of them will be posted to the blog.  Over time, I will begin to post some lists of titles which I will be working on, etc.  The initial videos will be of more basic topics as we figure out what will work best, etc.

I can say that we will be adding a voice over, as passing 737's just overhead could really ruin a good take!
Also, I have been in discussions with some other miniature companies about using their figures for our how to DVD's.  That has been very exciting.  I can tell you for sure that Raging Heroes figures will be a common sight!  Urban Mammoth is going to be there as well.  Both companies have great miniatures!


Cathy suggested that I try to mark the areas where the palette and lights work best.  A very good idea!


So, we hope to provide all the loyal Wappellians around the globe what they have been clamoring for...

I will keep you guys updated as this moves along!  Stay tuned!


Raging Heroes Vestals: Making some bases.


Time to get back into some Raging Heroes!  These are some really wonderful miniatures.  Fine sculpts, high quality casts.  Nearly all of these are one piece casts!

In this case, we have some fantasy Vestals.  I am going to break up this group in half and paint them in 2 different flesh tones.  Some will be typical Drow colors, and the rest as GW Dark elves.

The one thing that will remain the same is the base.  I want to do some lava bases, and I began by sculpting some Apoxy sculpt bases.  I started with my usual tin foil to save clay and make them lighter.


Just as I did with the much larger 80 mm inserts, I wrapped the Apoxy sculpt around the tin foil.


Once it had set up for a little, I brought out the sculpting tools.


One by one, I created my rock textures on each base...


A close up of a base in progress.


The group begins to take shape...


And now for some shots of the completed bases


I love the variety in the poses.


Can't wait to see some paint on these gals!!


Hey look... and early anniversary card from Mom & Dad.  And Babo.


Monday, November 19, 2012

Tales from the Crypt: part two


I guess a graveyard set of bases is quite appropriate for this evening, as one team gets buried on Monday Night Football.  I assure you, this will be way more fun!

See how much fun it is to make neat headstones out of baked sculpey?  For those of you familiar with the last post, you saw how I used my exacto knife as a drill, scouring out the interior circles.  It is a bit like starting out a circular cut on a piece of plywood by drilling a hole in it first, and then working your way outward with a jigsaw.

Plus, I was using Sculpey III, which is a tad more resilient than the regular sculpey.


The scribe tool is used to make some fine cracks.  I decided to leave this headstone devoid of any further details for the moment.  I may add a skull in the center of one side of the cross with some green stuff...


The cross now is able to stand on the riser.  It should even be able to fit on some of the bigger base inserts I did before, such as the 40 and 50 mm versions.


Now for the floor.  Once again, I want this particular set to be more interactive than the others, so the floor will be completely flat, with a rather generic pattern, so that any of the extra objects like the book stand or candles can be placed on it.


Once the initial squares have been carved with the wood carving tool, it's time to break out the scribing tool for the fine cracks.


Cracks completed!  The tiles are left relatively open, as I said before, so that the painter has the option of painting them as different color marble tiles, or even painting some inlay patters, etc.  I know for myself, I prefer to have that option open to me, no matter how nice the existing pattern might be in various resin bases you see on the market.  This way, I am not forced to paint the same pattern that everyone else who purchased that same base is painting!


Sorry for the mini rant!  With some sand and gravel added, this one is just about ready.


Here's another set of painted crypt bases.  You can see some of the "extras" that you could put on this bigger base.  Between the candles and the book stand, you cold make a whole diorama just out of this base insert!


Tales from the Crypt... another base insert


Yes, we have yet another base insert!  Sorry :-)

It will be fun, though... I promise.  I have to make an 80 mm version of this set...


This Groundwerks set from CMON was designed to be very modular.  All of the crosses and headstones were designed to be interchangeable.  Same for the candles and book stand.

We begin with a sheet of baked sculpey.  I used sculpey III for this design, since I needed something that was a bit stronger than the regular white sculpey you have seen me use so often.


I wanted to make a riser for the headstone, so I got a thicker piece and cut that to size.


To get some more variety in the riser, I have a thinner piece that will go underneath the taller section.


Both are aged and weathered with some broken chips...


To make an even thinner decorative addition to the riser, I added a plasticard piece that was even thinner...


The completed riser.


Now for the trickiest part... sculpting the cross headstone.  I drew it out first, using circles to space out the cross bars.


I took a very sharp exacto knife and cut away all the straight portions first, leaving just the interior circles.


The circles are cut away later, using the method shown in the next image...


I took my exacto knife and used the blade as a drill, twisting it, cutting away sculpey, until the blade reached my pencil lines.  The rest had to be cut away the old fashioned way :-)


Stay tuned for the exciting conclusion later!!


Vegetation for the woodland base.


Well, what would a woodland base design be without some foliage?  Once more, we look back to some pictures of the original base set.  The green stuff is all of the special details, such as the moss, fungus, mushrooms, leaves, etc.  All of it was added once the Apoxy Sculpt had set up.


The moss is done by spreading out a blob of green stuff, and stippling in the texture.  I did a little bit of 'pulling', so that there was some directional quality to the strokes.  Otherwise, it would be a very boring texture.


I try to position these clumps in various places, mostly concentrating on recesses.  This is important later on, as these clumps will help make an anchor for the more glamorous details.


You can see the mushrooms positioned on top of the mossy clump.  Some fungus is sculpted onto the side of the stump as well.


Now it's time for some vines!  I start out with one tube of green stuff, which is sliced at various points to make it branch out.


Once the branches are set, I can add some leaves.


More vines and leaves are applied, trying to make considerations for the overall composition and footprint of a miniature.


Once all the green stuff has set, the final sand and gravel application is done, and poof!  Woodland base!