Monday, November 19, 2012

Tales from the Crypt: part two


I guess a graveyard set of bases is quite appropriate for this evening, as one team gets buried on Monday Night Football.  I assure you, this will be way more fun!

See how much fun it is to make neat headstones out of baked sculpey?  For those of you familiar with the last post, you saw how I used my exacto knife as a drill, scouring out the interior circles.  It is a bit like starting out a circular cut on a piece of plywood by drilling a hole in it first, and then working your way outward with a jigsaw.

Plus, I was using Sculpey III, which is a tad more resilient than the regular sculpey.


The scribe tool is used to make some fine cracks.  I decided to leave this headstone devoid of any further details for the moment.  I may add a skull in the center of one side of the cross with some green stuff...


The cross now is able to stand on the riser.  It should even be able to fit on some of the bigger base inserts I did before, such as the 40 and 50 mm versions.


Now for the floor.  Once again, I want this particular set to be more interactive than the others, so the floor will be completely flat, with a rather generic pattern, so that any of the extra objects like the book stand or candles can be placed on it.


Once the initial squares have been carved with the wood carving tool, it's time to break out the scribing tool for the fine cracks.


Cracks completed!  The tiles are left relatively open, as I said before, so that the painter has the option of painting them as different color marble tiles, or even painting some inlay patters, etc.  I know for myself, I prefer to have that option open to me, no matter how nice the existing pattern might be in various resin bases you see on the market.  This way, I am not forced to paint the same pattern that everyone else who purchased that same base is painting!


Sorry for the mini rant!  With some sand and gravel added, this one is just about ready.


Here's another set of painted crypt bases.  You can see some of the "extras" that you could put on this bigger base.  Between the candles and the book stand, you cold make a whole diorama just out of this base insert!


Tales from the Crypt... another base insert


Yes, we have yet another base insert!  Sorry :-)

It will be fun, though... I promise.  I have to make an 80 mm version of this set...


This Groundwerks set from CMON was designed to be very modular.  All of the crosses and headstones were designed to be interchangeable.  Same for the candles and book stand.

We begin with a sheet of baked sculpey.  I used sculpey III for this design, since I needed something that was a bit stronger than the regular white sculpey you have seen me use so often.


I wanted to make a riser for the headstone, so I got a thicker piece and cut that to size.


To get some more variety in the riser, I have a thinner piece that will go underneath the taller section.


Both are aged and weathered with some broken chips...


To make an even thinner decorative addition to the riser, I added a plasticard piece that was even thinner...


The completed riser.


Now for the trickiest part... sculpting the cross headstone.  I drew it out first, using circles to space out the cross bars.


I took a very sharp exacto knife and cut away all the straight portions first, leaving just the interior circles.


The circles are cut away later, using the method shown in the next image...


I took my exacto knife and used the blade as a drill, twisting it, cutting away sculpey, until the blade reached my pencil lines.  The rest had to be cut away the old fashioned way :-)


Stay tuned for the exciting conclusion later!!


Vegetation for the woodland base.


Well, what would a woodland base design be without some foliage?  Once more, we look back to some pictures of the original base set.  The green stuff is all of the special details, such as the moss, fungus, mushrooms, leaves, etc.  All of it was added once the Apoxy Sculpt had set up.


The moss is done by spreading out a blob of green stuff, and stippling in the texture.  I did a little bit of 'pulling', so that there was some directional quality to the strokes.  Otherwise, it would be a very boring texture.


I try to position these clumps in various places, mostly concentrating on recesses.  This is important later on, as these clumps will help make an anchor for the more glamorous details.


You can see the mushrooms positioned on top of the mossy clump.  Some fungus is sculpted onto the side of the stump as well.


Now it's time for some vines!  I start out with one tube of green stuff, which is sliced at various points to make it branch out.


Once the branches are set, I can add some leaves.


More vines and leaves are applied, trying to make considerations for the overall composition and footprint of a miniature.


Once all the green stuff has set, the final sand and gravel application is done, and poof!  Woodland base!


Sunday, November 18, 2012

Not just sawing logs...


I apologize for the lack of early stage images here.  Everything I was doing with the Apoxy sculpt was not only very time sensitive, my hands were also covered in Apoxy sculpt slime!  I probably would have dropped the camera 2 or 3 times.


This is the Groundwerks base set from CMON which I am adding onto with an 80 mm insert:


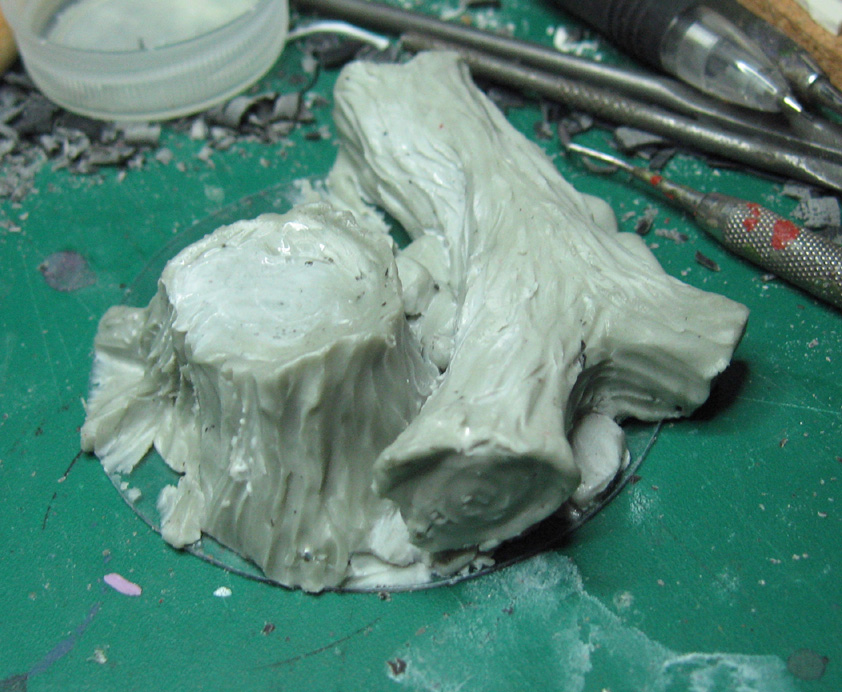
This is yet another training project for a future 'how to' DVD.  This is one of my favorite designs.  Just like the rock bases from the last few posts, I blocked out the main shapes with tin foil.  As with the other sets, it save a lot of time and clay.  

Once you get adept at working the tin foil, you can almost "pre sculpt" the base with the foil.


After establishing the logs and stump, I had to fill in the recesses with some large rocks to make it easier to cast.  It also stabilizes the logs, and gives me a platform for the green stuff extras.


A nice little set of rocks in my open area for composition...


All of the rocks are now in place, and the Apoxy sculpt is fully hardened, so it is time to start working with the green stuff.


I have another post showing all the green stuff work that was done.  Lots of mossy/grass texture coming up!!


Stay tuned...


A converted Klaivex for the Archon


Interspersed with all the work on the bases and other stuff, I did a little bit here and there on the last piece of the Adepticon Incubus squad... the Klaivex.

Inspired by the pose of Lilith Hesperax, I found a leg and torso set from a Venom.  This was pretty similar to that pose.  I was also fortunate enough to discover a small sprue of beastman horns!  Very handy.

The rest  of the bits were various Wyche and Kabal warrior parts.

As I did with the other Incubi, I made plasticard a klaive.


Here is some early assembly, focusing on getting the arms to hold up the two handed weapon.  This is the most difficult part, as none of the arms from any of the sets really work well for this purpose.


After I made a back banner/trophy pole of plasticard, it was time to make a base.  I wanted to have her standing on a tilted piece of terrain, in this cas a buttress from a 40k terrain kit.


Here are a few images of the assembled figure with a bit of green stuff, such as the right shoulder pad.


And now for the whole squad!


Trench warfare... sandbagging it


Another day, another base insert.  I needed to match the previous set of sandbags.  After finding the plasticard, I broke up some sculpey pieces and started glueing.


After attaching my plasticard, I carved a few wood planks from smaller baked sculpey pieces.


I tried to position the boards in an interesting way, but still allow for a big miniature to stand on it.


All the boards are now in place...


I grab the Apoxy sculpt, and sculpt some sandbags!!


First row in position.  After they set up for a bit, I used my tool to create a seam for each bag.


Additional rows are added, laying them out in a very similar way to placing bricks.  It is important to vary the placement, making the bags look like they are 'flexible', and not super rigid.


One more row!


This time, I put some bullet holes in the bags.


I tried to fill in all the potential gaps with Apoxy sculpt, so that it would be easier to make the casts.


Add some rocks...


Now for some sand spilling out of the holes!


More sand and gravel.


One more major detail.  I cut some polystryene tubing to match the shell casings on the floor of the trench.  They are placed on the feeder strip.


I may still add some larger shells, like mortar rounds, but all I have left to do it put some more green stuff on the ammo strip, and that's it!