Wednesday, May 16, 2018

The Road to Arras: a new terrain board


As I lead up to the Battle of Arras report, I wanted to show you what the newest terrain pieces looked like on the Ardennes board.

I am still using the forest matt from TableWar... and this time around you will be able to see a lot more of it!


Here are the road sections, which were profiled in a few different step by step tutorials.  Here's a link for you:


I made a number of road sections of various lengths.  My next task will be to make some curved sections and a few more that are at an angle.

Once the roads are in place, I can start to "build" the rest of the terrain around it.  Unlike the large hills that I used for the first two battle reports, I wanted this one to represent the flatter areas of northern France.  The idea is to represent the temporary German line that was assaulted by the British troops at Arras.


All of my new forest sections were utilized for this report... here's a link to the lest step by step:


I wanted there to be a few areas where line of sight would be almost continuous, so that it would be more hazardous for approaching tanks, as it should have been from a historical standpoint.  However, I have to make sure that all the tanks are not taken out by the 88mm gun in the first few turns!


The goal was to remain within the usual parameters of a two platoon selector, and not use the Tank Wars supplement.  There will be other battles where I will go ahead with that rules set, but this one was more about Rommel's actions in regards to targeting artillery, not Panzer vs Matilda!


The road presents a few options for rapid movement... if that is something you can associate with a Matilda.  Since the Allies get more Victory Points for getting vehicles off the board (by the Axis side) than anything else, covering these roads will be very important.

To prevent this game from becoming a pure defensive struggle, I added some modifiers to my "trigger" of when the French reinforcements would arrive.  There will be a series of telephone poles along the road, and if the German infantry can take down 3 of them, they will not only score 3 Victory Points, they will potentially delay the French entry onto the board!


The whole point of this "what if" scenario is to see what might have happened if the French commander had not died in a car crash, and his troops had gotten the orders to advance on Arras with the British.


Here are a few peeks at the British forces, which will make their debut on the battle report videos!


There will be a few Matildas, supported by a limited amount of infantry.  They will have 1250 points to work with.


On the German side, they will have Rommel himself, and he has some special abilities for this game.  He will add a +1 to shoot to any artillery piece which is within 3 inches (this only works for one at a time, so no placing two guns right next to each other!).

He will also negate the possibility that the 88mm flak gun will accidentally target the airstrike which will be coming into the game in the final stages.


Here's a link to the last video battle report, which was also a "what if" scenario called Sickle Stroke:


Tuesday, May 15, 2018

Blondie


Earlier this year, I did an experiment painting a unit of Clan Escher on a facebook live session to show how you can try to utilize that extended drying time to your advantage.

The technique has developed a lot since then, with new colors added, and even new jars to put my "remodeled paints" into!


Here's a link to that original session:


I am trying to create my own bottled versions of the Mig Ammo Oilbrushers.  I really love those, so I am trying to expand on that range by making my own.  It is relatively simple, as I already know the colors which I want to create... these are colors which I use the most, or ones that I would like to try more often.

Using my high quality white spirits, I think I can make something close enough, although I will be most curious to see if the drying times also come a bit closer.

As it is now, the Mig Oilbrushers can dry in about 4-5 hours.  Standard oil paint takes longer, especially if it is thicker.  So, we shall see what happens when the mixture contains more of the white spirits.  I don't expect it to dry that much faster, nor do I really need it to do that.  more of a curiosity than anything else :-)

Stay tuned!


Monday, May 14, 2018

Mosaic Tile Basing


As I was finishing off the rest of the mosaic tile bases, I tried to snap a few images to show you how I make the initial design look more like mosaics than a painting.  That is not very complex, just a little more tedious!


It starts with brown liner paint from Reaper, which is perfect for so many things.  You can thin it down so that it flows incredibly easily, but it still maintains much of its color integrity.  You can see how I moved the brush around to make it seem as if there were a myriad of individual tiles.


On some parts of the pattern, I had to make sure that I "followed" the texture of the design, in particular the more angular or patterned sections like those around the outer edges.  Straight lines in particular are very important, as you will see in each one.


After the lining was done, I went back in with slightly lighter versions of each color that was done in a particular section and "picked out" random tiles.  When the mosaics are created, tiles are not placed evenly.  Some are placed at slightly different angles so that the catch more sunlight and sparkle a bit!


This had to be done to every single base, and this version had a lot more 'pattern' to follow.  That is, lining up those tiles one by one following my initial design.


I had to work my way across the more open surface, which will be accented by a few different colors which are very bright.


Eventually I worked my way around the ship and the wave design, trying to follow the curves of each one.


As you see in this image, picking out the lighter tiles on the more intense patterns is quite dramatic, and makes what might otherwise be a boring area of color have some extra interest.


I think this view really demonstrates that principle.  This tends to show up more on the geometric patterns as opposed to more organic portraits. 


This pattern was very challenging, as I had to "square off" circular shapes, with 4 parallel stripes no less of different colors.  As with the other complex pattern, adding a few "highlight pieces" really helped to make it take shape.

You don't want to get too crazy with that, as it might start to detract from your miniatures.  I will also be putting a dusting of weathering powders on these to tone that down.


Here's a link to the filming of the original basing video that I made as part of the Painting Pyramid series.  It was one of 12 different basing techniques that I filmed!


I have already sent the link to the YouTube instructional video that I created for the Painting Pyramid series to the patrons who subscribe $5 or more to the patreon page.  I have much more under way at the moment, and I want to have that ready for the patrons to see as well!


Saturday, May 12, 2018

Savage Blades


I have been using the oils for a greater and greater percentage of each figure as I learn more techniques, and manipulate the colors even more.  A set of four figures was painted all at once using the oils, and I pushed much farther into the skin colors, eyes, gems and other surfaces than I had thought possible.


Keep in mind, the primary use of the oil paints is to allow me to work on a much greater number of figures at the same time.  It is not necessary to paint entire figures with them.  In fact, the vast majority of figures will be finished off with standard acrylic paints once the majority of the work has been done with oils.


The ability to continue blending colors on the surface long after they have first been applied is a massive advantage for me, and that means I can work on 3-5 times as many figures as I used to.  It also makes painting very large creatures, or figures with many hard to reach areas take far less time with way less hassle!


Thursday, May 10, 2018

Roadside Forests: A new tool for trees!


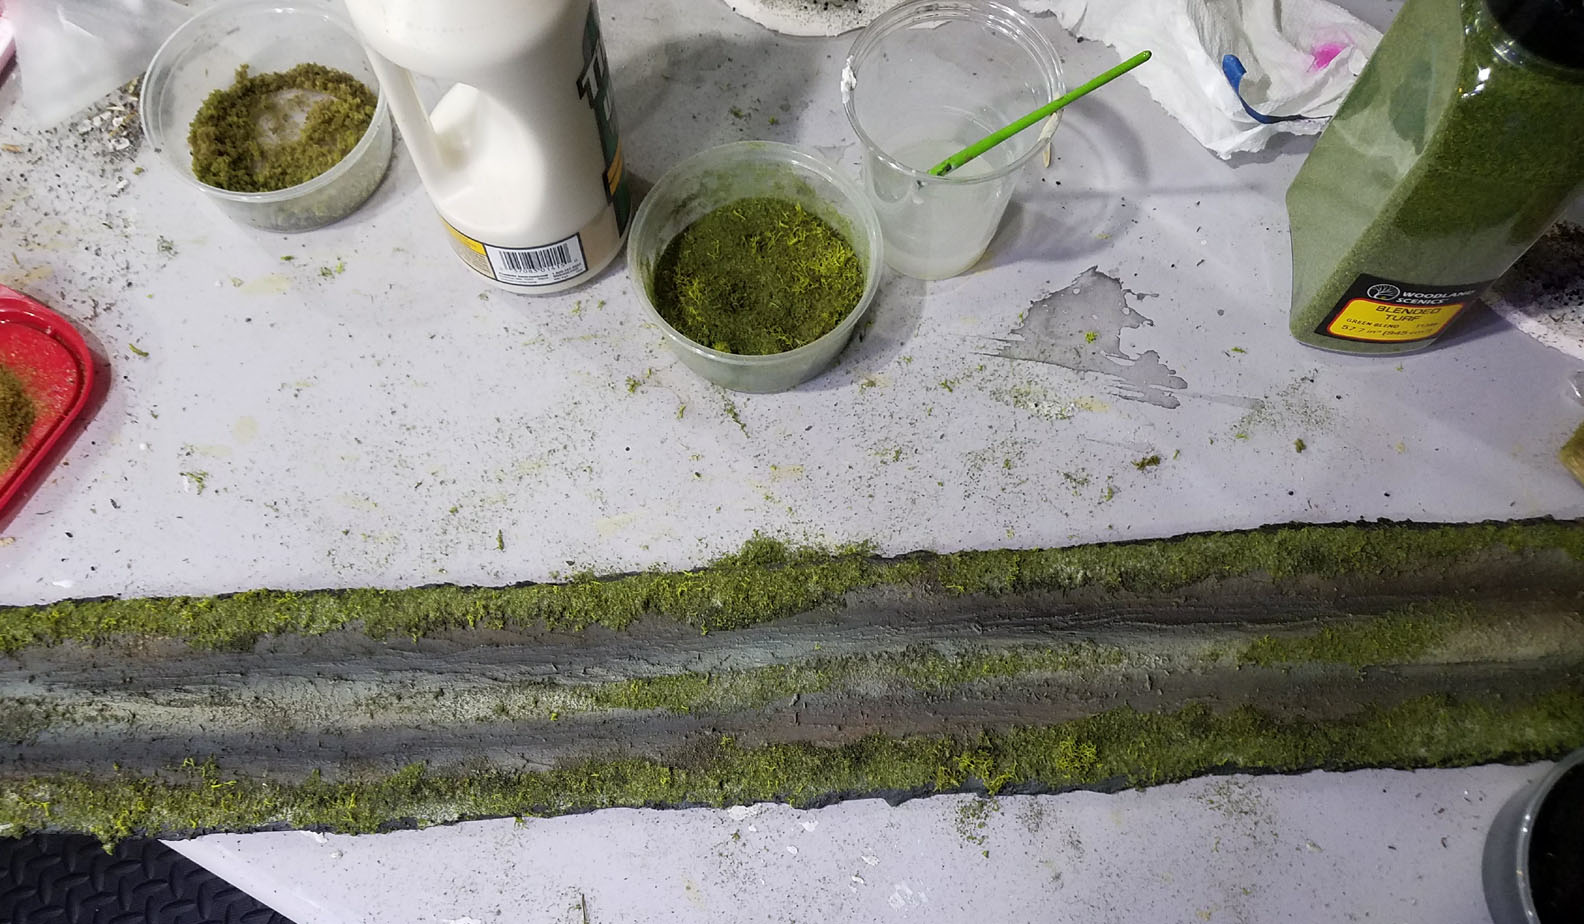
As I was working on the display board for the Little Wars tournament, I was continuing a similar process on my road sections and some other elements for the upcoming Battle of Arras board.

Since I was making roads and trees for the display board, why not make usable terrain pieces!

In fact, I used some of the leftover foliage from that display board on the road sections...


I painted them at the same time as the display board.  Here's a link to the first episode of the display board posts:


A watered down wood glue mix was used to attach that foliage to the road, in the same manner as the display board:


Originally I was going to put some bushes and shrubs on the sides of the road sections, but I need this batch to be easier to transport, so a lower profile is needed.


While I created the trees for the display board, I had another batch of tree stands under way.  These would range in all manner of sizes and shapes.  I needed a few large sections for the middle of the table, since the big hill and ridge line sections won't be used in this report.

I made some longer, narrower pieces to go alongside the roads, and also place in front of the painted backdrop.


Just as I did on the display board, the spray adhesive was use to adhere the flock to the moss.  I began with the fine, dark flock in order to "shade" these parts.


The coarse flock was used to get a bit more texture and color variety on the trees and bushes.


Once all that had been completed, I could go ahead with the final layers of greenish flock.  This is much finer than  the previous layers, so it sticks very well to all the texture that is in place.


I make sure to have newspapers all around the work area, since it makes it MUCH easier to scoop up what does not stick and put right back into my container.  This is a lesson that I learned the hard way.


Here we go!!!  New terrain pieces all set for the next batch of filming.  If you want to see what they look like on the table, you can check out my previous posts on the Ardennes board, or check out some of the battle reports on my YouTube channel:


Wednesday, May 9, 2018

The Goat Club


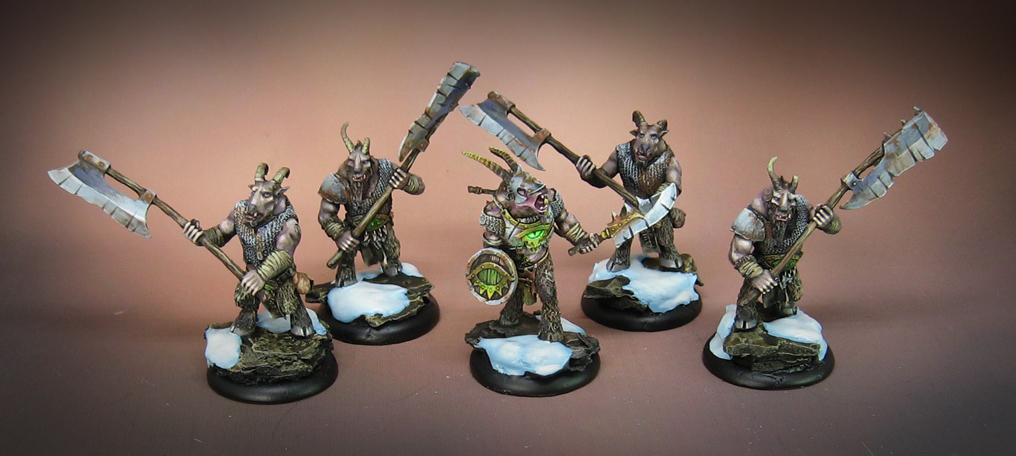
This unit of Beastmen is from Mierce Miniatures, and it was painted in a very similar way to another unit which was cast in metal.  I did a multi part series that took the group from primer to finished, starting with this episode:


Then we have episode two, getting into the painting itself:


All of these episodes were supposed to show how the Secret Weapon Weathering paints can be used for 'regular' painting or even weathering ;-)


This part dove into the weathering a bit more:


This post gives you a look at how the figures turned out:


One of the reasons I want to create more "unit painting" videos is to show the process of painting multiple figures in a format that is not broken into smaller pieces as I must do in blog posts.  You can only go around 10-15 images at most, and that usually means I must break things down into 2-4 posts.

People who don't follow this closely enough end up seeing only 1 or 2 episodes, and not always in the order meant to be viewed.

These are the types of videos I am furiously working on right now for the Patreon Page, using the new equipment and following a vast amount of testing.

Stay tuned for much more!