Wednesday, May 11, 2016

Working in Worbla: Taking that first step


Some of you know that the first time I helped out at the WWX booth during GenCon, I tried to make a quick costume made from what was at hand.

Afterwards, I learned about an interesting material for making the kind of armor that you would see on the sort of steampunk western characters in the game.  Once I painted the legendary Wyatt Earp figure, I thought that might be a fantastic cosplay!

While I was at Marcon last weekend, I ended up being part of a judging panel on the masquerade.  After several hours on that panel, the next thing I knew I was invited to sit in on a panel which would discuss how to work with this material!  Excellent!

There are now multiple types of products which are similar to Worbla, but I will focus on that kind in this post.  Another note... this is the traditional regular variety.


There are two distinct sides.  The smooth side is the adhesive end, while the rougher texture is the 'top'.  Keep in mind, all scraps can be saved and used again, no matter how small!


I can't recall what this was called, but it was a different kind of product.  It had less texture, but I think there was less adhesion as well.


While the various kinds of Worbla were discussed, I started cutting out pieces so that we could test how the material heated up, and what effect that process would have.


Layering in this manner creates additional texture, but I must keep in mind that all of these layers will be heated.  Since I have never done this before, I cannot be sure what kind of effect that it will have.  It's possible that I will just slag the whole thing :-)


More layers are cut.  I will see if I can use the scrap materials to sculpt into some kind of border pieces on the edges of the badge.


I wanted to try and make two kinds of screws... one set was cut from the sheets, while the smaller ones (and rivets as well) would be fashioned from the melted scraps.


The final test would be to see if I could carve or sculpt the filigree texture on the lowest level of the badge!  I had no idea how rapidly or slowly the material would cool, making such sculpting more difficult.


With only minute left in the panel, I turned on the heat gun and started melting!

It only takes a small amount of heating to get things pliable, so less is always more.  I set all my pieces aside, and worked my way up, heating each layer slightly so that it would stick... and not blow away!

We found that a decent heating gave me 3-4 minutes of working time to sculpt the patterns on the shield, and straighten out some other edges.

I was pleased that repeated heatings did not ruin the previous layers, turning them into that dreaded slag!  Very nice.

Many thanks to Mogchelle Cosplay for providing the materials and the know how!  I definitely have a much more solid foundation on which to build.  Much experimentation will still be required, but I am nowhere near as blind as I was when I first started.

Here's a link to her facebook page:


And finally, the convention came to an end.  At after party, long after most folks had gone home, I was able to secure a few cookies for the intrepid travellers who had journeyed with us.  Babo loves all cookies, but ones with faces are even better!

Many thanks to Jack and everyone else who worked so hard for us at Marcon!


Tuesday, May 10, 2016

A new pattern


While the poses of these Lord of the Rings 1st age Elves are very similar to one another, I attempted to get some variety in the freehand patterns.


I thought this might give them a more individual and unique look, and not so much cut and paste!


I had kept the basing quite simple on them as well, since I was still getting used to the Lord of the Rings system at that time.


No Laughing Matter


With all the activity in recent weeks, I have not had a chance to finish off the Laffly trucks completely.   However, I thought that it might be fun for you to see some images of what they look like before all of those finishing touches.

This is the Tank hunter version.


As I mentioned in the previous post, the gun is magnetized so that I can set it on to a standard gun mount for the non self propelled version. :-)


I was quite happy with these, given the minimal expense and extremely short amount of time spent constructing them from pink foam and plasticard.


I have some very fun shots of these vehicles seeing some action in our first Bolt Action battle report.  They did far better than I ever imagined!


There are a few things that I want to add to all the Laffly trucks, and that would be some pintle mounted MMG's.  The transport versions have two of them, so I will try to replicate what was done in this scratch built version.

I now have more of the transports, so there will be a lot of articles on the painting and weathering of each vehicle.  Stay tuned!!


Monday, May 9, 2016

Meet my little pets


I've been showing you the individual shots of the Grotesques... but now it is time to show all of them together, along with their Haemonculus baby sitter!


This view from above shows the same basing that was carried through the entire army... vehicles, monsters, jetbikes and more.


These guys all involved many new techniques, using blood effects, fluorescent paints and lots of object source lighting.


This gives you a few glimpses at the freehand patterns that I managed to sneak onto each figure.  Once again, that's the same pattern which was used on all the Reaver jetbikes, Venoms and Razorwing.


The Abomination figure to the right required a lot of manipulation.  I used a number of Chronos Pain engine bits.


I tried to get some variation in colors from one Grotesque to the nest, with subtle variations on the bony parts and the drug injectors.


One last view of the gang!!


Sunday, May 8, 2016

Welcome to the Club!


Since this appears to be MONSTER WEEK, why not have this big boy from Reaper miniatures.

He weighs in at 14.8 ounces of solid pewter!


I believe that one of the arms was repositioned before it got to me for painting.  And yeas, painting something this massive which is already on his base was an interesting challenge!


The way the muscles were sculpted forced me to treat a lot of the shadow areas as five o'clock shadow.  If that had just been a continuous swath of skin tones of the pink variety, it would have been exceedingly boring to look at!

These views might show that particular situation best.

I also had to deal with the hair on the arms, etc., and it seemed like the best way to allow that to mesh with the rest of the arms was to have plenty of green already in the skin tone.


Add to that the snow base, and it was quite important to have that cooler color injected. 


Saturday, May 7, 2016

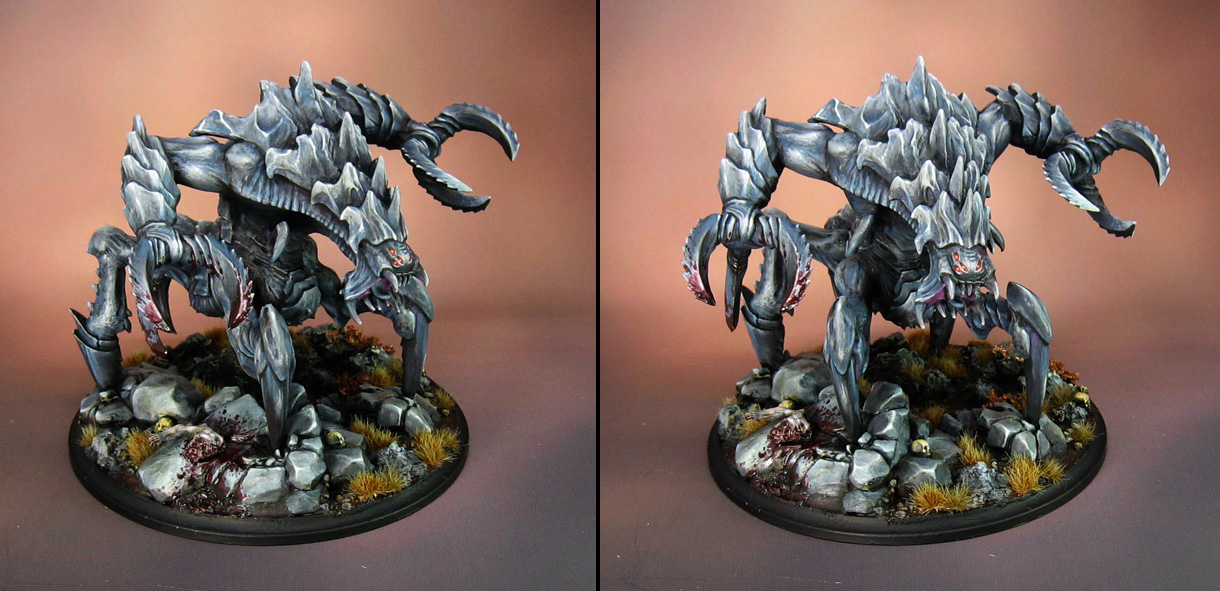
A Great Big Bug!!


Whoa!  Look at the size of that varmint! 

Stomping through the Weird West, we have the new King Scarab from Wild West Exodus.


He is the Heavy Support for The Watchers, the new alien invader faction.  This is one of four new factions released from the Unfinished Business kickstarter.


To give you an idea of scale, the base is the size of a DVD!


This monstrous beast can tear up just about anything.


You can see from these images that he's enjoying a meal right about now.


By the way, the majority of those rocks you see on his base are part of the figure set.


I added a few additional rocks to fill out the base.  Just like the Greys Hired Hands, I had to get creative with tinting the gray colors.  Some had more of a blueish tint, others more greenish, some almost pink.  It is even more crucial on a massive thing like this to create as much difference in the shades as possible, otherwise it would get quite boring to look at!


This was painted to match the concept art, by the way.  And yes... it was all shades of gray!  More warm grays than anything else, so I needed to expand on that range.


These images include a few of those hired hands, which are standard size infantry.  Now you can really see how colossal this guy is!  Wait until you see Buggy next to Old Stompy!

Stay tuned...


Friday, May 6, 2016

Roll out the Runes!


I think it was about a month ago when I profiled the new Green Stuff World texture rollers, and I never got a chance to post any images of the first test bases!

Right now, I have about 6 or 7 different texture rollers.  This was the first batch, purchased directly from Green Stuff World.


For the demonstration, I wanted to use a stronger, firmer sculpey clay.  The gray extra firm is perfect, because it is not rubbery like the Sculpey III.  While it is more robust than the original white sculpey that I normally use, it is still designed to be carved somewhat easily.


Here's a quick review of the process.  I rolled out a slab of the clay onto a ceramic tile.  This is a much better surface for baking, as it won't make your cookies smell like sculpey, which baking on a cookie sheet will do.  Also, those tend to flex and the sculpey gets too hot.


I did the usual sculpey shelf style bases as a quick test.  I have some cork underneath the sheets of broken sculpey.


You can see that I was able to make a number of bases, and still have clay left over!  I also added some sand and gravel around the edges and seams.


A few Secret Weapon skulls were added for some extra imapct!


I have a few ideas for painting these bases.  I want to try some glowing runes on a few of them... at least the ones which are underneath a magic user! :-)

There are many more articles to come, showing additional textures and more complex/elaborate basing methods.  I just wanted to get these on screen for you as quickly as possible!