Wednesday, January 20, 2016

Big Dude

 
Here's a big lad from Red Box Games.  He is standing on a 40mm base, which makes him ogre sized.

 
As with all the other skin colors on the Red Box Games figures, I tried to get some nice subtle greens in the shadow areas.  The usual technique of mixing a warm, toned down green with some of the Flesh Wash did the trick.

 
Since this one was a bit bigger, I could have even more fun.  However, I still had to keep all of the skin colors matched to the dozens of previously painted minis. 

 
This is the largest of the Red Box Games minis that I have worked on so far.  There are a few new metal horses that I'm going to be painting soon, so stay tuned!!!


Bigger, Badder Wolf


We have another fantastic Wulfen figure from the Norsgard Miniatures line!  I had a lot of fun with this guy.  Here's a link to their facebook page:


They have created a number of wonderful figures, which I have found to be cast in very silky, resilient resin that is very easy to prep!  There are even weapon and head swapping options, which is great!
Also, the poses are very dynamic.


This guy is the largest Wulfen I have done from Norsgard (he's on a 40mm round base).


The faces are very expressive and finely sculpted, which allowed me to feel as if I was painting a portrait.  That was fun!!!


I hope to have many more Norsgard miniatures here to show you!  One more very special Wulfen is under way, so stay tuned :-)


Tuesday, January 19, 2016

The Red Baron


It's been a while since we last visited the dreaded Blood Star clan of Asharah, so I thought I would show another of the jetbikes.


All of these were heavily converted, using the extra wings and hulls to give them more of a hefty appearance.  Since the Bladevanes are supposed to be the primary weapon, I added extra ones.

The side benefit was having many extra surfaces to learn how to do the blood effects! 


I also tried to have a fun continuous theme on the bases.  This landing gear from a Storm Raven was an homage to the crashed tail of that same Storm Raven which was used on the Archon's Venom.


This view from above gives you a better peek at the freehand design.  I liked the pattern so much, it was the subject of my freehand video.  The pattern was used on everything in the army... infantry, vehicles, monsters, and more.


That Freehand Design video is available at Kings Hobbies and Games:


Greys with Guns


We return to the Weird West with The Watchers from Wild West Exodus.  This time, the long range hired hands.


It won't be long now before the kickstarter rewards will be heading out to all the guys and gals who have been eagerly anticipating their early arrival!  This also means that you will be able to build up your new posses very rapidly since they will be available in the Outlaw Miniatures shop too!


I have been having a lot more fun than I expected painting the Greys.  It turns out that I have forgotten how much fun I had making the Shades of Grey video, where I explored all kinds of tints to what can be an overlooked color.


On these guys, I have been including teal, purple, brownish gray and even some green in areas where the glow from the gun casts a bit of light on them.

In addition, I can add even more warm tans and sienna tones on the bases, making them a nice foil to the more neutral grays on the figure itself.  I can't wait for the first group shots!!!

Cowboys vs. Aliens!!


Monday, January 18, 2016

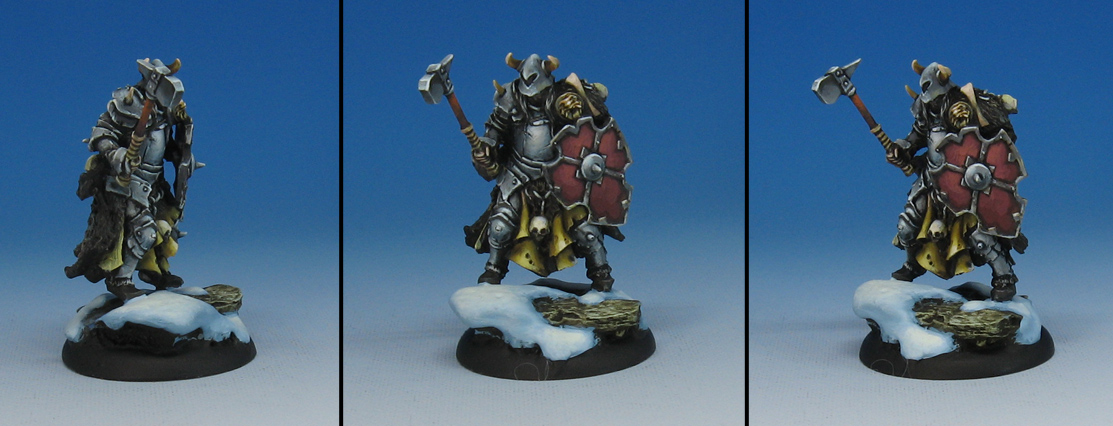
The Man in the Iron Mask


Here's a fun Chaos warrior style mini from Red Box Games.


As before, he is part of the gigantic batch of similar theme figures which spans a number of different miniature companies.


Lots of these guys yet to come, so stay tuned!


Dynamite!


Here are a few images of the completed Lady Dynamite from Magic Reality Miniatures.  I may still put on some weathering powders and other effects, but I thought I would wait until it got a bit warmer for spraying fixative.

I really liked the extra elements that came with the figure, like the sticks of dynamite and the boxes of gunpowder!


I followed the concept art color scheme, just to check them out side by side.  It was a lot of fun to paint, and the gears on the 'base' made it very easy to create this vignette around it.


The face had a lot of fine details, so I was able to get a neat expression on her face.

These views also give you a better sense of how the gear on her base looks with the larger base that I made.  Seeing these makes  me very glad that I made sure to put that slate blue color on the iron!  It does help make her pop with all of the warm colors in her clothes. 


The rust helps to keep the two surfaces tied together, however. 


Be sure to check out the Magic Reality Miniatures website:


Sunday, January 17, 2016

Almost There!


If you are not too afraid to watch, the variation on the Shaded Basecoat technique continues.

What I am doing here is very similar to what I used to do with my watercolors... that is, taking some salt or some other substance and putting that on the paper with the wet paint.

Those would interact in very interesting (but unpredictable) ways, and created some very interesting effects along the way.  I would build from these random effects, letting that chance array of colors decide the direction for me.


As for this figure... there was a lot more than just the miniature itself.  I was trying to make a little vignette here with the iron base, gears, etc.

Since so many of the colors on the figure would be warm browns, tans and siennas, I put a cooler seafoam green color in the mix for the base.  Later on, this would really show off the rust effects!


I am mixing that seafoam green with some of the glaze colors, such as umber and black.


I tried to keep up with the main base and the gears on the figure, so that they would maintain the same kind of spotlight effect.


They are just about ready for some rust and weathering!


More definition was also being placed on the figure, developing the middle tones and lighter areas.  The important thing is to continue working on all sections at once, and not letting yourself get locked into one tiny area!


Now for some rust!  It was a simple mix of a rust colored paint and the sepia wash to keep it from getting too opaque.  Once again, more random things would happen when this was applied.


I focused on the recesses, as the oxidation tends to occur there.


To darken the rust in some places, and even get an oil stain look, I added a bit of Reaper Blue Liner paint... a very high intensity dark paint.


Rust is also added to the gears on the figure...


Getting there!  I continued to work on the figure, defining details on the face, working out what sort of colors I wanted on the crates, and more.  The crates needed to have a little variety in their color tones as well.


In nearly every layer that I have been painting on this figure, I have been mixing in some of the wash colors with my regular paints.


Since I was working "globally", I could always see when something was getting too light, or not light enough, right away.  That's the big advantage of not working on only one tiny part to the exclusion of the rest of the mini.


The images got a little burned out here, but in this stage I was going back in with very dark glazes to define some areas better or make the highlights seem brighter.


Just about done!  I may still add some weathering powders or do some kind of oil slick/grease effects, but I want to take pictures of how it looks first, so that I can get a comparison of the two!

Stay tuned!