Saturday, January 11, 2014

Some in progress pics for you...


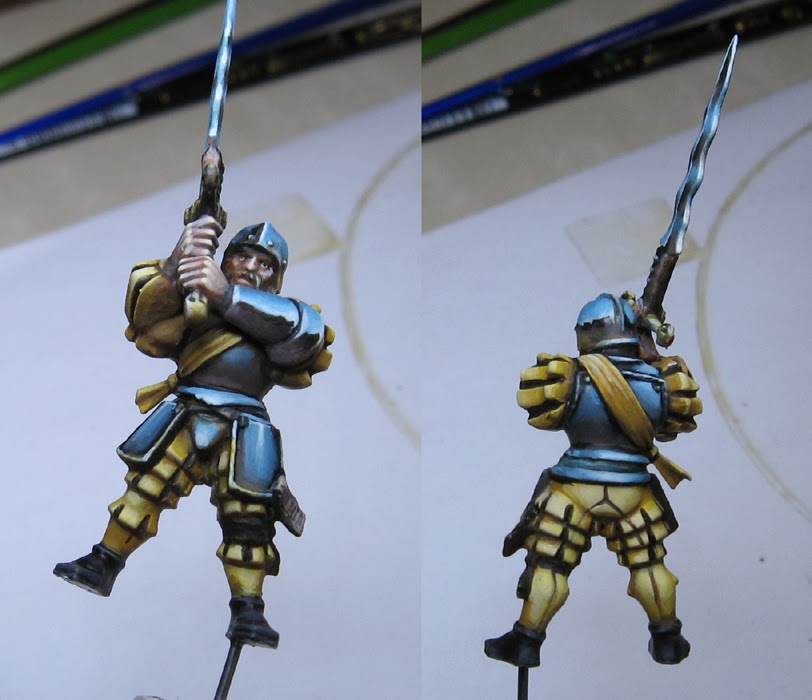
Hey folks... I just happened to have the camera nearby, so I snapped some images as I was painting another Greatsword.  The LED lights really work much better for these kinds of things.

This mini is in that Shaded Basecoat stage that you hear me talk about so much.  Notice the filbert brushes nearby!


Yes, that is a Cool Whip container lid.  I have used far more bizarre things for a palette, I assure you!  

As always, the idea behind the Shaded Basecoat is to start lighter in order to set up the subsequent glazes.


In these next few images, you will see some of that glazing and shading.  Sometimes I use glaze colors such as the GW glazes or Secret Weapon washes.  There are times I will just water down paint.  Sometimes I will mix in glaze medium to thin down a color.


More dark glazing... but also tinting.  I am trying to get a variety of warm and cool in the yellows, but also establish the darker blues on the armor.  Later, I will do some 'light glazes' on that armor for both the sky and earth portions... but especially on the earth colors.


These crazy curvy blades are a nightmare, but an interesting challenge!  The 'light glazes' can really help here, since they are basically semi-transparent lighter colors.


More lightening of the metals, but more warm earth tones continue to be added.


With many of the armor shades well on their way, I started working more on the yellow.


Can't forget the base!  I tried to have some green here, so that the blueish colors would not be the only place on the entire mini where you would find cooler colors...


More definition on both the metal surfaces and the yellow.  Sharper edges near blended edges help to create that hard/soft edge contrast that is vital to make metals.


Here is how it stands now.  More work to be done.  Also, the Army Painter brush on dullcoate will help to eliminate some of the shiny areas.  Those are created by the various materials that I use and mix together.

Stay tuned for the big finish!

Friday, January 10, 2014

Some 'classics'... and Reapercon!


These old metal classics will always bring up fond memories.  While the casts were getting a bit rough due to age by this point, these were still interesting to paint.


I suppose it also reminds me of finding my way early on in my miniature painting.  Some of the first non Blood Bowl GW minis I painted were the old Grey Knights.


Those figures back in the day were my first attempts at non-metallic metals.  Yes, there was a time when I tried to use metallic paint. :-)  However, that was still in the context of sky earth.


I may do some experiments with the Valleko Metallic medium.  Perhaps I will mix that in with my usual SE-NMM colors and see what happens!!!


That could be quite interesting.  I am hoping to do a lot of experimentation in the second half of this year.  Have to get through a bunch of work first!


And I guess I can make it official.  I will be at Reapercon this year!  Yes indeed!  It does not conflict with Adepticon, so the good folks from out west have decreed that I should come out there ind infect them with my madness!

Further details to come!


Two by two, covered in goo


Well, the team continues to grow.  At this point, a decent number of Rotters and all the Pestigors completed.

As I have mentioned, the Rotters were done of various races... in pairs.  So we start with the beastmen,


Then some rats


And some squats.


The Pestigors


And the merry men as they stood the other day.


I have the companion lizardman Rotter finished, so pics of that next...


The Nurgle Warriors and coaching staff should interest you as well!

Cathy suggested I put the link to the Wamp forum for the voting.  Register to Wamp and put Wappelville over the top!


Thursday, January 9, 2014

Burned to a crisp


Meet Cinder... a fun little lava dragon that I painted a while back.  Originally I used it as a "Baby Bolrog" for Lord of the Rings.  I played with it in one game, and it was interesting.

I think with the new monster rules in the current version, it could be much nastier!


I was still learning the game at the time, so I think he could be far more useful now.


I put a bunch of skulls and skellies on the base for some extra interest.


I used the same basic lava technique as I did on the videos.  The fluorescent paints are incredibly useful!  Even the most firey orange looks like brown compared to those colors.  They are made by Vallejo.


A few things of note.  

I am calling on all loyal Wappellians to vote for this crazy blog on the Wamp miniature painting forums.  I was just informed that it is up for Blog of the year 2013!  Craziness!

No matter what, I am always very glad that anyone takes the time to check out my insane rantings!

Also, Cinder is here:


Queens of the Underdark


This gal is one of the last Raging Heroes Blood Vestals remaining.  Since the Drow scheme has been more fun to paint, I have been using that on these final miniatures.


As always, lots of detail to work with, and lots of nice edges.


Plenty of clarity on the face as I have mentioned many times.  That makes it so much easier to paint the small things like the lips, eyes and so on.  Many thanks to Raging Heroes for these marvelous creations!


Wednesday, January 8, 2014

Aw rats...


OK, another cheezy rotter!  I guess this little guy really does like cheese...


Working my way through the rotters.  I think there are 5 more to go.


Skittering through the slime?


It slices, it dices...


Well, you will be seeing a lot of these guys over the next month or so.  I have been working on them for a while.  Ultimately, this will be a unit of Greatswords in Nuln colors.

I have to say that it is really odd to be painting anything Empire related which is not in Altdorf colors!  In fact, I cannot recall painting Empire in any other color scheme.


The black and yellow is going to be a fun contrast to the shiny armor.  It will also give me a chance to reflect a bit of that yellow as I did on the sword.