Sunday, November 18, 2012

Trench warfare... sandbagging it


Another day, another base insert.  I needed to match the previous set of sandbags.  After finding the plasticard, I broke up some sculpey pieces and started glueing.


After attaching my plasticard, I carved a few wood planks from smaller baked sculpey pieces.


I tried to position the boards in an interesting way, but still allow for a big miniature to stand on it.


All the boards are now in place...


I grab the Apoxy sculpt, and sculpt some sandbags!!


First row in position.  After they set up for a bit, I used my tool to create a seam for each bag.


Additional rows are added, laying them out in a very similar way to placing bricks.  It is important to vary the placement, making the bags look like they are 'flexible', and not super rigid.


One more row!


This time, I put some bullet holes in the bags.


I tried to fill in all the potential gaps with Apoxy sculpt, so that it would be easier to make the casts.


Add some rocks...


Now for some sand spilling out of the holes!


More sand and gravel.


One more major detail.  I cut some polystryene tubing to match the shell casings on the floor of the trench.  They are placed on the feeder strip.


I may still add some larger shells, like mortar rounds, but all I have left to do it put some more green stuff on the ammo strip, and that's it!


Saturday, November 17, 2012

Watch your step... chaos everywhere!


Well, primer and paint are drying, Apoxy sculpt is setting up (yes nother base insert!), so it's time for the conclusion of the chaos base.

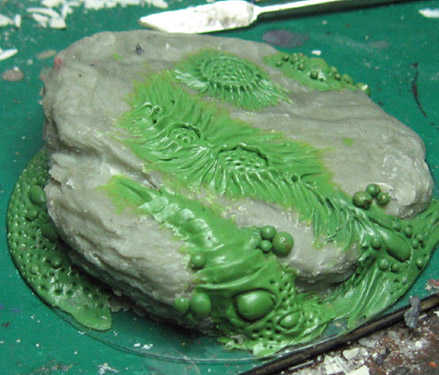
Using the yellow heavy mix of green stuff, I had set a big blob on the top surface of the rocks and created the ovals.  Fron the edge of each oval, I used my tool to stretch the material out away from the oval.  By keeping the tool wet, and having a stickier mix, the long slender pulled texture of green stuff managed to stick to a somewhat slippery surface.


In the previous post, I also had a few bases with this kind of texture.  I began with a pointed blob, and used a flat sculpting tool to create the "ribs".


The edges of the ribs are smoothed out, and I get some more blobs and holes to match the surrounding effects on the bottom of the base.


These "blobs" could be painted a few ways... even as eyeballs!


Going back the "principle of threes", I need one more oval on the top surface to offset the previous two that were sculpted.


Some tiny holes added so that all three match...


I put another set of blobs and pulled texture on the far side of the base for some balance...


And then added some pustules.  A chaos base without pustules? Inconceivable.


After seeing all the pustules n my primary texture area, I felt that balance required a few pustules on the far side.


Some oxide paste, a few rocks, and there you go!!


Coming up... a little trench warfare.


It's pure chaos! Strange rocks...


All right!  Another 80 mm base insert.  This time, I have to make one to match my set that I sculpted a few years ago.  the set was modeled after a base that Cathy created for one of her Golden Demon entries in 2007.


The rocky part was made with tinfoil and apoxy sculpt, just like the last two designs.  Once that had set up completely, it was time to get crazy with chaos!  Out came the green stuff.  I mix a bit more yellow than blue, so that the mix is a little softer and more pliable.


To re-create the textures from the original bases, start by blocking out the 'sores' or whatever you want to call the ovals.


Once the ovals are in, I use my tool to create some small holes.


On the other side of the base, it's time to extend the chaosy bits over the top of the rocks...


I use one of my tools to spread out the original blob, pulling it out from the center.


More little holes are created with the same tool...


And filled in with little balls of green stuff.


It's just about time to extend that piece over the larger face of the rock...


An even bigger blob of green stuff (heavy on the yellow mix) is spread out, and I start sculpting the ovals.


And once again pulling the green stuff away from those ovals.


Stay tuned for the exciting finale!!!!


From kitchens to bathrooms... luxurious marble tile!


Well, maybe not.  But, it is a fun type of base to create, and it can look really neat!

By now, most of you are very familiar with the process.  Start with cork, and put a layer of baked sculpey on top.


I set a smaller chunk of sculpey in the open area instead of the cork...


Just like the skull base, I want to draw out my pattern...


Time to start carving and scribing!  Just like our previous base design, the depth of your cuts is very important.


Here I am using my trusty carving tool!


Some early results.  You can see that I did the smaller tiles in the pattern first.  I found that this is the best approach.


Once the entire basic pattern has been carved in it is time to put in all the cracks and missing tiles.


I used the metal scribe tool that you saw on the skull base to put in those finer, shallower cracks.


Once all the carving is finished, it is time to put down the sand and gravel!


Here are some images of the previous bases I made for this set.  Fun to paint!!!


Friday, November 16, 2012

One can never have too many skulls...


Yes, I know, we have all seen skulls galore on everything Fantasy or 40k.  They are everywhere!  

However, it was time for me to make another 80 mm base insert to match a set I did years ago.  This one is very Inquisition inspired!  I have used it on my own Grey Knights and Sisters of Battle.

The process begins with a layer of cork.


Then we add a layer of baked sculpey, which is then carved and shaved to fit.


My next step is to draw out the design which will be etched into it.


More circle guides to get my pattern symmetrical.


Design drawn!  Time to etch!


Here is my primary tool.  This 'V' shaped carving tool is great.  You do have to be very careful when pressing this tool into your sculpey, since you do not want the cuts to be too deep.  It is better to make a few passes with the carving tool than to make one bad cut, from which there is no return!


For the finer elements, and for the small weathered cracks, I use a scribing tool that Cathy pioneered.  Thank goodness she discovered this technique, as it has been as much of an aggravation/time saver as the rocks were for the previous two base sets!  Yea Cathy!


This view lets you see all that work a bit better.  Ideally, you have deeper cracks and shallower cracks.  This creates more interesting details.


Sand and gravel added, along with a broken bit of marble.


More to come!