Friday, November 2, 2018

Swingin' the Blues


One more of the blue Vikings for you!  These guys are done in the style of my Army of the Dead, just substituting blues for the greenish glow.


Here's a peek at those Army of the Dead:


The Army of the Dead will also be part of the Army Painting series (the $15 level) on the Patreon Page.  I will take your through the basing process all the way through the glowing and corrosion effects.  I have the figures prepped, and the paints are ready!  

There's already 3 complete series up on the page now, and each set of episodes contains 10-13 hours of videos.  Here's a link to the page:


Thursday, November 1, 2018

Monte Cassino: Part 3


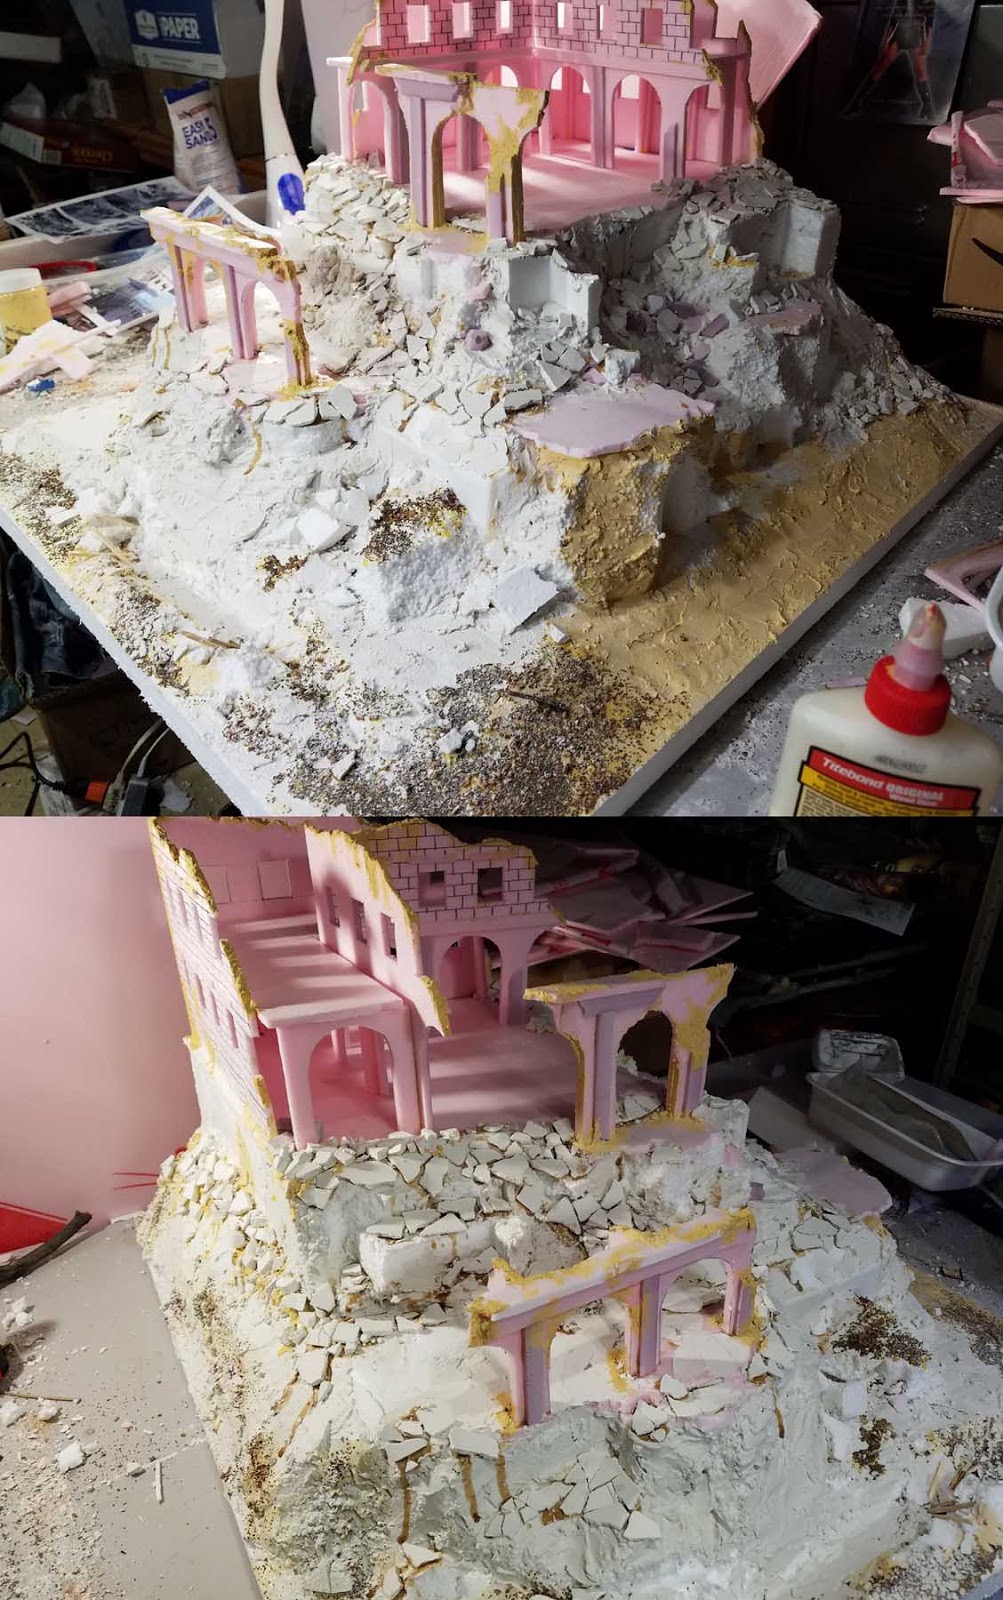
Part three of the Monte Cassino display board sees it starting to take shape!  Of course, it would not be much use as a display or terrain board of miniatures could not fit on it... so let's see a few on the board!


The Machine Gun and Mortar teams were based to make it look like they were taking shelter in the broken colonnade.  While this was done to make them mesh with the display board, it proved to be very handy in making little shelves for them to put all their stuff on!


Now for the cascade of broken tiles and walls!

Just as I described in the previous episode, I pressed the pre cast pieces of plaster onto the surface, with the pressure creating natural breaks in the pieces.


This process was repeated all across the display board at various levels


I had to make 5 or six "casts" of plaster, and I varied the thickness on each.  The inset really gives you a sense of what it looks like up close!


I did have to be careful to keep my 'platforms' clear, however, or there would be no place for the support weapon teams!


I also needed to add some details to the existing walls, such as the stone sills and the brick texture.


I did that very quickly with a pen, trying to extend the pattern over both walls.


I like to put some Oxide Paste on the tops of the broken walls, which makes them seem less like foam, and that the bricks may have been pulverized, etc.


I wasn't going to have lots of extra time to do my usual layering of coarse to fine gravel, so I opted for focusing on the areas which had the least broken plaster bits.

I was going to use some fine flock instead... as I have learned of previous pieces that it almost looks more like dirt/dust than painted sand!


The yellowish material that you see if wood filler.  I found that it can be very good at filling wide gaps, since it is very strong and flexible.  Once that is in place, a thinner layer of plaster can be added over the top.

I think you can see the plastic container in the lower left..  That had left over dried chunks of plaster in it, which made ideal smaller rocks!


I tried to keep the overhanging pieces a bit on the thicker side, and they were set into the glue/plaster mix.  I worked my way all around the Abbey, proceeding down each level of the collapsing sand castle.


The gently sloped lowest level is meant to hold a vehicle or two, but also serve as an easy place to "connect" the other pieces of the terrain board.


Here it is with rubble and gravel applied!!  Stay tuned for the next episode !!


Monday, October 29, 2018

Monte Cassino Display Board: Part 2


Part 2 of the Monte Cassino display board continues with the setup for adding plaster to all the foam work.

As I mentioned in the first post, the interior of this upper level would have to be removed for painting before I could finish that off by adding rubble, etc.


Using those junk pieces of white foam gave me several advantages, one of which was the basic shapes that appeared as I broke them apart.  You can see what looks like the walls of foundations and lower sections of the board.

When I gathered references, I noticed that the intense bombing even tore away parts of the hilltop, taking the structure along with it.  So, I thought these exposed sections might be interesting!


I used the painters tape to hold the white foam sections in place as the glue set.


When I was working on the forest terrain pieces, I noticed that adding wood glue to the plaster mix provided extra strength and adhesion.  That was going to be very important on these near vertical sections of ground and broken walls.

Since you have to add moisture anyway, it might as well add that flexibility and holding power!


As the plaster was setting, I took broken bits of foam and created some larger sections of shattered walls.  The plaster will also cover up the very obvious "bubbles" of the white foam chunks.


Here's a closer view of the scrap chunks of foam added to create a landslide effect.  Again, looking at the references the entire structure resembled a collapsing sand castle.


Now for the really fun part!  I took some plaster mixed with a little more water so that it would flow into some quick moulds.  This would be a larger experiment of something that I discovered by accident on a previous project.

In that instance, I had taken left over plaster chunks from my mixing container and poured those out onto wet glue and plaster on a hillside to create some rocks.

Let's see if I can make some broken floor and wall pieces from this!


Adding even more wood glue to a plaster mix, I would set those plaster chunks down onto the surface, pressing on them a bit.

This pressure caused additional breaks and cracks, and gave them a very natural look.  In the past, I have carved up broken sculpey pieces to create broken walls.  That is OK on small bases, but not on the massive scale of this project.


The cracks and breaks were even more pronounced when they were placed on very uneven surfaces.


More plaster was added to the lower levels also, keeping in mind that sand castle effect.


I tried to keep the plaster as thin as possible, because that could add a bunch of weight.  The use of the white foam certainly cut down on the extra pounds!


Let's not forget the purpose of this project... and that is the primary use as a display board.  I will be doing additional posts on those individual units and weapon teams.

The bases were made to match the terrain as closely as possible.  I tried to leave specific areas on the board for each figure, so that it also became a diorama.  When it is used for games as a terrain piece, these key places will be important for units as cover, line of sight, etc.

Stay tuned for part three!!


Sunday, October 28, 2018

Wild Shot


This is Illethena, one of the characters from the new Wild Assent board game on kickstarter.  The home page has some information on who she is:


Each of the miniatures are one piece, detailed but solid.  They also have quite a bit of detail, as you can see here.


Here's a link to the campaign, which is approaching the final day!


Saturday, October 27, 2018

A Little NMM: Unit painting videos


The Age of Sigmar Medusae unit was a fun way to begin the Army Painter video series!  As with each set of tutorial videos, I start out with the basing.

This involves more than just making a batch of bases... I try to go deeper into how to manage time and thereby your choices.  I give examples of how much time is added by adding various extra effects, and if it is worth spending that additional time.

We all have very little of that precious resource to spend on our own armies, so understanding the implications of each choice can mean the difference between getting it done when you need it or never completing it in the first place!


I attempted to show what impact adding things such as Object Source Lighting and Non Metallic Metals can add in a visual sense, but also how that makes each piece potentially take longer.  

Of course, I am also trying to show how to make those extra effects take less time, and where "savings" can be found!


You can check out all three Army Painter series here on the Patreon Page:


Friday, October 26, 2018

The GreatJon


This GreatJon figure from the Song of Ice and Fire miniatures game was painted in oils, using mostly the Mig Ammo Oilbrushers.  It was a lot of fun to do various blending of colors, etc. a few hours after the paint had been applied to the figure.


The idea behind the use of oils is to make it easier to work on large batches of figures at the same time, as the figures themselves become the palette!  This will allow me to work my way through an army more quickly, but still get the same kind of subtle color transitions as I might on a single figure.

In fact, this figure was painted at the same time I was working on the Winter Soviet Bolt Action minis.


One of my favorite features of the Song of Ice and Fire minis are the weapons.  These are well cast from a stiffer plastic, which means they are very strong,  and have little to no clean up!  Practically a perfect weapon every time.


I am creating tutorial videos for each of the Stark and Lannister special characters, focusing on the basing and individual aspects of the clothes, faces, etc.  These will become available to the Patrons on the Patreon page:


Thursday, October 25, 2018

Monte Cassino Display Board: Phase 1


Stage 1 of the Monte Cassino display board begins with a collection of refuse I have been collecting for years.  Normally I would toss out these styrofoam chunks from various heavy packaging, but it seemed like it could be useful for making taller hills for my Bolt Action terrain boards.

While I could use the sheets of pink foam, piling those up for huge terrain pieces such as these would get very expensive very rapidly!!


I positioned these on my primary sheet of harder white foam, hoping to utilize the flatter surfaces and even the "archways" that you see in the two foam pieces!  You can even see where I started to hack away at parts of the foam in the corner.


Around the stronger central "square" that provided the structure, I took more chunks of the softer foam and began breaking it up to form the shattered hillsides around the monastery.  So many bombs were dropped on it, even parts of the hill itself were blasted away.


I used a heavy wood glue to keep them in place.  If I had some liquid nails, I would have also added that for long term strength.  However, I did put dozens of very long metal pins into each piece of foam, so I suppose that I did have a type of nail!

To create a few 'floor' sections, I used my normal thin underlayment foam.

I will try to include a few of my reference pics in the next post to show you what I was trying to get, and how I had to fudge things.


It is important to keep in mind that this had to serve as a display board and playable terrain piece, so I could not create the entire gigantic monastery on this one board.  In effect, I took several iconic pieces of the building to create this vignette.

I love the blue painters tape, as it helps to hold things together as the glue dries, and it peels away nicely if need be.


The rows of small rectangular windows were a very recognizable feature of the ruins, so I brought out the matt cutting machine to slice those out in a hurry, using the pink underlayment foam.


I made two sections to cover the corner, realizing that I wanted to have a second floor there to display my units, and for subsequent games.


The tricky part would be the interior, which would face into a courtyard.  I also had to match a colonnade with arches that 'connected' the outer ring to an open plaza with stairs.  You will see what I mean a bit later.


As you can see, the interior walls support that second floor, which is where the troops will be standing.  It is important for them to be visible for people to see, and also easy for me to get at during a game!

The insert shows the interior arches and columns that will add support along the outer edges where the rubble piles will be placed.


To make things more complex, this had to be removed for painting, so I could not glue everything in place.  That can create a nightmare of trying to get things measured and in place, as stuff never seems to fit the same when it is glued, no matter how many times you dry fit it!


I will be adding a few broken walls to the interior of that second floor for stability and a touch of realism.  As I will mention several times, you have to balance stability, playability and utility all at the same time, which means compromising on certain things.

I also did not have a huge amount to time to spend on this, so getting the most out of each element is key.


All along, I was using pieces from other armies as a scale reference.


I made a few changes to the interior arches, since they did not fall where I wanted them to.  That is OK, because what too its place was easier to work with, and actually looked better while providing the same support to that second floor.


I think you can see what I was trying to achieve with the archways.  The idea is to have a few broken sections, and even a few pieces of those broken arches on the bases of my weapon teams!

I was able to create a few of those sections for the Machine gun team and the Mortar crew.


Here's what we had at the end of Phase 1.  I needed to let all the glue dry so that I could start to add the largest rubble pieces, and the plaster too!

Stay tuned for the next episode...

This kind of tutorial is something that I am hoping to add in video form to the Patreon Page, but will require a host of new equipment.  I might make that the next "goal" of the Patreon Page.  Another camera, mount and other equipment is still needed.

The side bonus of having this equipment would mean a huge improvement to battle reports, where I can show much more of the battlefield in sweeping views that don't shake, better sound, and a secondary camera for dice rolls and for tactic cards, etc.

Here is a link to the page!