Friday, January 5, 2018

Snow Patch


Part two of the winter terrain series begins with a much larger version of the piece that was created in part 1.  I will be using a much larger scrap piece from the Barbarossa board, and a piece of the thin underlayment foam.


You can see the progressive levels which were added with each section of thinner foam.  I also tried to vary the shape of the edges of the thinner pieces.  When I did the forest board, those tended to end in very neat arcs, and with this board, I want to have them be more irregular.

Note that each piece is cut with a beveled edge, and that I have left some room for adding trees, rocks, and other elements.


I always save my left over pieces!  The two sections on the left are going to be ideal for larger rivers which will need bridges for crossings.  

The image on the right shows that irregular edge I was talking about...


After gluing the pieces together, strips of painters tape were added to keep them from warping or separating during the subsequent steps.


Just as was done in part one, I took the shaved pieces of thicker foam and made 'steps' of rocky outcroppings to resemble slate, etc.


Plaster will be used to manipulate the shape of this hill section, and also provide some structural strength.  The idea is the make a sloping edge which will make it easier for miniatures to stand on the sloped parts.

The gentle slope should be fine for whole squads to march across or gun teams to set up.

If the plaster is mixed a little "drier", you can even sculpt a few additional shapes into the hill section.  However, the more plaster you add, the heavier your terrain piece will be!


The plaster mix is roughly applied to the entire hill section with a palette knife, making sure that I leave those rocky outcroppings exposed.  Adding this plaster mix will fill in all the gaps around them, and make it seem as if they really are part of the hill, and overgrown.


Pine trees are added, sticking the wire bottoms into the foam with some glue, making sure to leave room for infantry squads, gun teams and even vehicles.  Place them unevenly, pairing up a smaller tree with a bigger one, and then placing a mid size tree a little further away.

That is a better and more natural composition.


I set some logs into the wet plaster, which will both look more natural and provide a place for a smaller infantry squad or mortar team to be in hard cover.


Using a wet brush mixed with glue, I brushed over the plaster as I did in part 1 to smooth it over.  The glue now provided a bonding surface for the leaves and gravel which were added in this step.


Now it's time to let this all dry, so that it can be painted, flocked and get its snow texture!

I will show you some images of the new winter tundra battle mat which I am attempting to match as I put these finishing touches on these first terrain pieces.

This is just the beginning, as there are many more experiments that I want to conduct with this board!  I also want to make frozen rivers and ponds, blast craters and defensive bunkers/trenches.

If it is possible to support the Patreon Page, it will give me more time to work on more of these terrain pieces that are so much fun!  That will also allow me to purchase more new materials for these experiments:


Thursday, January 4, 2018

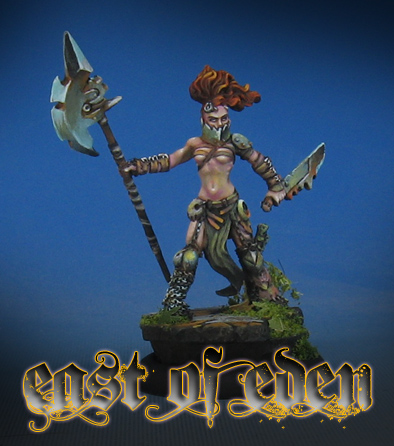
East of Eden


This was an interesting figure to paint, from Eden Miniatures.  They have some fun figures as part of the range, especially some of the bigger creatures and characters.


Obviously there are a lot of muted earth tones on this miniature, which meant that I had to work those into the skin tones as much as possible.  To counter all of the greens, grays and browns, I mixed a little of the Reaper Clear Red into the skin tones, which added a 'rosy' touch to the skin here and there.


Wednesday, January 3, 2018

Winter Returns


It's time to get into the winter swing with a few terrain pieces for my winter Bolt Action board.  This will be constructed for multiple theatres and eras, including the Winter War, Hungary, Battle of the Bulge, encirclement of Stalingrad, fighting around Leningrad, and much more!

I will be using scrap pieces from the Barbarossa board that we did last summer and fall.

A few new materials have been added to these kinds of pieces of late, including spackle and plaster mixes.  Note that I saved the pieces which were shaved off the thick foam section...


You have seen me using these small decorative trees before on the Ardennes board.  They are very inexpensive, and I got them from Amazon. 


I glued a piece of the thin underlayment foam on top to extend the height of the hill.  Some additional glue was applied, which will mix with the spackle which I am about to add.

A palette knife was the perfect tool to spread out the plaster, and even mix it with the glue.  This will make the plaster stronger, and hold the gravel and sand mix which is yet to be added.


Once the spackle has been spread out onto the surface, I cut down the small chips of foam into smaller bits, and layered them on top of each other to create a few rock slabs.  I have done this in the past with my terrain pieces, and it always enhances the look of those pieces.

I'm looking forward to seeing what the flock and snow will look like on these!  In fact, I want to have some cliff edges on which I can hang some icicles. 


I smoothed down the spackle and glue mix with a wet brush, so that I can start placing some larger rocks into that wet plaster.


I had a few different types of gravel and sand, which I didn't get too crazy with, since they will be covered with flock and snow later on.


As you can see, it was a simple matter to shove the trees into the foam with a bit of glue!  I am working on a much larger and elaborate version of this, which will explore the use of the pink foam and plaster a bit more.  Stay tuned!

If you want to see even more terrain building articles, any support that you can offer to the Patreon Page is appreciated!


Tuesday, January 2, 2018

The Darkest Heart


This very nice bust from Black Heart Models was painted mostly with the Mig AMMO Oilbrushers.  Those offer very nice consistency right out of the container, which is identical to 'regular' acrylic based miniature paints.

I printed out a few reference pictures to work from, so that I could try some fun color variations on the face and the armor.  As you can see, I liked the 'hammered steel' helmet, and went with that.

Here's the webpage for Black Heart:


I had a lot of fun painting this bust on a Facebook live episode, which you can view here:


I did some finishing details with acrylic paints once the oils had dried.  Working on large scale subjects like these busts are very fun for me, as I have never gotten a chance to do that before!  

The larger size allows me to incorporate even more of my old 2D art techniques.


I'm planning to do more of these historical busts on future Facebook Live sessions, including Hannibal and Vlad!  If the Patreon page receives enough funding, I can do more frequent live sessions and more Patreon videos as well.  Any contribution is helpful, and makes you eligible for the monthly raffle figure!


Sunday, December 31, 2017

A New Year Dawns!


Earlier this week, I tried out some more new techniques and materials during the final Facebook live session of the year.  I showed some more ways to utilize the mixture of weathering powders and rubbing alcohol to winterize Soviet vehicles.

You can see that episode here:


I had a few Soviet vehicles set up from previous classes which I had taught at Reapercon, where I had demonstrated how to use other weathering powders to work on the shading and weathering of the vehicles.  Now I wanted to show how well that mix of materials can work to make winter whitewash.


Here's another technique and materials combination that I wanted to show.  This is something that I had done with bases, and I wanted to see if it would work on a vehicle!  

Not only did it work very well, I was able to combine them with one more material to make melted snow on the back deck vents.  That was very critical, as it was the one effect I didn't think I could get with the Snow texture and flock!


One more test was creating my own mud mixes.  Originally it was going to be plaster and oil paints as I had seen in other demos, but I already had plenty of weathering powders on hand.

They mixed together very well, and I was able to get everything from a heavy mud mix to a very thin version which spattered perfectly!  This also made some fantastic stains on the fluffy snow, which was an unexpected bonus.


As usual, I had gathered as many reference photos as I could of various color schemes and markings.


This was a very fun video to create, and I learned a great deal!  If you would like to see more live sessions such as this, and watch more live experimentation, please drop a contribution on my Patreon page.  Any amount is helpful, and will also get you a chance to win the monthly raffle figure!


Friday, December 29, 2017

Snow and Steel


Another addition to the very large winter fantasy army includes some classic Chaos Knights.  The old style armor on the horses kinda takes you back to the earlier days of Warhammer...


This was approached in a similar manner to the Beastmen, using a variety of Secret Weapon weathering paints in a series of glazes.


Here's a link to one of that series that gives you an idea how that's done.


I'm hoping to paint one of these in a facebook live session, or even in a patreon video.  While I try to put as much info into the pictorial articles on the blog, sometimes there's no substitute for seeing it painted before your eyes!

Here's a link to the Patreon page if you would like to support that!


Wednesday, December 27, 2017

Pork Chops


Here's another Mierce Miniatures figure painted with oil paints.  I painted it mostly in a Facebook live session, with a link here:


The oils allow for much more "on sight blending", which means that I can slap some paint on the figure and mix it right there... not necessarily making a specific mix on the palette and bringing that back to the figure surface.


The base is a typical Bark and Branch method.  I have a live session on that as well:


As with the other oil painted figures, I did some finish work on this guy with regular acrylics.  In essence, I am trying to use the oil paints as a souped up Shaded Basecoat technique.  

I work on many figures at once, and being able to use the much slower drying oils means that I can bounce around from figure to figure while the paint stays workable.  While wet palettes can keep the paint wet there, it will dry very rapidly on the figure itself.

So, using these oils let me work on massive amounts of smaller figures at once, or even several very large figures!

I am hoping to show this multiple figure technique in a Facebook live session.  Those are primarily funded by the Patreon page, so any contribution there is very helpful for making those happen is very helpful!