Saturday, September 3, 2016

More Mud!


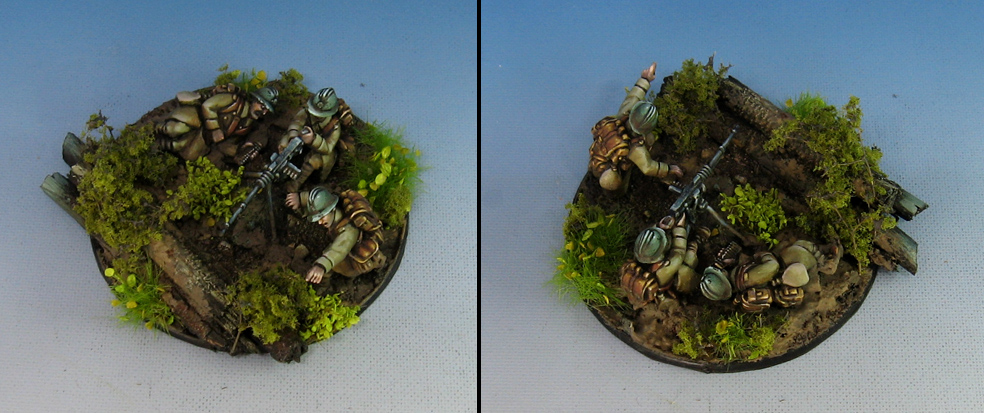
Here's an experiment which I have wanted to try with the AMMO heavy mud products... putting them on 'regular' miniatures and their bases.

While the typical use for powders, pigments and other similar materials are considered ideal for vehicles, I wanted to see what would happen with these same products on one of my Bolt Action weapon teams.


Just as I did with the half track vehicle in the last AMMO article, I started out with the moist ground heavy mud.  Since these are supposed to be more of a forest base in late spring and early summer, a bit of wet mud around the gun emplacement would make sense.


It wasn't just the color I was after, but the texture as well.  Once this material dries, it actually feels like mud when you touch it.  This can be applied very thickly, which saves a lot of time... no need to build up layers.


I also wanted to see how this would work and look on miniatures.  The bottom edges of the coats and the boots were definitely a well suited location to test this out.  Since it is an oil based material, I could go back in later and manipulate it with another brush... softening an edge here and there.


I even sprinkled and brushed on some powdered pigments while the heavy mud was still fresh to see what would happen!


Once I mixed that in with the heavy mud, I got some very nice clumps of semi-dried dirt.


I was very happy with how a quick application of the AMMO muds changed the entire look of the base! It is important to note that the base had already been painted and darkened down to set up these lighter colors.

This is all part of the pre-planning and chess match that is needed with multi-step materials and techniques such as weathering.


Here are a few shots in the photo booth prior to the addition of foliage.


Voila!  Shrubs and such added, which now play off the warm but neutral mud colors nicely!

Friday, September 2, 2016

Sneaky Skinks


There were Skinks of every color in the Lizardman army... turquoise, tan, red, purple, blue, and green.  They always had a very interesting look on their faces!


The scales along the back were always fun to paint, while the Skinks with head crests were great to make stripes or other patterns.


Again, I have lost track of how many that I painted for the army.  It had to be over 200!


That means that lots more are on the way, so stay tuned!

A link to what this unit looked like:


Thursday, September 1, 2016

Arial Attack


Here's another thrower from the newest Samurai Orc Blood Bowl team.  I have been putting final details on them, and now I can also do the photography on the team.  I'm really looking forward to some pictures of this team in the Stadium!


This element of the team was a little more difficult than the earlier figures, since these required much more armor to be sculpted on.  As I mentioned with the first Lineman, with each time I make one of the teams, I get better and more efficient with that part of the sculpting.


I figured out some much easier ways to sculpt these armor sections, which not only follow the flow of the arms better... they are also easier to paint.  The key was being able to get all the 'ridges' in each plate more regular and even.  On other attempts, these got a little out of whack, and that made painting clean lines a real challenge.


Stay tuned for some Blitzers coming your way!!


Wednesday, August 31, 2016

Let's Get Happy!


It's been a while since I have used the Happy Seppuku moulds for non-sci-fi basing, but my current projects made these two moulds just perfect for the task at hand!

This is the brick and cobblestone texture, pressed into the usual white sculpey.


I want to make a few different village/urban style bases for the winter Americans stuck in Bastone during the Battle of the Bulge.

These textures are nice and easy to 'break', as they have so many natural fault lines!

Here I broke off the edges to roughly fit the base.  I'm leaving a little extra space for broken bricks and even snow piles.


Once I have the overall shape, I cut out a few of the bricks with my wood carving tool.


This is repeated on a few other bases... but I want to save the brick texture for something else...


Most of the bases are going to be made from the cobblestone texture, so that the brick sheets can be used for the remains of upright walls.


Just as I did with the bricks, I tried to cut out a few missing stones, especially around the corners.


This U.S. MG team will be taking some cover behind the remains of a brick wall.  Broken bricks and some snow will also be placed on the periphery of the base.


Whenever I bake sculpey sheets, I always take my exacto knife and cut out some rows of bricks.  I make a variety of sizes, all the way up to large stones of cinder blocks.


I chipped away at the brick wall section, using my large bricks as a curb.  It's best to chip away at the corners of the bricks to make them look a little less fresh.


The basic setup of the base is now ready for the final touches, such as the piles of broken bricks around the edges.


This Vallejo paste will be a perfect medium in which to set those bricks.


As I mentioned previously, it's best to chip off the corners of the bricks before you place them.  If you are building an entire wall from them, you could do that once all the bricks have been glued in place.

Some lights sand and gravel is added to help keep them where I want them.  It's important to remember that snow will be put on top of most of this.


I kept working around the edges of the base, putting bricks in as random a pattern as possible.


A little sand and gravel over the top, and this is just about ready for painting!


I will be adding the same kind of broken brick textures to the other small bases too.  Once these are painted and the snow added, I will do another post to show you how those look!  Stay tuned...


Tuesday, August 30, 2016

Ride of the Sabre


Here's another fantastic miniature from Albino Raven miniatures.  There is a wide variety of genres covered in the line... everything from fantasy miniatures to modern era soldiers, as well as larger and smaller scale figures.

Here's a link to the website:


There was certainly a lot of action going on with this figure, and a lot of dramatic lights and darks to enhance that look.  


The base is constructed from tree bark and branches as usual.  I really love how such simple materials can make something so realistic and dramatic!


I had to be sure that the warm tan colors of the sabertooth didn't get lost in all the natural tones of the wooden surfaces, so those were a bit more saturated than those background colors.  The rider was painted with the most blueish-gray tones to make him stand out.  

Once again, an instance of controlling contrast mostly through the brightness or purity of color, instead of basic light vs dark contrasts.


He's also here:


Monday, August 29, 2016

Enemy at the Gates


Here's the first color test figure for the Isorian faction from Gates of Antares.  You have seen me working on lots of Bolt Action stuff from Warlord, but this is going to be quite different! 

Getting back into the Sci-Fi miniatures after all the steampunk, fantasy and historical figures will require a very different mindset.

This genre does allow for a much wider and varied palette, which is always a good thing.  Letting myself get too locked down in extremely muted tones permanently would make things boring, and I would miss out on all kinds of great color combinations and effects.


I had a few goals with this faction.  First, choose a scheme that would be very different from the origainl box art.  Next, I wanted to emphasize all the glowing elements, since Object Source Lighting is a huge obsession of mine!  Finally, I can dive into certain color combinations that I have had to leave behind for a few years.

Shapes such as this are a very nice way to work on "two tone" color sets.  That is, using the tans and oranges in one area, while using a cooler, deeper red around the shoulders to give me a better contrast for the weapon glow.

I like to call this "color chess", as I try to plan and manipulate opposing colors, lights and darks, and even the amount of saturation to maximize contrast.


Best of all, I get to dust off and bring out all the different Sci-fi theme bases from the past, such as this design.  I have also worked on a massive variety of new bases too!


Just as with Bolt Action, there are a number of Gates of Antares figures which will be appearing here on the blog!  Multiple factions and armies are under way, so stay tuned!


Sunday, August 28, 2016

Wee Little Skinks


I cannot count the number of Skinks that I painted for my Lizardman army, but I do know that the vast majority were of the hand weapon and shield variety.  Only about 24 of them were the blowpipe skirmishers.


I had no Saurus in the army, and just a small unit of Temple Guard every so often when Mage Priest Babo was on the scene.  The concept of the army was centered around "Temple Restoration Crews", comprised mostly of skinks.

Skinks on terradons scouted from above, while skirmishing skinks guarded the outer defenses on the ground.  Other Skinks prodded huge Salamanders about, as others directed Kroxigors to move heavy stones from shattered temples and move the repaired stones in their place.


The largest stones would be moved by the Stegadons, which also doubled as Engines of the Gods with, you guessed it, a Skink Priest on top!


There is an entire story written about this army, called the Legend of Sticky Wikkit... the greatest of all the Skink Chiefs.  Here's a link: