Wednesday, June 15, 2016

Sacrifice of Heroes


As you saw in the previous episode of this battle report, the German reinforcements had come in earlier than I thought, and in the worst spot.  Still, the commitment had been made, and the advance would have to press on no matter what.


At the same time, attacking aircraft pounced on the artillery battery.  While I had kept one Lorraine behind for anti-aircraft cover, there were not enough, and repeated attacks continued to grind down the battery.

In the future, even more AA support will be left behind!


Sadly, the flanking maneuver pulled off by the Panzers would claim a prominent victim.  Charles himself!  Alas, he was caught out in the open, and no amount of evasive actions would prevent his Somua from being destroyed.


There could be no time to dwell on such a loss, with the far objective just one turn away!  The Somuas and the Hotchkiss units were sent forward.


At last, one of the objectives was in sight.  It was being guarded by just one Panzer T-38.  If that could be taken out, the sudden death factor might be enough to secure a French victory!


But just as hope was beginning to dawn for the French tankers, multiple units of German light tanks speed onto the battlefield.  While they had little hope of destroying the heavier Somuas, the Lorraine transports would prove an inviting target.


Try as they might, the Somuas were not able to take out these lighter vehicles, despite point blank firing!


The German guns struck home on the unit of infantry in their transports.  Several were destroyed, forcing the occupants out into the open.


This seemed to be a disaster, but the intrepid machine gun toting infantry were undeterred. They promptly rallied, and immediately launched an assault into the town!  

As it happened, they had approached from a lightly defended part of the town, which meant they could overwhelm the few defenders in the area, and claim control over the western half.


Suddenly, the forward objective was now threatened by a pincer advance from infantry.


The contest of act and react continued as the light German tanks bypassed the town to take on the exposed MG unit which was approaching the pinned down German infantry holding the second objective!


The battlefield was now a swirling maelstrom of destruction and confusion.  What was a front line was now the rear, and flanks seemed to have no consequence.  A deadly merry go round!


With all of their timely reinforcements on the board, the Germans could now attempt to isolate certain units and grind them down.  While it had been a relative stalemate to this point, these later moves would prove to be too much for the overstretched French units to handle.


Eventually the impact of all those reinforcements was felt in a devastating way.  With the troops out of the Lorraines, the threat of ant-aircraft fire was gone, leaving the skies open for one last air assault.

This, in combination with the fast moving scout vehicles and tanks meant that the vital objectives could not be taken.  Valiant sacrifices were made... perhaps precious time was gained by this action.

One can be sure that more attempts shall be made to stave off complete disaster!  Stay tuned.


Tuesday, June 14, 2016

The March of the Lorraines


After the first game of Flames of War, I determined that mobility would be very crucial for any future battles.  Over and over, foot slogging units would arrive late and far out of place.  Also, air power was proving to be absolutely devastating.

That's what prompted me to scratch build those Lorraine Carriers.

They would now get ther first test on a wonderful table set up by Paul at Draxtar Games.


We did some reworking of typical scenario conditions this time around, since I was not able to build everything that would eventually be needed.  We even tossed in Charles Du Gaulle, just to see what kind of effects that might have on this type of setup.


This does not show all of the German force, which was certainly a rapid strike force with lots of vehicles!  They were not incredibly powerful, being early war tanks, but very high numbers of fast moving threats.


The "Charlie Effect", as I now call it, basically set up a nice little drag race off to the left side of my lines.  I had to advance far down the long edge of the table to claim one of the objectives.

Speed would be essential, as the German forces would be getting reinforcements soon enough!


My Somuas and Lorraines got a nice head start with my hero's special ability.  As you can see, they offered each other mutual protection... the tanks protected the transports from other vehicles and infantry, while the Lorraines gave vital protection against attacking aircraft!!


The far off objective marker meant that the Somua unit would have a long way to go deep in enemy territory... could they reach it before all the reinforcing German armor arrived?  I was hoping to at least be in position before their arrival...


That advance was slowed somewhat by the transports, which are considered slow tracked vehicles.  I was tempted to rush the tanks forward, but that would leave them quite vulnerable to that air support.  The terrain also meant they would be bunched up in that effort to rush the objective.

I had to slow them down just enough to remain in sight of the anti-aircraft guns of the transports.


There was a road which provided a measure of protection from the entrenched German positions, but it would be a prime target for any reinforcing tank platoons, of which there were many!


Charles determined that the road would have to be used, regardless of the potential dangers.  At the same time, a small detachment of Hotchkiss tanks was sent towards the town to flank the defenders inside it.

Perhaps that move could split the attention of any arriving reinforcements...


The fight for the other objective in town became an interesting infantry and artillery duel.  The bombardments were not very effective, but the MG unit dismounted from their transport was proving to be very dangerous to the German position.  

Perhaps this could be the maneuver which would divide the attention of the Germans just enough!


Despite a continuous bombardment by the 75mm artillery, the dug in Germans could not be sufficiently pinned to cover a French advance.


Oh no!  The armor support not only arrives early, but exactly where the Souma column is most vulnerable.  It will be difficult to avoid major casualties here!


I had avoided putting too many vehicles jammed together on the road, worried about them being trapped there if the first and last tanks were to be knocked out.  Apparently that is not something that I needed to worry about.  Next time I will make more use of these 'tunnels' through the hedges.

Can the armor and infantry elements combine their advances to claim the objectives?  What role will the troops in the armored carriers play?  Find out in the next episode: Sacrifice of Heroes.


Monday, June 13, 2016

Prepare for Battle!


One more very fun miniature from Demigods Evolution.  Just like most of the other figures from the range, there are multiple options for the arms, with weapons or banners, and so on.


I also enjoyed working all the various filigree into the golds/brass finishes.  The blue marble was done to provide a nice contrasting color to reflect into those golds.


The base was pretty extensive, built up with cork and sculpey.  I put a penny next to it to give you a sense of it's size.  He's pretty big!


He's also here:


Sunday, June 12, 2016

Massive Firepower!


Lookie what we have here!!  It's the gigantic new heavy support for the Dark Nation.


This great beast is the Wendigo, and he is not shy about carrying along a set of rocket launching tubes powered by the dreaded RJ-1027 energy.


The base is a size of a DVD, which gives you a sense of the scale!  Ironically, for something so huge, the concept art and the nature of the critter itself called for a relatively restricted palette.


With one notable exception, that is.  The glow from that huge gun had to be as firey as possible, which meant that all those muted grayish browns would be the prefect foil for such object source lighting.


All the elements of contrast were available.  Light vs dark, saturated vs muted, and warm vs cool tones.  As you have heard me call it before, it is the triple play or hat trick of contrast, depending on your sport! :-)


It was nice that I could do a lot of the glow on the face, because all the deep sculpting elements could be brought out even more, and even make the face look more sinister.  Bright lights right under the face have a tendency to do that, even when it's not something as colossal as the Wendigo.


These views from above show how the base not only puts him in a 'setting' but it also stabilizes him in one place, as the thickest bark is right under the feet, where the pins are. 


Lookin' right at you!!


Now for the ultimate size comparison, with a standard hired hand on a 32mm base!


Saturday, June 11, 2016

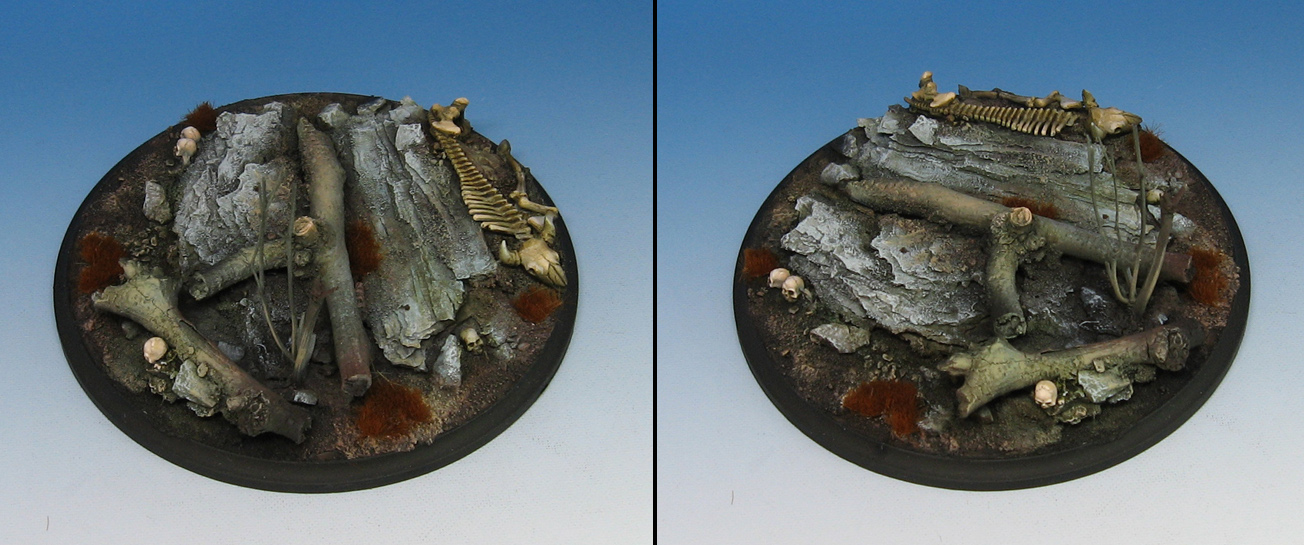
Secret Skeletons


Soon you will be seeing the massive critter that goes on this huge base, which is the size of a DVD!  For now, I thought you might like to get a look at what the base looked like before I put the Wendigo on it.


Most of it is made from the usual bark and branch method.  I have a tone of articles on that in the basing section.


What has been added to give it that Wild West feel would be some nifty skulls and skeletons from Secret Weapon miniatures.  I have put the skulls on lots of bases over the last few years, but I have not had as many of the skeletal bulls.  A giant base such as this seemed to be just right for that kind of bleached beast!


Stay tuned, as I show off the images of the gigantic completed Wendigo from Wild West Exodus.


Friday, June 10, 2016

The Army of Fire


We return to the realms of Mantic and their new Kings of War miniatures.  I have been working on a number of them, especially the Salamanders.


I have done a number of posts about them, showing what the sprues look like, etc., as well as different color schemes.


Some have been more "traditional" theme, and with lots of jungle vegetation.  This time around, I wanted to show the "Army of Ash" color set that I was visualizing for my own army.

The plan was to have a unit of the Salamanders advancing through a jungle, scorching it as they moved.


The weapons they carry really lend themselves to that firey theme, so I gave that a test run.  I really enjoyed this guy!  It was a classic contrast of the super warm and intense fluorescent oranges next to the very muted cooler colors... mostly grays.

I think this could make quite an interesting movement tray of 22-25 figures!!