Sunday, June 12, 2016

Massive Firepower!


Lookie what we have here!!  It's the gigantic new heavy support for the Dark Nation.


This great beast is the Wendigo, and he is not shy about carrying along a set of rocket launching tubes powered by the dreaded RJ-1027 energy.


The base is a size of a DVD, which gives you a sense of the scale!  Ironically, for something so huge, the concept art and the nature of the critter itself called for a relatively restricted palette.


With one notable exception, that is.  The glow from that huge gun had to be as firey as possible, which meant that all those muted grayish browns would be the prefect foil for such object source lighting.


All the elements of contrast were available.  Light vs dark, saturated vs muted, and warm vs cool tones.  As you have heard me call it before, it is the triple play or hat trick of contrast, depending on your sport! :-)


It was nice that I could do a lot of the glow on the face, because all the deep sculpting elements could be brought out even more, and even make the face look more sinister.  Bright lights right under the face have a tendency to do that, even when it's not something as colossal as the Wendigo.


These views from above show how the base not only puts him in a 'setting' but it also stabilizes him in one place, as the thickest bark is right under the feet, where the pins are. 


Lookin' right at you!!


Now for the ultimate size comparison, with a standard hired hand on a 32mm base!


Saturday, June 11, 2016

Secret Skeletons


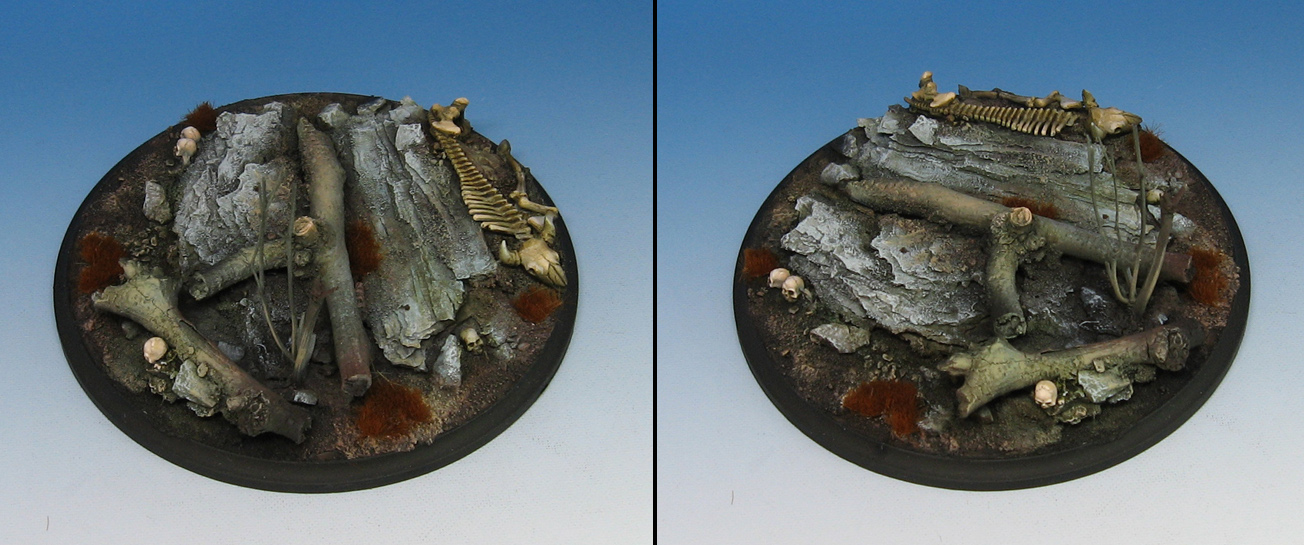
Soon you will be seeing the massive critter that goes on this huge base, which is the size of a DVD!  For now, I thought you might like to get a look at what the base looked like before I put the Wendigo on it.


Most of it is made from the usual bark and branch method.  I have a tone of articles on that in the basing section.


What has been added to give it that Wild West feel would be some nifty skulls and skeletons from Secret Weapon miniatures.  I have put the skulls on lots of bases over the last few years, but I have not had as many of the skeletal bulls.  A giant base such as this seemed to be just right for that kind of bleached beast!


Stay tuned, as I show off the images of the gigantic completed Wendigo from Wild West Exodus.


Friday, June 10, 2016

The Army of Fire


We return to the realms of Mantic and their new Kings of War miniatures.  I have been working on a number of them, especially the Salamanders.


I have done a number of posts about them, showing what the sprues look like, etc., as well as different color schemes.


Some have been more "traditional" theme, and with lots of jungle vegetation.  This time around, I wanted to show the "Army of Ash" color set that I was visualizing for my own army.

The plan was to have a unit of the Salamanders advancing through a jungle, scorching it as they moved.


The weapons they carry really lend themselves to that firey theme, so I gave that a test run.  I really enjoyed this guy!  It was a classic contrast of the super warm and intense fluorescent oranges next to the very muted cooler colors... mostly grays.

I think this could make quite an interesting movement tray of 22-25 figures!!


Thursday, June 9, 2016

The Savage Heart


This is the fourth Wereshewolf from the amazing set by Raging Heroes.


All of these figures have been very fun to paint, with dynamic poses and tons of details.


I tried to paint each one in a slightly different color scheme.  In many ways, this fourth and final miniature in the series has the most 'traditional' color scheme.


As I did with the other three figures, I tried to continue the 'built in' base rocks... that is, the angled rocks that were a part of the sculpts.  This one had a rather large rock sculpted under the hand and foot.


With the set now complete, I will take some group shots!  Stay tuned for those!


Wednesday, June 8, 2016

The Armored Fist


With the hurriedly constructed building drying and curing, I made some even more hastily build road sections.  The night before the test battle, I took the airbrush and some colored primers to both the buildings and the roads!


This was the result.  I didn't get too crazy with the painting at this point, because it was more about the physical size and playability factor.  Would the moveable floors hold up to the weight of the metal French gun teams and squads?  Did I match the scale of the intact buildings which one of the other players had purchased?


In fact, the colors I used to paint them was influenced by those on the intact structures.  All of this had to be done with some pictures passed to me over facebook, so I was kind of anxious when we started setting them both on the table!


Success!  The mortar team fit quite well, and did not tip over or anything like that.  The sight lines were perfect, and I was able to give each structure its own personality.  In fact, each wall of the buildings had a different characteristic.  


The lone anti-tank rifle looks for troop transports heading down the road.  Once more, those upper floors were designed to be the perfect sniper nests, so this view made me quite happy!!


Let's not forget about the roads!  While I had used my own vehicles as a size reference, I didn't have any wider footprint vehicles such as a Panzer to place on my roads as I made them, so it was a relief to see how nicely the PZ 4 fit on the sections.

Not too wide, but not too narrow!


The primary reason we wanted these sections was to create far more interesting battle scenarios.  I will describe what I created a little later.  We wanted to have the roads to help vehicles cross the board more rapidly, thus freeing up the long axis of the board to battle scenarios.

Also, destroying the roads would be a new kind of objective... even cratering them with demo teams and/or aircraft!!


The floors held up nicely to even more metal, and the sight lines worked beautifully. 


Defending a crossroads was a prime victory condition for my future scenarios, and this quick set up convinced me that I had done my job.  I was able to fit all the sandbags and tank traps around that intersection, and it easily held a 10 man squad.


As a labored away with the pink foam, hacking it apart into all those wall sections, this was the ultimate reward that I had envisioned.  To see this view was incredibly exciting for me.  A lot of hard work, well worth the effort.


I tried to create a multi tier format for the scenario.

The Germans could get 10 VP's for being within 10 inches of the center of the crossroads.  They could earn 5 VP's for every unit that exited off the Allied edge of the board (we were deployed on the short sides of the board, obviously!)  Three points were awarded to either side for unit kills, and one point for each table quarter held.

The Allies would get 15 points if they could keep that entire intersection area clear of Boche.  That meant that all the buildings would have to be emptied of German units.  Very unlikely, so it was probably going to come down to unit kills and table quarters.

There were other special deployment schemes as well.  At some point, I hope to show a genuine battle report to you!  But, it all has to start somewhere, and that's by building up a table.

Stay tuned!!!


Tuesday, June 7, 2016

A Town in Ruins


Phase two of the ruined buildings continues with the addition of sand and gravel to the piles of bricks around the outer edges of each structure.  Once again, this is as much about adding some strength as it is visual.


I worked my way all around each building.  Another extra touch could be a larger pile of brick/debris in a doorway, blocking the path of troops.  This would give even more character to the building, making it tougher to get inside, but also a touch easier to defend!


To make the partial upper floors, I cut some pieces of the thin foam to size, which would then be covered with wood texture.


I had some balsa wood, which was cut into strips of various widths.


While I worked on the individual floors, the buildings themselves could dry and cure.  You can see that I have positioned the first floor section on one of them.


I didn't get too crazy with the placement of the floor boards.  Yes, I could have gotten more fancy, but they are supposed to be more rural structures, which have also been pretty well blasted apart! :-)


Also, I took some broken boards (probably the remains of roof joists), and placed those on the floor.  I tried to make interesting piles, but kept them as low profile as possible so that miniatures would not have a hard time standing on them.


I repeated this process on the ground floor as well.  Since this covered more area, you can see that I tried to make more board sections.  However, this part of the building is going to be far less visible, so I had to remember not to spend too much time putting in small details which might never be seen.


If you recall from the earlier images, I had wanted to make a blocked entrance.  A pile of boards was a very fast, very effective way to do just that!


Here's a scene with all the buildings and the floor sections.  I modified them slightly once I realized that it would be wise to make them removeable.  Once we tried them out in a test game, that decision proved to be exactly right!

I have a series of images showing them with a touch of paint, together with some road sections which were made at the same time.  Hopefully these articles will prove to be handy for you!


Monday, June 6, 2016

Houses in a Hurry


Just like I needed the Lorriane transports in a rush... and the 105mm howitzer... a host of terrain was needed for our weekend test of Bolt Action.

While Dan was providing the intact buildings and forests, we needed ruined buildings and roads.  This post will focus on the buildings.

The supplies are very simple.  Thin pink foam, glue, and oxide paste!


The first step was to take some measurements and generate some simple building shapes.  These were designed to reflect the structures that Dan was providing.  My original building was 'intact', which meant that I could make ruins of various levels of destruction. :-)


I cut out each wall, making sure to vary the heights as much as possible.  This creates interesting sight lines, and even makes some parts of the buildings more vulnerable than others, or less desirable for firing positions.


Since they are ruined, I wanted to show how they might have gotten that way.  I might still add some "small arms fire" divots, but the larger shell holes were the most important.  I was even tempted to make some major blast holes in the wall for additional firing points.


Four walls ready to go!  As you will see, it's important to make the heights line up.


To glue them together, I used a bit of Elmer's glue, and some blue painter's tape.  The tape would hold things in place as the glue dried.  I could cover the tape with oxide paste, which was going to be applied for texture anyway.


You can see the walls set up nicely.  These will be very strong for the comparatively delicate construction.


This view makes it clear how there will be multiple exposed levels.  Only one portion of the building will have the second floor available for firing positions.


To add some quick detail to the outer walls, I cut up strips of the leftover pink foam into small bricks.  These would double as reinforcement of the walls too.  I used some oxide paste and glue to give myself a decent material for attaching the bricks.


I tried to place them as randomly as possible, even creating small piles where I could.  Eventually I want to make larger piles, which could be placed outside the buildings for infantry to use as cover, or even to hinder movement.

Stay tuned for more scratch built super cheap items!!!!