Monday, January 18, 2016

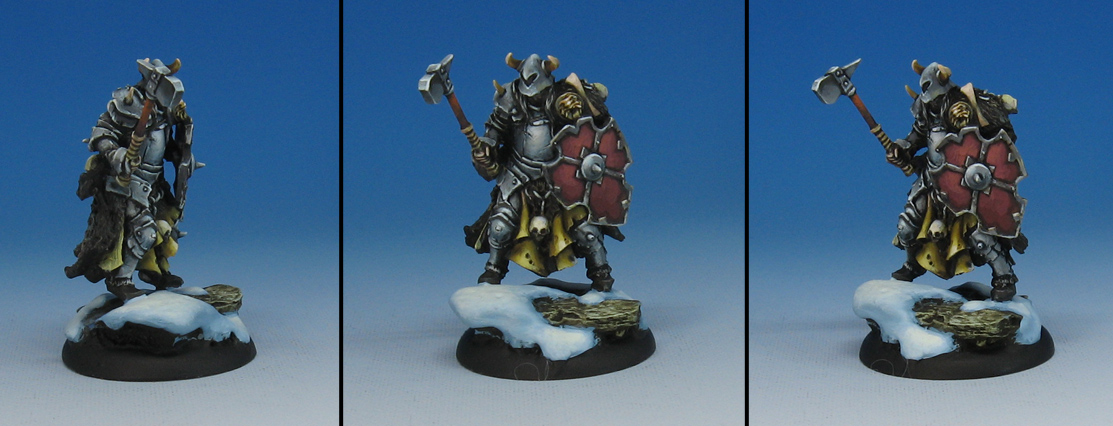
The Man in the Iron Mask


Here's a fun Chaos warrior style mini from Red Box Games.


As before, he is part of the gigantic batch of similar theme figures which spans a number of different miniature companies.


Lots of these guys yet to come, so stay tuned!


Dynamite!


Here are a few images of the completed Lady Dynamite from Magic Reality Miniatures.  I may still put on some weathering powders and other effects, but I thought I would wait until it got a bit warmer for spraying fixative.

I really liked the extra elements that came with the figure, like the sticks of dynamite and the boxes of gunpowder!


I followed the concept art color scheme, just to check them out side by side.  It was a lot of fun to paint, and the gears on the 'base' made it very easy to create this vignette around it.


The face had a lot of fine details, so I was able to get a neat expression on her face.

These views also give you a better sense of how the gear on her base looks with the larger base that I made.  Seeing these makes  me very glad that I made sure to put that slate blue color on the iron!  It does help make her pop with all of the warm colors in her clothes. 


The rust helps to keep the two surfaces tied together, however. 


Be sure to check out the Magic Reality Miniatures website:


Sunday, January 17, 2016

Almost There!


If you are not too afraid to watch, the variation on the Shaded Basecoat technique continues.

What I am doing here is very similar to what I used to do with my watercolors... that is, taking some salt or some other substance and putting that on the paper with the wet paint.

Those would interact in very interesting (but unpredictable) ways, and created some very interesting effects along the way.  I would build from these random effects, letting that chance array of colors decide the direction for me.


As for this figure... there was a lot more than just the miniature itself.  I was trying to make a little vignette here with the iron base, gears, etc.

Since so many of the colors on the figure would be warm browns, tans and siennas, I put a cooler seafoam green color in the mix for the base.  Later on, this would really show off the rust effects!


I am mixing that seafoam green with some of the glaze colors, such as umber and black.


I tried to keep up with the main base and the gears on the figure, so that they would maintain the same kind of spotlight effect.


They are just about ready for some rust and weathering!


More definition was also being placed on the figure, developing the middle tones and lighter areas.  The important thing is to continue working on all sections at once, and not letting yourself get locked into one tiny area!


Now for some rust!  It was a simple mix of a rust colored paint and the sepia wash to keep it from getting too opaque.  Once again, more random things would happen when this was applied.


I focused on the recesses, as the oxidation tends to occur there.


To darken the rust in some places, and even get an oil stain look, I added a bit of Reaper Blue Liner paint... a very high intensity dark paint.


Rust is also added to the gears on the figure...


Getting there!  I continued to work on the figure, defining details on the face, working out what sort of colors I wanted on the crates, and more.  The crates needed to have a little variety in their color tones as well.


In nearly every layer that I have been painting on this figure, I have been mixing in some of the wash colors with my regular paints.


Since I was working "globally", I could always see when something was getting too light, or not light enough, right away.  That's the big advantage of not working on only one tiny part to the exclusion of the rest of the mini.


The images got a little burned out here, but in this stage I was going back in with very dark glazes to define some areas better or make the highlights seem brighter.


Just about done!  I may still add some weathering powders or do some kind of oil slick/grease effects, but I want to take pictures of how it looks first, so that I can get a comparison of the two!

Stay tuned!


Saturday, January 16, 2016

The Variety of Reaper


Here we have some fun examples of the vast variety of Reaper minis.  Monsters, critters, sci-fi, fantasy, pewter or BONES... it's all there.


You can find just about any miniature you need with the figure finder on the Reaper Miniatures website.  You can break it down into over a half a dozen categories, and that really saves some time!


With Kings of War becoming so popular, I have now found even more uses for all the BONES minis.  They make excellent monsters and large infantry for hordes, etc.


You can even fill out your units and Heroes with every race you might need.  The same is becoming true for sci fi as well as Zombicide figures.

Most of my Zombicide characters are custom made heroes based on the type of miniature that I chose.


Here are a few different looks at the group shot on a different color backdrop...


The Reaper unicorns have proven to be very useful horses for my games of Wild West Exodus!!


Another approach


I thought I might show you a few images of the painting process of the Magic Reality Miniatures Lady Dynamite.


In the previous series of Shaded Basecoat posts, you watched me go from middle tones to light, followed by glazing to shade and tint those lighter colors.

I will use these glazes alone to take the colors from the somewhat flat grayish white to darker tones. 


I also want to show you the use of the Secret Weapon washes that I call opaque such as the Concrete.


When a wash color such as Concrete is mixed with other washes, or even regular paint, it will lighten the color!  I know that most of you see glazing as something that only darkens a color.

Once I discovered this concept, it opened up a whole series of new techniques and options!


When I mix the concrete with some of the very intense Vallejo washes, some very interesting chemical interactions take place.  The colors sometimes push each other away, not mixing completely.  This is very useful when you want to get random color effects on something like weathered metal.


I added more dark colors to the base, this time mixing in some regular purple grey paint with the glazes.


The same kind of technique would be used on the figure itself.


Just as with the base, I mixed some of the glaze colors together, keeping that concept art color scheme in mind.


I can see the horrified looks on your faces right now!  This is something that is always entertaining in my live classes.  Keep in mind that all I am trying to do here is drop down some darker tones, and get a little variety in those darks.


The Concrete was was also mixed in with the different glazes at this time.


Before you all run away from the screen in horror, I wanted to show you an image from barely 20 minutes after the previous images were taken.

As we like to say, you have to accept that the figure is going to look pretty nasty at first, and seemingly out of control.

Since I am going back to my 2D art roots, I don't feel like any control is lost! :-)  Stay tuned for more...


Friday, January 15, 2016

Blood and Poison


There's one more touch to add to those ninja archers... some blood/poison blades.

As I mentioned in the previous post, the idea behind this is to create something that can be seen very easily on the game table in order to distinguish two units from each other easily.

You can see the products that were used in this image.  The heavy gel, which I use for everything from water effects to fire to fur sculpting, is an all purpose must!  Then we have some Secret Weapon miniatures realistic water and Vallejo fluorescent yellow.


I thought I would try to get a mix of blood and poison on the blades, so the first layers would be a mostly blood color with a touch of poison.  The fluorescent yellow is mixed in with the deep red and Realistic Water, and allowed to flow down the blade.


I am not mixing in the heavy gel just yet, since I am focused on getting some blood onto the blades first.


I thought it might also be interesting to have some drips and splatters from the blades on the ground and snow piles.


The first layer on the snow was a very transparent application of Realistic Water with a little of the red mixed in.  Additional layers were added in the center of these spots, in order to make it look like the blood was starting to be absorbed into the snow.

Having hard lined red dots on the snow would make it look like blood hitting a ceramic floor!  I thought this would keep the snow effects going.

If these were my own minis, I would have added a tiny layer of snow flock over the top, and let the blood drops naturally soak into that rough surface.  However, that's not an option here, as I must keep these snow bases in line with the dozens of other bases that were done before.


Fortunately there were a number of instances where the snow piles were right under the blades, so I could keep doing the soaked blood effect again and again!


And here's a quick shot of those bases...

I had so much fun making these kind of blood effects on my Adepticon Dark Eldar army, I did a video as part of my instructional series.  It was called "Bloody Mess", and it was lots of fun!!

Here's a link to a YouTube preview:


To try and simulate a very obvious poison color, the fluorescent yellow was mixed into the heavy gel, which could create some drips on the blades.


I put the yellow/gel mix onto the tips of the blades, letting the darker blood stains make it stand out.


On these horizontal blades, it was neat to add a few different drips hanging from the knives.


One more view with all the poisoned blades!!  Stay tuned for all the individual mini photos!

If you are interested in the "Bloody Mess" video, you can get that directly from me, and don't forget many more titles here: