Saturday, June 13, 2015

Hoof and axe


Today we have the beastman champion from Mierce Miniatures.


It was fun getting to paint mass amounts of blood effects on the weapons of this group!


Three down, seven to go!


A surprise in every corner


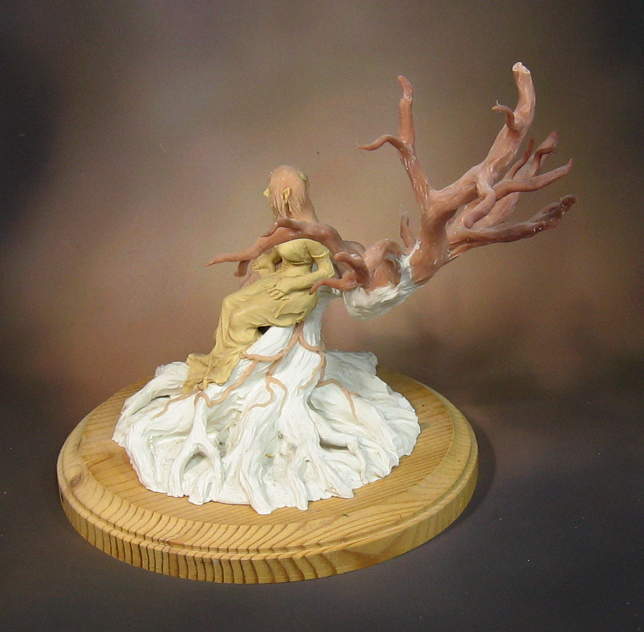
While I do remember starting this sculpt years ago, I quite literally bumped into it the other day when I was looking for something else!


I never finished it, but it probably had as much to do with lack of a finishing material, such as Apoxy Sculpt.  What you see in these images is a number of layers of sculpey over an armature.


I would approach this very differently now.  It would have been made mostly of tin foil as a solid armature, and wrapped in thinner layers of Apoxy Sculpt.  This would certainly have kept the weight down!


As it is, this is pretty heavy.  You can see that the back of this piece still has a number of layers to go.

Sculpey can be baked multiple times, as long as you are careful about it.


I was going to sculpt some fairy wings on the back of it, but I may or may not follow up on that.  Perhaps I could even make them out of a transparent material, as I won't be baking this any more.

Whatever additional sculpting to be done will be completed with Apoxy Sculpt and green stuff.


I will also be adding a lot of intertwining vines around the tree branches.


You will get a kick out of this... until I started taking pictures of these angles, I didn't even realize I had sculpted a face into the tree!

My guess is that I stopped working on this over ten years ago, so I think I can be excused for the memory lapse. :-)


The Apoxy Sculpt is a great material on larger scale pieces like this, since it is very easy to smooth it out by adding water to your finger or sculpting tool.  This breaks down the top layers a bit, and the surface becomes like a liquid.

So, it ends up with a very thin layer of 'slime', which dries very smooth.


It's also very strong, and it will lend additional strength and support to the sculpey sections.


I have a lot more experience sculpting smaller details now, so, I am looking forward to completing this at some point!


I have some of the "color shaper" tools which I tested last summer at Convergence.  Those will be very handy!!


I will be sculpting a lot of filligre on the dress and other areas, adding jewelry and possibly some leaf patterns.


The DVD gives you a sense of how large this is.


I will be sure to take lots of images of this when I do finally get around to completing it!

Stay tuned...


Friday, June 12, 2015

Crushing the glass


Let's combine a couple of great things... a Dark Sword miniature, and Secret Weapon crushed glass.


This is a fun Dark Sword figure (don't forget that current kickstarter!!), which had lots of tiny little details.


For the base, I used the Secret Weapon crushed glass/water effects technique.

He's also here:


That's a mighty unusual flag you've got there


Another Mierce Miniatures beastman for you!


These skin or hide style banners are always an interesting challenge.


You have to come up with an array of similar colors that do stand out a little bit from each other.


Thursday, June 11, 2015

Covering new ground


Here's another one of the Dark Sword miniatures that was used in the "How to cover a broccoli base" series of posts.


It was a fun exercise in muted colors, and balancing the browns vs greens.  Grey was used as a "go between" color, to make it easier in blending those two together.


Also, this was my first chance to try out the new foliage that I brought back from Reapercon.  I really loved it!  Not only did it mimic the colors I painted on the figure, the leaves were light enough to stand out against the shadow areas of the cloak!

The individual leaves are very nice... actually shaped like real leaves, with a touch of the veins in the lighter ones.


He's also here:


Know when to fold 'em


This product is something brand new... a photo studio that really is portable.

It's from Foldio, appropriately enough, and I think it will be just the solution to my 'on the road' photography issue. This box holds everything, even the lights!


That was always the bugaboo with my previous "portable" suite.  The backdrop folded up, but it was heavy, and I was still left with two pretty big lamps that would get scalding hot.  This meant that I had to wait for the lights to cool down enough so that I could pack them.


Not such an issue here, as you can already see the LED light strips.

It comes with all sorts of AC adapters, so they will work in all regions of the world.


There were four backdrop colors.  I have a great deal of testing to do with these.  For instance, I am very curious to see how the black backdrop might work in this system.

Furthermore, I am quite hopeful that the Hangar 18 backdrops will work with this system.  My assumption is that the larger backdrops will be required.


As I mentioned before, it is very lightweight, and small.  It uses magnets to allow you to assemble and take it down in no time at all!


You can see the magnets pretty well in this image.


Now the box is turned right side up...


And we have the LED strips.  What's truly amazing is the concept of allowing you to control the intensity of the light!  Those round dials on each strip let you turn the light up or down as needed.


It took a few seconds to stick them onto the surface.


This is the bar that holds the backdrop in place.  It is so much better than my previous system, where the backdrop was held in place by a velcro strip that was tough to use, and didn't work with anything else besides the one or two backdrops that came with the set.


These are the four background colors.  Again, I want to see what happens with that black backdrop!


For my initial experiment, I went with the neutral grey backdrop.


Lights are plugged in, and a figure in the box!!!


Did I mention that this suite is quite large for something so portable?  That's a 40mm base, and it looks tiny.  So, this should fit those vehicles, big monsters, groups shots and even buildings!

My next post will show you all the various test results.  No matter what, it will certainly be replacing the massive, bulky setup that I must drag around with me when the show goes :on the road".

Stay tuned!!!!


Wednesday, June 10, 2015

A guiding light


Once more, we have a fantastic figure from Dark Sword Miniatures.  I had some fun making the glowing wand/spell effect on it.


As usual, there is a lot of fin detail and cleanly sculpted lines.  They also have a new kickstarter under way right now for a small line of new miniatures.


This view shows the new foliage a little better.  It's part of that big batch that I got at Reapercon!  I love it.  I never had this color of static grass flowers before, and it made a very nice contrast to the greens!

She's also here: