Wednesday, September 10, 2014

Visiting the jungle again...


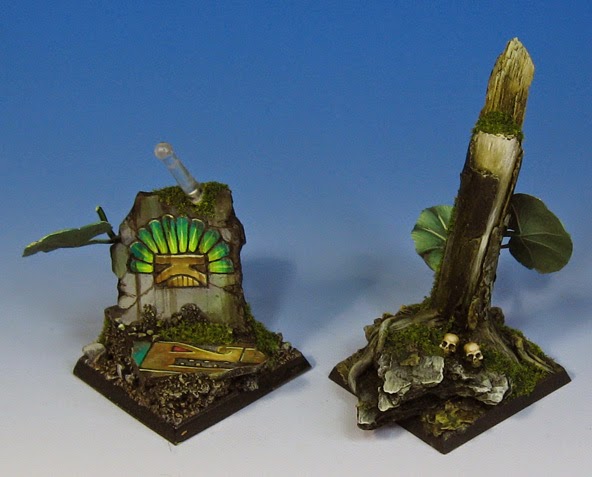
The second of the Terradon bases.  This time, we have an all wooden version!


Next to the first sculpey base.


I was very pleased with the painting of the foliage!!


Now I am very eager to see them with their flying critters in place.


Positioning them so they can rank up will be another challenged altogether. :-)


I also have some more of these on the way, since there are six flying lizards to base!!


More patterns!


Time for a few more camo patterns!  This crackle pattern has interested me for a while, so it was fun to give it a try.  I will probably do this on one more set.


This one is almost a more 'modern' camo pattern.  I think it's another late war scheme.


Here's the two newest colors next to the early war gray.


This image shows the last 4 sets.


Now for all five, including the desert scheme.  I am glad that I have been trying out a nice variety of patterns, instead of doing just the typical gray.


There will still be at least 2 more units of gray, however!


Tuesday, September 9, 2014

What's the Secret?


Let's get to the painting!  Nothing very fancy here, since I am looking for more of the blasted, dead look.  That means lots of muted grayish greens.


You can see those lighter greens being established here in the Shaded Basecoat phase.  Remember, lighter colors first, shade and tint later!!


Figuring out just where I want the lights and darks to go.  I am trying for a bit of a 'spotlight' effect right at the base of the main branch (i.e. tree!).


You see that spotlight starting to emerge here.  Since this is some of the best, most realistic rock texture of the bark, I want to emphasize that.


The exposed wood areas like these are a little trickier.  They need to be lighter than the surrounding bark, but not too much.  Otherwise, it will lose the sense of scale... making it look like a branch, not a tree!


The Shaded Basecoat phase ends.  Time to shade!!!


A pile of Secret Weapon washes at the ready.


Mixing the washes together, I tried to get variations in my shading colors... some warmer, others cooler.


This shot shows you how many different shades are out there on the palette.


Starting to look different, yes?  Always work in layers here.  You don't have to slop on huge blobs of wash.  Approach it lightly, adding extra layers if you want to make it darker.


Once that initial shading phase is complete, the fun begins.  I start mixing regular opaque paint colors into the remaining wash colors to make those semi translucent 'middle tone' colors that I love so much!


I am reclaiming some of the sharpest details in that spotlight area which I want to be the center of interest.  This creates the hard edges by way of sharp contrast, thus drawing the eye to that place.


Managing the colors on the branches as well.  I never used to paint the dried foliage bases before, but now that I have made a practice of doing so, I find that they look so much better, and match the rest of the piece so much more.


Some final highlights in the spotlight zone.  I will use some dark brown static grass on this as a final touch.  Oh yeah, and a miniature as well.  Stay tuned!!!!

What's old can be new!


In this scene, we see an old base that was originally done many years ago be altered  with a few new tests... mainly to see if some of my favorite Aquarium foliage could be painted. :-)

First, I added a slab of sculpey so that I could carve in a design, which would hold the vine and leaves.


The slab was painted first, with a design very common to the other Lizardman bases I have done.


And then for the leaves!  I mixed in some primer with my first layer of paint to make sure it would stick.  That seemed to work very well.


And a peek at what the purpose of the base was for!


Monday, September 8, 2014

More from the jungle


This is another experiment I wanted to conduct... finishing off one of the broken tree branches with Apoxy sculpt to create the roots.

I began with bark, just as I did with the previous base.


I was not sure how much the Apoxy sculpt might slide around on the bark and branch, but it seemed to stay in place during the sculpting process well enough.


All the extra sculpting here will improve the stability of the branch, of course!


I also wanted to add a few viney things around the roots...


Getting there!


Now I just have to wait for this to set up so that I can add some mica flakes for ground cover.


The mica flakes are applied with a flat sculpting tool as usual.


The ground cover is in place.  This won't be painted in fall colors, which I normally do.  It's supposed to represent fallen jungle foliage, so green and brown will be the scheme.


It's time to add some aquatic plants as vines.  I want to see what it will be like to paint these.


A few Secret Weapon Miniatures skulls to top it off!


Sunday, September 7, 2014

The lab is open... Bark 'n Branch


OK boys and girls... the experiments continue.  The idea here was to see if I could take some broken twigs, some bark, as well as some other odds and ends to make a quick base.


What I was hoping for was to get something which looked really nice, but could be executed quickly.  I started the process by using chunks of barks that were various sizes.  I needed to get a bit of an angle on this, so, I propped up the big piece with other smaller bits.


The building process continues.


Aside from super glue, I put in some Vallejo black lava gesso to fill n the gaps.


A branch piece was added.  Normally I would sculpt this, but speed is what I was after in this experiment.  Heck... it's got some pretty nice texture as it is!


Yes, the usual rock and gravel are added.


There was a bit of a gap at the bottom of the tree branch.  I tested out the black lava as a filler, rather than using apoxy sculpt or green stuff.


More filler, rocks and gravel.  This is not just for appearance.  These added substances are also designed to lend more overall strength to the bark, preventing it from flaking off.


I also wanted to add a few additional branches so that the original branch would look bigger.  As you can see, there are now three sizes of branch.


Some Secret Weapon Miniatures skulls are always a nice touch!


Now I just have to wait for everything to dry and set up!