Friday, May 16, 2014

Work in progress... the beginnings of color on the scratch built raider.


Here are some images of the partially painted Land Raider scratch build (see previous posts for images of the unpainted vehicle).  It is about 50% complete.

Again, all of the weaponry was made with the extra firm gray sculpey.  It worked very well for that process!


The sponsons and turrets are all removeable, and can turn in any direction.


The various parts and weapons can be exchanged with the other land raider, which was given storm bolter sponsons.


Eventually, I will get to finish this guy!  I have a TON of freehand to do.  It will be a lot more like the eggshell Grey Knight Land raiders you saw at Adepticon.


It was fun to actually take some pictures of this.  I had not even looked at it in years!  It was tucked away in a cabinet... so far back that I had not noticed it was even there!


When I do finish this off, I will take many more images for you!


Right down to the last man...


When we last saw our intrepid Axis partners, things were looking a wee bit dicey.  Since it only took four victory points to secure an Allied victory, each unit was of vital importance.

I was unable to move the heavy German units on the right very far, since the order cards just weren't there.

However, that would soon change, as they launched an all out attack on the US infantry squads.


The damage was not as much as I had hoped.  Fortunately, the US was not able to do much in response... leaving them even more vulnerable to my heavy units.


Just the trick!  A massive attack, spearheaded by all the armor I could bring to bear.

The American units would suffer heavily, and the survivors were forced to flee!


This put a serious dent in the Allied offensive, and gave me a chance to re-position my units.


Yet another all out advance.  Even the infantry units join in.  The S.S. squad valiantly assaults the tank unit, wiping it out!  


More American infantry units suffer major losses and retreat.  These critical delays allow me to press my own offensive.


Alas, the S.S. unit ends up sacrificing itself in an effort to take out the mobile artillery.


Worried about the heavy losses they had taken, and the menacing approach of Tiger and Panzer units, the survivors of the American infantry dig in.


However, my spotters notice this action, and give advance notice to my own troops.  Clearly more well trained and battle hardened, my own units dig in for an even more solid defensive posture.


This meant that I could unleash my Tide of Iron without the worry of giving up those last few victory points.  That is, unless the Capitalist Pigs are able to eliminate those Italian units which have been trapped in the town.


The Americans attempt to bring in their own feeble Sherman tanks in a desperate move to eliminate on of the dug in German units.


Somehow, that unit survives!  This means that I can set up one last final push...


Look out!  The US have a prime chance to kill off that last member of the infantry squad stares death in the face... and death blinks!!!!


Now for my Ace in the Hole.  A card that allows me to move any four units of my choice.  This spells doom for the Americans, as I can now surround one hapless mobile artillery unit.

They are so frightened by the encounter, that they become mobile enough to flee off the board... thus ensuring an Axis victory!

Rich did a great job writing this scenario, finding as much balance as possible.  I really should have lots, but 4 key cards allowed me to stave off destruction and launch those deadly counter-assaults.


Thursday, May 15, 2014

The Italian Connection... Part one


You saw the Italian troops on the painting table... now you will see them on the battlefield!!

First, Wage had to help me with another round of kickstarter boxes.  Shipped out seven yesterday, and ten more today.


Then we walked the 800 feet to D' Anardo's for some fantastic pizza!  Best in the world.


Here is the scenario that Rich created, and the story behind it.

A battered Italian unit is trying to hold out to protect their precious church.  The Germans are attempting to "rescue" their  Italian allies, and hold the village and set up an observation post in the church.  The location also contains a key roadway, necessary for the Germans to keep the campaign supplied.
The Americans are seeking a quick end to the Italian invasion and puncture the soft under-belly of Europe.  The command sees the importance of this location, but is unable to get a heavier force to the battle quickly.

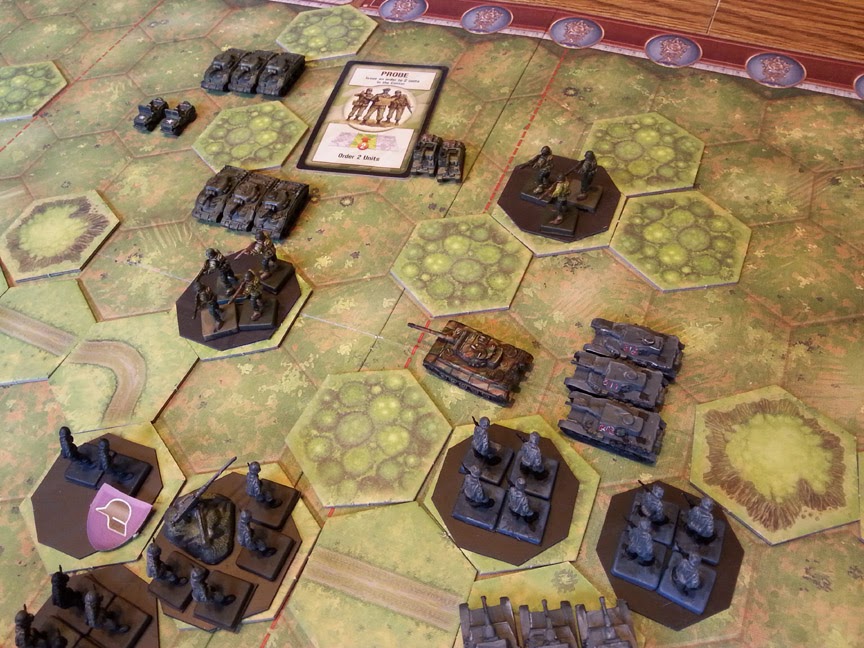
A view of the battlefield, forces deployed.  The Italians are on the far left, holed up in the church and cemetery.


I have to worry about these guys, because they are 3 easy Victory Points for Rich and the filthy Amerikanners.


My heavy units are waaaaaaaaaaaaaaaaay over here on the left.  As you know, if you don't have an order card in your hand that will move stuff over here... it will just wait there until you do!


Here are my starting cards.  The recon card will be vital, since that might help me get more cards to move stuff on the left flank.  The Ambush card should help if he attempts to assault one of my dug in positions as well.


I start out with the Probe card so that I can take advantage of the road (units move one space further if they start and end on the road), and move these guys the heck over to the left!!


Here I used that Recon card so that I could get some help on moving these heavy units.


Ambush!  Rich was very tempted to wipe out the last of the machine gun squad... a Victory point, and also the elimination of one of my heavy units.  His mobile artillery had targeted them earlier.


I tried to get the Italians in a better spot, and also fire at the Americans.  No luck there!  They need to go back to gunnery school.


The Shermans move out to come after the light Italian units.  Uh oh!


Not looking good over here.  One unit wiped out already, and the others in a perilous position.  Fortunately, some light weapons fire from the infantry frightened away the Capitalist Pigs, and they retreated.


Medic!!!  This MASH card was the first of several game saving cards for me.  Remember, all Rich has to do is kill 4 units.  I saved the Machine Gun squad, bringing it back to full strength.


The Americans press their advance once again on the right... would the German heavy units be able to disrupt this inexorable surge?  Will they be able to rescue their Italian "allies"... stay tuned!!


Tiny soldiers?


Hey!  Back to some historical minis... courtesy of Memoir '44.  They put the 'mini' in miniature, as you saw by the comparison shot.

These are technically French troops, but we thought we would paint a portion of them in Italian color scheme.

It's hard to clean up the mould lines, but I gave that my best shot.


Some gray primer from Badger sticks right to it!


Now for the real paint.  A bit of Clouded Sea from Reaper.


I used a little Vallejo Highlight USMC.  I was not worried about any kind of nicety in the painting.  I will be doing a number of glazes later...


I continued to lighten up certain areas, moving more towards the the light grayish green shade.


I mixed that same light gray with a terra cotta color to make some skin colors.


Time for glazing!  I brought out these dandies so that I could work very quickly.


You can see the watered down liner paints, along with the Black Shade.


Here they are after the initial layers.


I followed up with some darker colors to define a few areas, such as the backpacks, etc.


I went back in with some lighter skin colors as well.


Now the faces and hands have a bit more shape.  Obviously, these are not the most perfectly sculpted faces in the history of miniatures... but, they are super tiny!


I added a few more details here and there...


I decided to add some mud splatters to the overcoats, which would make a nice color contrast to all the blueish gray, and make them look more like they had been in trenches (which is where they would be in the upcoming scenario!)


Coats muddied up!  I also added some touches of red for epaulets and on the collars, like we had seen in a bunch of research photos.  That was another nice splash of color, and would make them instantly recognizable from the French versions.


This is a standard 28mm figure towering over them.  Gives you a real sense of how tiny they really are!!

It was a lot of fun painting them.  Now they would be fighting for their very lives in an exciting scenario that Rich created himself!  That is coming up tomorrow, methinks...