Monday, January 28, 2013

Fist bump time! Terminator Squad finished!!!


Yes!  Now this is the moment I love... getting to attach finished miniatures onto bases!


After seeing them on stick for so long, it is always very striking to see them on the bases for the first time.  By the way, the bases are from DragonForge...


One by one, they are attached, building to final completion...


I don't think I have ever taken an image of this stage.  In fact, I know I haven't.  So, you are seeing history :-)


And now for some group shots!  I will post the individual ones as they are processed.


These guys were way tougher than I thought they were going to be, due to massive sculpting and casting issues.  I certainly learned a lot...


I hope you have enjoyed seeing the process of painting these guys.  It is always interesting to look back at those early stages when you get to this point, and see what it took to get here!


Again, I will post the individual shots later.  I did an experiment with some new lighting, which I liked a lot, and will become a permanent thing.  It was a bit of an accident, as a fallen/shattered light made the experiment necessary!


More on that story later! Stay tuned...


As always, the techniques used to create these guys are on the painting video kickstarter:


Something to shake your Fist at :-)


At last, we arrive at the closing stages of those Pre Heresy Imperial Fist terminators!

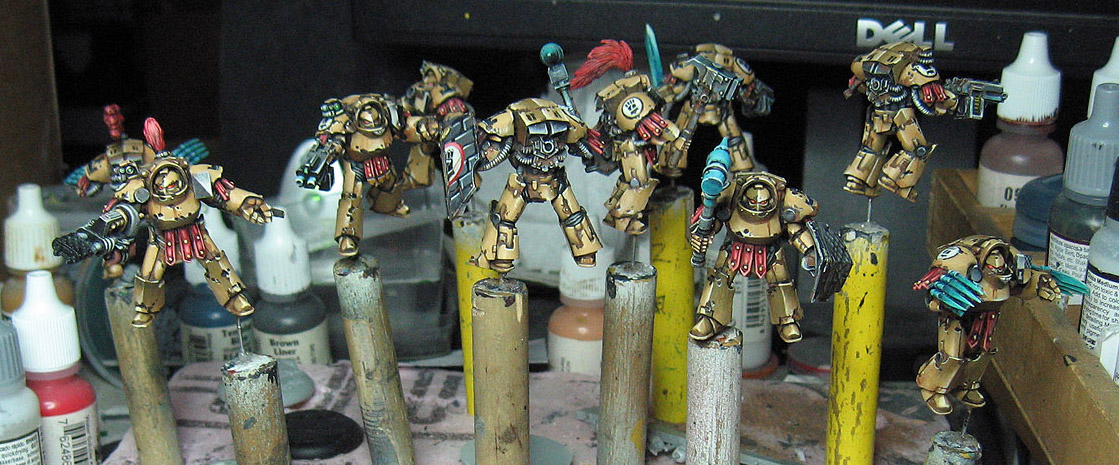
When you last saw these, I was working in the lightest yellow colors.  That's about where we are in this image...


These next few images show the last couple of layers, where the final highlights were applied.  In addition, I worked on the reds.


After the reds were completed, I went back in to a lot of the symbols and icons to clean them up and get those finalized.


That left a few big tasks left to do, and the first would be the teal colors on the lightning claws, Thunder hammers and swords.  I worked on both the lightest and darkest colors to create more definition and smoother transitions...


Just about there!  I did a bit more freehand, and enhanced some of the weathering.


Here's a close up image of one of the final yellow highlights.


Stay tuned tomorrow for the pictures of the finished results!!!

This group needed several painting techniques, starting with the Shaded Basecoat.  I also had to do the yellows, lots of glazing, and some OSL, as well as freehand designs.  I have videos covering all those topics in the painting kickstarter program here:


Sunday, January 27, 2013

It takes Two to Tango...


As promised, the pair of Fiends!  It was very easy to match all the colors (mentioned in the previous post), since it was such a limited palette.  Keeping those initial colors so basic made matching them a snap.  Here I am adding the gold/brass to the second fiend on the right...


The plate has most of the colors that were used.  As usual, I as using a large, flat brush to put down this stage.


These pictures show most of the pieces with all of the lighter colors applied.


So, the next step will be glazing and shading these guys darker!  Lots of fun coming up!  Stay tuned...


This Shaded Basecoat technique, as well as the glazing stuff coming up, are covered in various videos as part of the painting video kickstarter!

Here's the link:

Painting the Fiends: some Shaded Basecoat in action...


OK folks!  Here are those images I promised.  

These show that good old Shaded Basecoat technique under way.  As those familiar with this concept already know, the principle behind this technique is to get color on every surface as quickly as possible.

This is very helpful, because it gives you a visual reference to compare and contrast each color against the other.  One color that you think is pretty dark can end up looking very light once you put a very dark color next to it.

The idea is to put colors in place from the beginning.

You will also notice that they tend to be lighter.  The darker shades and colors will be created by glazing in a controlled fashion.


For instance, the gold / brass can now have the shadows added via those glazes, which means I can tint them different shades, creating more interest.  If I shade it darker with purple in one area, and a greenish black in another, that will make the overall color more interesting.


Transparent layers take less time to paint than opaque layers, so you also save time!


There are also far fewer color mixes to remember.  So far, I believe I have only used 5 colors total on these guys.  This means that if you can't get back to a certain project for a while, you won't struggle to recall what you used... no 'formulas' to remember!!


If you are painting an entire army, that helps a lot. :-)


Later today I will be posting images of this guy's buddy.  That will illustrate just how helpful this Shaded Basecoat can be for matching future paint jobs!


That is why this topic is the very first video of the Painting Pyramid!  It is the cornerstone technique of the entire structure.

You can find out more about that here:


Saturday, January 26, 2013

Magnetizing your Forge Fiend...


The latest crop of GW figures have definitely gone the way of ball and socket joints lately.  This has been causing me some consternation as I try to figure out ways to magnetize them,  Gone are the days of the dreadnought arms, where that one miracle magnet takes care of everything!

For a while, I was trying to drill into the 'ball' part of the joint to sink the magnet in there.  This took a long time, and it lead to a less than strong joint.  Also, polarity issues could be even more tragic if you got them wrong, etc.

Some of you may have seen my newer method of magnet to metal.  It has spared me the polarity craziness, and saved on magnets!

Somehow the idea struck me that if I were to change the joint itself, all those waiting magnets might work again.

Out came the razor saw, and I started slicing away...


Now I had created a space for the big hefty magnet to go!


And cut some magnetized sheet metal for the weapon.  This is important!  Not all sheet metal is the same.  If you get #5545 vs #5544 or whatever, your magnets will be useless!  We test them out in the store after finding out the hard way.


Here is our waiting joint...


"Click!"  Yea!


Here's the rest of the weapon arms for the two Fiends.


I also did the same thing for the heads!

Next up:  Painting the Fiends.  This will be a classic case of "Shaded Basecoat!"


Yes, a link to the Kickstarter... I wish I could do a "Magnetizing your Minis" how to video...


Dredge Blackwater, Highwayman


Here is another offering from Stonehaven Miniatures!  He is Dredge Blackwater, a dwarf highwayman.

Dredge utilizes his talents in the most direct way possible.  He is not one to spend much time thinking out a plan, but only because he creates excellent plans so quickly.
He does not always communicate his intentions.  Dredge jumps immediately into action and explains himself afterward!

This was another one of those 'limited palette' exercises.


Every color that I used on this was greyed down, and I used the same greenish off-white for the highlights on all the colors.  This was to give him a bit more shadowy appearance.


This set of views gives you a better look at the base.  The base itself is from DragonForge...


While I added some leaves from Woodland Scenics.  You can see that I took some of the maple leaves (a thin tissue-like substance), and glued them onto the base.  Once they set up, I painted them in a fall scheme.  Semi dried out leaves...


A few more shots of the leaves.  These things can really add to a base, that's for sure!!!


There are lots of basing technique videos on the Painting kickstarter here, and more are being added!


The rest of the crazy Gobbos from Gamezone!


These guys just kept getting funnier.  Cathy painted the fanatics, and some pesky Gobbos that had a different sort of 'moon' in mind...

Gotta love the Target Goblin!


And this guy hauling garbage...


This shaman was fun as well with the warpstone.


The various bases were done in a few ways... either carving a chunk of baked sculpey, or by sculpting some rocks with apoxy sculpt.


Look out!  Incoming!


The Painting Pyramid kickstarter is almost at the next stretch goal...