Monday, December 24, 2018

The Making of a Tutorial Series


It is hard to believe that I am already on Series Five of my Army Painting video sets!  In fact, this one is nearly complete, with just one episode to go.

This set of tutorial videos takes you through the process of getting the ethereal glow of the Army of the Dead, as well as the rusted, corroded look of the armor and skin.


As always, each series begins with basing, and this was no different!  I did a variety of Sculpey and cork bases, with many of them designed to 'correct' the extreme forward leaning figures.


I try to take you through as many different materials and designs in each basing episode as possible, and go over some simple safety procedures too.


Where possible, I try to paint a base or two during the basing episode.  In this case, some quick marble bases.


The next episode is always the painting of a "color test" figure, which is where the look of the unit is determined.  More importantly, this is the time where you figure out how long each figure might take to paint, and if you might need to leave out certain extras to save on time.


Episode 3 is the Shded basecoat phase, which is always down and dirty!  However, it is also a very critical stage, because most of what will happen over the following 2 episodes will evolve from this early work.


You can see some dramatic lights and shadows already, which set up the subsequent layers of fluorescent paint very nicely.


Sure enough, the next episode was focused on creating that ethereal effect, and the difference is very dramatic.  In episode 5 of this series, I will tackle the rust and corrosion, along with the final highlights.

Along the way, I discuss how I will be using the army (which will inevitably take part in my video battle reports!), and why I chose to leave out or include certain effects.


I have already done a tutorial series on my Easterlings, which focuses on painting gold non metallic metals, as well as adding freehand without taking too much precious time!


I will be doing all of my Lord of the Rings armies in this tutorial series fashion, including Rohan, Harad, and others.


As I mentioned, this is Series 5.  Previous episodes have covered Age of Sigmar, Bolt Action Soviets (using oil paints), Easterlings, and even Song of Ice and Fire units!  These are real armies, which I will actually be using in games and battle reports.  

I don't think that any other tutorials out there show the process of painting entire units, which is a very different animal than painting one off figures.  Over and over again I mention the "currency of time" which none of us has in abundance.  The balance between the look of the figures, the playability, and the time to paint them is a delicate one.


The Army Painting pledge is a $15 level which gives you access to virtually all the video content created each month, including the Dark Sword videos.  This means that you are getting about 18-22 hours of videos each month!  Here's a link to the page: www.patreon.com/JamesWappel


Saturday, December 22, 2018

Mountain's Men


I continue to be amazed at the Song of Ice and Fire miniatures, and what you can do with them!


When you consider that they are basically unbreakable gaming minis, having this much fun painting them just seems impossible.  Since the armor is sculpted in a more realistic fashion, you end up with cleaner, smoother lines.  This makes executing Non Metallic Metals much easier..


I didn't want the Mountain's Men to have as much of a shiny look as I did on the Lannister Halberds, which meant introducing more purples and greens into the mid tones of the metals.  As you have heard me discuss many times in my articles and painting videos, purple and green mixed together make a wonderful set of grays.

When those are separated, and placed next to each other, they still register to the eye as a gray, since the eye "blends" them together.


This was an initial color test miniature for an upcoming video tutorial series for the Patrons.  I will be taking on the Mountain's Men unit as part of the Army Painter series on my Patreon Page.  Here's a link to the page:  www.patreon.com/JamesWappel


Friday, December 21, 2018

The Great Wappelville Baking Show!


On the day of our Anniversary, it is time to show another annual tradition in Wappelville, and that is making the Christmas cookies!!

It took on an added dimension after catching the Great British Baking Show... and it all begins with making the doughs...


With the Gingerbread and Nutmeg cookies baked and cooling, it was time to make the all important frosting!


To make her Peanut butter Blossoms, Cathy unwraps lots of Hershey kisses...


On to the frosting!  It is hard to believe that most of these food colorings were used for the fondant frosting of our wedding cake.

Cathy discovered some new candy decorations for the cookies in various colors, so I was looking forward to trying them out!


All the colors are now in bags, and it is time to decorate those cookies.


Here we have the first few trays, including the Christmas Shark.  Those new candy bits proved to be just as helpful as we thought, and opened up a lot of new options for decorating.

It just would not be Christmas without trains... all aboard the Wappelville Express!


It wouldn't be a happy Holiday without a few tanks and soldiers.  And some Goblin helpers for Santa!


Holiday Spirit really soars with the Dauntless SBD and the Demon Angel.


Trunko, Jeero and the rest of the stuffed animals would be very disappointed if we did not have a few cookies to represent them!


Yup, we made a few cookies.


Just a few.  I think it was about 11 pm by the time we were done.


Sherman is delirious to see his own cookie!  Don't eat that now...


So it is time to say Merry Christmas, and wish a Happy Anniversary to my wife Cathy.  We have been on the miniatures painting journey from the very beginning, and it has been a great sleigh ride!  I love you very much!


Thursday, December 20, 2018

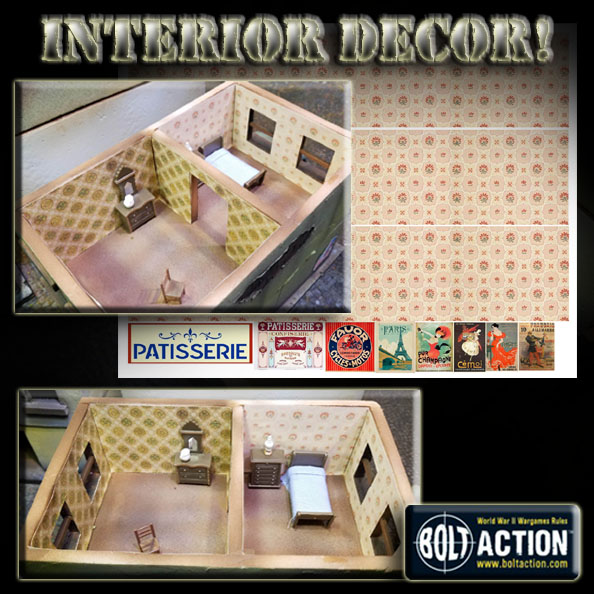
Interior Decor!


Here's a quick follow up episode to the Nouvion board series.  While it is not the step by step that I will be making in the future, it will still be useful!


I had hoped to make the interiors of the buildings look more 'lived in' as opposed to the usual blank wall interiors.  In the past I had printed out wallpapers for MDF buildings for our Wild West table, and I thought it would be just as nice for Bolt Action...


This meant doing a LOT of Google image searches, and then some work in Photoshop.  I measured out the floors of my buildings, and then patched together strips of the wallpaper which could be printed out.

You can see the small posters which take up the unused space on the page.  These were meant to be general advertisements, specific signage on various stores, and even propaganda posters.


Some patterns were more easily spliced than others.  I think I did six different types of wallpapers.  I also continued my sign/poster collection!


Each of these strips matches the height of my individual floors, so all I have to do it cut out the windows, doors, etc.


These were printed on printer paper which is also has an adhesive backing.  Basically, each 8.5 x 11 sheet is a gigantic sticker!  I have noticed that it is still a good idea to hit the surface where you are placing the paper with a glue stick in the corners for extra adhesion.  


You will be seeing these wallpapers and posters in a few new video battle reports in January, so stay tuned to the YouTube channel and subscribe!  https://www.youtube.com/watch?v=2LgWEoymVQw


Wednesday, December 19, 2018

Raise your Sword


This Stark Outrider has a slight conversion to it... that is altering the angle of the sword arm.  In this case, I am still using the alternate color scheme to give them more of a historical look.


All of the Non Metallic Metals were still done in the same way as the previous sets of Stark infantry.  They were meant to have a shine, but not the same sort of Sky Earth Non Metallic Metals as the Lannister unit that was featured in my latest Army Painting series on the patreon page.  Here's a look back at that unit: https://wappellious.blogspot.com/2018/12/shiny-lannisters.html


As I have mentioned before, I will be featuring the Stark army in the "official" color scheme when I create the how to videos for the Patreon Page.  I will be creating videos for the units and the individual characters/NCU's as well.

Each of the series is usually 10-13 hours of tutorials, which take you from prepping and basing the entire unit all the way through the painting process!  You can check that out here:  www.patreon.com/JamesWappel


Tuesday, December 18, 2018

Building Nouvion: Part 2


More images of the Nouvion terrain board which I have been working on to continue my France 1940 series of battle reports.

In case you have not already seen the articles on how the buildings were created, I have a number of previous episodes:


In the last episode, I talked about the 1/48 scale furniture and what that added to the scenery, as well as the scatter bricks made from the Das modeling clay.


I also made these sandbag emplacements out of that clay, and they have proven to be even sturdier than expected!


The idea was to make sandbag emplacements that could cover any of my weapon teams, and even a squad of 10 infantry!


Here come the reinforcements for the next battle!


I will have to find ways to make mailboxes and other small street items.


The 75mm gun also fit behind the sandbags, as did the heavier 105mm.


As I look at the images of the streets, I definitely want to make some destroyed tanks... along the lines of these scratch sculpted objective marker/terrain pieces:  https://www.youtube.com/watch?v=F2GrlbpDT0o


The Citroen car in this image was part of a 1/48 scale airplane kit... perhaps I will get lucky and find some more!


All of my previous video reports have taken place in forests and hills, so this urban environment will be quite different!  Here's a link to one of those earlier reports: https://www.youtube.com/watch?v=78AWDqiSgH4


The higher sight lines of these buildings will offer some interesting sighting angles, and there will be a LOT of blind alleys.


I also look forward to seeing what difference the roads will make, and the use of barricades to cut them off!  At this point, I am still trying to compile the equipment needed to make tutorial videos on my terrain.

As I have mentioned in other articles, some of the equipment has been acquired.  However, the more costly items remain, which is one of the reasons I have the Patreon Page.  A much larger filming area is required, as these terrain pieces are pretty big!

There are already a lot of painting tutorials available on the page, including the Army Painting series on the winter Soviets!  You can check that out here:  www.patreon.com/JamesWappel