Saturday, January 27, 2018

Gone Fishing


Here's another Naiad Warrior that I conducted a few experiments with.  As I mentioned in the first post on the Naiads, I wanted to see if I could make some seashells mesh with the base, and some plastic foliage too.


I ended up tinting the shells with a light glaze of grayish green, since they stood out far too much from the rest of the base.  I was very pleased with that result, as it took away some of the brightness, but not the overall pattern.

Doing a heavier glaze over the plastic foliage was equally successful, using the Reaper Green Liner, Blue Liner, and some of the Vallejo Sienna Wash.  This not only made the color more appropriate,  it gave it the perfect 'flat' look, instead of the very glossy plastic.


Friday, January 26, 2018

Home On The Range


Here are the finished images of the January Raffle Figure for the Patreon Page.  The figure itself was originally sculpted and cast for a charity event, but it is available for purchase (you can e-mail Dallas at ampsayyc@gmail.com).

She was painted in a recent Facebook Live session, almost entirely with oil paints.  Here's a link to that demo:


I have been enjoying the oils so much!  It creates a lot of opportunities for color blends and unusual combinations, since you can mix paints right on the surface of the miniature.  I have taken to calling it "On Site Blending", and it is almost as if the miniature becomes my palette.


As I mentioned before, this is the January Raffle Figure for the Patreon page.  The more support I can generate for the page, the more live sessions that I will be able to do.  I really like them, but is is not very easy to balance them within the normal miniature painting work sessions.

Also, the Patreon funds are invested into the Raffle figures, shipping them out, and securing new supplies and subjects for the live demonstrations.  I always try to do something interesting and different, be that a new technique, material, and so on.


These larger scale figures have offered me an opportunity to finally paint a few.  Nearly everything that I paint has to be able to work in a gaming situation, and this is a very nice change!

The new Green Stuff World grass tufts have been very handy on my Western style figures... and these taller versions were fantastic on a large scale 75mm figure.


With each attempt I do with the oil paints, I find myself doing less and less "post production" work with the acrylic paints.  Once I learned the glazing tricks with the oils as you saw in the live demo, It has gradually eliminated the need to go in after the oils dry with more precise details.


If you would like the chance to win this figure for the January monthly Patreon Raffle, this is the last week to get in your pledge!  Any amount gets you the opportunity to win it, and your support is appreciated!

Here's the link:


Thursday, January 25, 2018

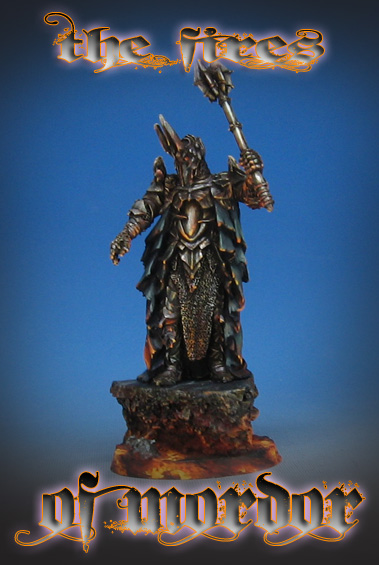
The Fires of Mordor


Here's the final results on the experiment with the Vallejo Metal Medium.  While it is called "medium", the conversation that was generated after the initial post makes me think that I should say it is not a 'medium' in the classic sense... it is very much like metallic paint in consistency.  It is not a thin glazing style medium!

In the past I have used regular metallic paints and added them to regular colors, but those tended to shift the original color.  This is designed to turn the color you are using into a metallic paint without that kind of significant alteration.

If you want to see the original step by step post, you can view that here:


As I mentioned very often in the original post, it was an interesting challenge,  since I normally use various NMM techniques.  It just kinda worked out that way, since commission painting requires you to do what it requested, and that means matching previously painted figures and so on.

Also 22 years spent as a 2D artists meant that metallic paints were not part of the picture so to speak!  There are not metallic watercolors, oils or pastels.  This article was made to discuss that idea further:


The lava style base was made to create that sense of Mordor, and provide a lighting source for the OSL.  I have a number of painting videos on USB drives which discuss OSL, making these lava bases, and the fluorescent paints used in the process.  Here's a sample video of the Object Source Lighting:


I will try to do more experiments with the Metal Medium, so I am looking around for the best miniatures to show such techniques!  A facebook live session is in the works, which will be yet another live experiment where whatever happens is unrehearsed. :-)

You can support those live videos by subscribing to the Patreon Page.  Any amount makes it easier to produce more of these, and gives you the chance to win the monthly Raffle Figure!


Wednesday, January 24, 2018

Man the Guns!


This is my third Laffly truck for my early war French army, but it has a few extra details that the others don't.  Before version 2 was released, there was a lot of questions about how many machine guns were active on these transports... and where exactly the guns were mounted.

The new version made things a lot clearer, but I'm still glad that I did these conversion elements to this great vehicle from Mad Bob's Miniatures.  Both machine guns can be removed, and the crew firing is a very fun addition!


If you want to see what this looked like when I first did the conversion, and a conversation of what it was like to hack away at the gun on the pewter figure, you can check out this previous post:


Most of the vehicle, and the figure as well, were painted with acrylics.  Of course, I have some Mig Ammo mud effects paints, and those made short work of adding the mud and splashes!


As I became more familiar with working on these historical vehicles, I started to get a better handle on things such as stowage and other ways to customize the vehicles.  When you have up to 3 of these in your army, it can be very handy for telling them apart from a distance in the middle of a game!


Here's a link to the Mad Bob's Miniatures site:


With this completed, it is time to start filming the first of the battle reports!  I can't wait to see these on the Ardennes board, against their German Heer counterparts.

I have 13 other armies under way, so these battle reports will eventually cover every era and theatre of the conflict.  It will be part of my Patreon Page offerings once I get the recordings down and edited.

If you would like to be a part of making that all possible, here's the Page:


Tuesday, January 23, 2018

Forged in Fire


I have posted a variety of articles on the blog about Non Metallic Metals and how I ended up using that technique.  The primary reasons are that it is what I am requested to do, and it is also due to the 20+ years spent painting in 2D art.  There are no metallic watercolors, pastels or oils, so you have to simulate the impression of metal

This is what I have been doing for 17+ years of miniature painting, but running across this old guy made me try something new.

It had been mostly painted way back in 2004, when we briefly messed around with metallic paints.  The base was made during my Painting Pyramid Kickstarter, and I wanted to see if I could make the metallic paints work with the glowing effect!

First, I had to get a variety of cooler tones in the metals.  I had always wanted to try the Vallejo Metal Medium, which turns any color into a metallic paint.

You can see me doing that in these images.  I am using the same green color that was mixed into the grays for lighting the cloak.


The more of the Metal Medium you add to the mix, the "lighter" the color becomes.  This proved to lend a lot of flexibility to the process.


I added a few other colors to the Metal Medium as well, and it was very interesting!


I even mixed in some of the Vallejo Glaze mediums, and that made a very nice effect, as it is already transparent.  Now the metals had a variety of warm and cool colors, and these would help to set up the brighter more intense tones of the lava reflections.


To ensure that the lava reflections would still look like metal, I could mix in the Metal Medium with the fluorescent paints!  This was crucial, since it is one reason why I had abandoned metallic paints.  They would not work with things like Object Source Lighting, since the "reflections" would stand out like a sore thumb against all the metallic shininess.


In fact, adding that Metal Medium gave the fluorescent paints just enough of a 'shine' so that it would incorporate itself very well.  I had to remember not to add that medium when I painted the effect on the cloak!


There was not a ton of the reflected color on the figure... just a few strategically placed areas to create the impression of them.


I might actually have to do a Patreon Page video regarding these, as it was a lot of fun, and I felt like I was discovering new things with each brush stroke, just like the oil paints!

If you would like to support that Patreon Page, any amount would make it easier for me to create more of those videos... and you would also have a chance to win the monthly raffle figure!


He's also here:


Sunday, January 21, 2018

A Well Oiled Machine


This was a the first set of French Bolt Action figures to be painted almost entirely in oil paints.

The more resent projects have a much higher percentage of these oil painted units, since I have been able to develop new techniques almost every time I use them!


These all look virtually identical to the figures painted with traditional acrylics, but the major advantage is speed, as I can do far more figures at a time.


With the extended drying time of the oils, I can work around entire units, and the paint on both the palette and the figures will stay wet and workable for days... usually about 2-3 in winter with the heater drying out the air.


While the original Winter American forces that I painted with oils saw only about 40% of the figures painted with oils and completed with acrylics, these were closer to 80%.

As I mentioned before, I learn a little more each time, and I have even discovered that I can do glazes of oils on top of wet oil paint.  This is very similar to what I would normally do with my acrylic washes, which means that I can take these paints even deeper into the process.


Originally I had seen the oil paints as the medium I would use on vehicles, but that quickly expanded to the regular infantry as well.  Since the colors on the infantry are usually quite similar to the vehicles, I can hammer away at everything all at once.

I don't have to worry about paint drying up or not being workable on a figure even when I have 20 infantry and a few vehicles all the painting table!


I have been painting a number of vehicles in my Facebook Live sessions... covering all kinds of approaches, materials, effects and so on.

Here's a link to a recent vehicle painting demo using the oils:


Friday, January 19, 2018

Happy Anniversary!


This very fun little miniature is the 25th anniversary figure for Reaper Miniatures.  The face in particular was a fantastic shape to paint, with lots of character and eyes that were shaped well enough to get some nice details as well.


I have not gotten many opportunities to paint figures like this one, so that was great!  A little green stuff was used to extend the pewter base a little bit...


In addition to those Dark Sword figures, I have some Reaper minis which will be part of those Patreon Page demonstration videos.  These will be in addition to the usual live sessions on Facebook.  Just like the Dark Sword figures, those will be available for viewing by Patrons, and then raffled off like the Monthly Raffle figure.

I am going to try and record a few of those this week to see how they go!