Saturday, November 11, 2017

Shades of Gray


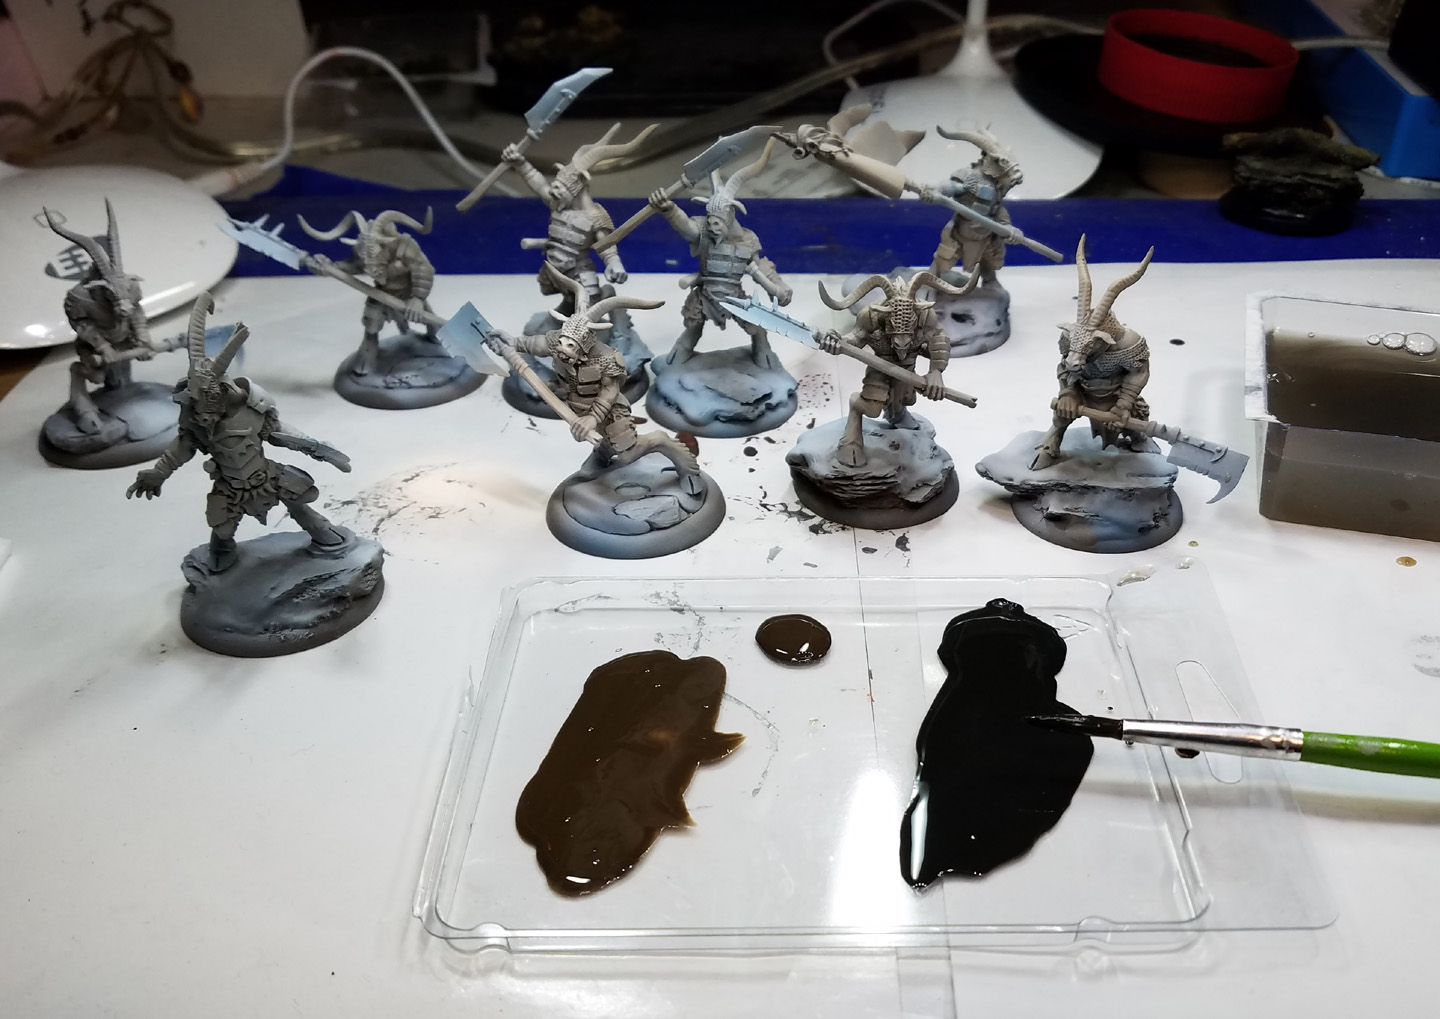
In the previous episodes, you saw how the figures were "Primer Painted" and the first layers of glazing.  The process continues with more work on the bases and the initial glazes on the metal surfaces.


I mentioned in the last post that glazing is not always about making things darker.  You can also do lighter glazes, which is what I am doing here.  In fact, I was also able to add in these lighter colors while the previous layers of glazing were still wet.


This greenish color was used on all the lion cloths, and that process of wet into wet was used to get some lighter tones in very rapidly.


I added in some warmer Secret Weapon weathering paint, and that was used to make the lighter tones.  Again, it was done so quickly, the paint didn't have the time to dry, allowing me to use that wet into wet method.


All the tunics have a decent amount of shading on them.  The deepest darks and highlights are yet to be placed, because I want the 'context' of all the other colors surrounding it first.


I brought out a few Badger paints to work on the snow.  This is mostly due to the requirement that all my snow match previously painted figures.  Since I have a lot of these two Badger colors, I knew that I would never run out!  

Also, I wanted to show that just like the primers, Badger paints can be used with a regular brush... no airbrush required...


The process was pretty simple.  Mix up a middle tone color, and apply that all around the hooves and rocks.


As you might imagine, progressively lighter layers were applied.  While I do emphasize glazing quite a bit, I still use layering when it is the right approach for a given result.


As I work on these layers, I am using one of the #8 round craft brushes which is a bit worn out.  This means that I can "flatten out" the bristles of the brush, which in effect creates a Filbert style brush.  This is excellent for feathering out each layer of paint, acting like an airbrush.


With the bases painted, I moved on to the metals.  These will eventually be heavily weathered, but I need to get some blue/greenish gray shading on them first.  I will use a few Secret Weapon weathering colors, along with the Grey Liner from Reaper.


I thinned down the lightest grey for the first layer, removing the excess with one of the makeup sponges.  I don't want to destroy all of the lighter colors that I established with the primer painting.  Also, keep in mind that several darker layers of glazes will be added after this.


I worked from one beastman to the next, setting up the second and third layers of glazing.


You can see the effect that the second darker layer of glazing has.  Stay tuned for the next episode, where I will put additional layers of glazing on the skin/fur, begin to weather the metals, and work on other elements... stay tuned!

If these kinds of how to articles prove useful, I have the patreon page up and running to try and fund more articles like these.  While I love taking pictures of the process, and making the step by step articles, it does slow down the progress that I can make on commission pieces such as these.

Even a $1 pledge is very helpful, since that will also go towards more supplies which I can use for live experiments, etc.

Here's a link to the page:


Friday, November 10, 2017

Like a Sponge


While I have done a few episodes on how to use the Badger Airbrush and Stynlrez primers for my "Primer Painting" technique, you have not seen as much of what happens after that process!  So, here's the first series which demonstrates what is done with all those nicely pre shaded figures!

Here's a link to that original Primer Painting post:


I began with putting some darker glazes on the bases, using a few simple colors.  The Reaper Umber brown and Brown liners make fantastic deep glazing tones.


I worked my way around the snow piles, using the watercolor "negative painting" technique.  The brown liner gets down into the deepest crevices, making them nice and dark but not black, which is a dead, uninteresting color.  The 'warmth' of the umber and brown liner will also help to make the cooler blues of the snow seem that much colder and icier!


As you can see, I am using the same green handled #8 round craft brush as I always do!


Once I have a decent coverage on all the rocky areas, I grabbed one of the makeup sponges and dabbed away at the sections which are supposed to be lighter.  All of the crevices remain dark, but now I have tinted the rest more of a warm brown.  By wiping away the paint, I am taking better advantage of all the pre shading that was done in the orginal "Primer Painting" phase.


Each base is a little bit different, so found that I had to use a few different types of makeup sponges... some were eye liners, other for lipstick, etc.  You too can be a master of the beauty products domain.


I used a Secret Weapon Miniatures weathering paint to get some deeper tones on the weapon handles, just the same as I put the dark glazes on the bases.


I also wiped away excess paint on some spots to reveal the lighter pre shading underneath.


Now for the most important bit, and that is all the skin and fur.  This is going to require several layers of glazing (both darker and lighter glazes), but for now I just want to establish some mid range tones... nothing very dark.


Mixing a Reaper flesh type color with the Secret Weapon weathering paint turned it into a semi-opaque glaze.  Yes, not all glazes have to be super transparent!  I also had a mix of the umber and that flesh color, so that I could vary the tones that I was placing on the fur, etc.

Finally, I had some of the brown liner on hand, which was used to glaze the bottom of each leg and the hooves.


You can see that process taking place here.  Just as I did with the previous sets of glazes, I used a variety of sponges to remove the excess and bring back some of my original lighter shades.


I was very glad to discover the larger triangle shaped sponges, because those can be cut up into different shapes, or even to remove dirty sections which are no longer useful!


I think you can see in this view how the lighter glazes blended into the deeper brown liner glazes at the bottom of the legs.  By starting at the waist and working my way down, gravity worked naturally in my favor as I glazed down towards the hooves.


So we are now at the end of stage one!  I will be doing a few more episodes to show how these "Primer Painted" figures go from pre shaded primer to completion!  

I have corrected some of the crazy linking issues to the Patreon page, which only revealed themselves once the page went live (of course!)  So hopefully this one works as it should!  Stay tuned for the next episode, where I work on the snow, the banner, horns and more...


Wednesday, November 8, 2017

A Higher Rez


I think the last little step by step that I made of "primer painting" showed a unit of Bolt Action minis, so I thought I would snap some images of a more diverse group.  There are a number of different manufacturers here, ready for some Stynlrez Primer from Badger Airbrush.

As you know, there are already a dozen colors, which means that you really can paint with primer!  I Began in this case with one of the new dark brown primers, which is called Ebony.


It is a very nice Van Dyke Brown shade, which was a great initial layer for these big beastmen figures from Mierce Miniatures.  At this point, I am just looking to cover every surface.


There's even more sitting over here, including some telephone poles that I quickly made for the urban table (there's a how to on those coming as well!)


I prime dozens of figures all at the same time, along with large creatures and even terrain.  Once that all has the first darker layer, I will start to add in some lighter colors and let those 'mix' in the reservoir of the airbrush.  The lighter tone here is the 'Skintone' primer. 


That is allowed to mix in the reservoir with the remaining Ebony primer, and the figures will be primer painted lighter and lighter...


I continued with this process on the Reaper and Red Box Games figures, gradually lightening that mix... but making sure not to wipe out the original darker color in the shadow areas.  Some of the Mierce beastmen are shown in the inset image.

Remember, what I am trying to do here is the replication of my Shaded Basecoat technique on a mass scale.  Since you are going to be making a bit of a mess anyway, why not do a whole bunch of minis at once, instead of just a handful?


I gradually add lighter colors into the mix, such as tan and then ultimately a tiny bit of white primer.  I do not clean out the airbrush at any stage here!  It is important, because allowing the colors to mix and flow from the brush means that you get those smoother transitions of light to dark along the way.


I also have to keep in mind that I sometimes go back into the darker areas with another tone once I have all the lightest colors established.   Sometimes I will do that by mixing in the ghost tints with primer colors.  You still get the benefit of a primer, but now it is tinted in a way that you could not make a primer color...


Here's  that lightest color established on the beastmen.  The bases will have snow on them, just like all the previous figures in this massive army.  So even more lighter colors have been added in those areas.


There are certainly more colors in the primer range than tans and browns!  There are greens and even a blue, which I will use here on a few Mantic figures, which have an obvious under sea theme.  You can see what the slate blue primer looks like on the test spray.


After I put the blue primer layer down, I started to mix in some seafoam green to get a few quick color transitions.  I will be painting glazes over this with the Reaper clear paints to enhance the depth of tone and shades, along with golds and copper NMM which will see the original greens and bues showing through.

That is all a part of the Shaded Basecoat technique, which is setting up the layers of glazing in advance.  Sometimes the glazes are meant to darken and enhance these early layers, which is the case on the beastmen.  Sometimes, however, I will actually put layers of color that are the opposite of what I did during the primer painting phase, using that as an underpainting.


Finally, I added a few spritzes of the slate blue on metal areas, such as the weapons and armor on the beastmen and this Gondor figure.

I will try to do a few step by step articles to show how I take advantage of all this rapid primer painting, so stay tuned for those!

I am also going to start doing the live sessions again, now that we have learned a few things about gaining more control over the camera focus and macro settings!  If you want to see more of that, I have established a patreon page which will create a bit more time for those live action tutorials:


Monday, November 6, 2017

A Larger Scale


As most of you know, I have been at this blog thing for quite some time... well over 5 years.  There have been thousands of posts, nearly 1 every 24 hours over the life of the blog!

I have also tried to create as much variety as possible, with every possible manufacturer and genre, also including all important basing, which you know is my favorite :-)

I try to blend how to posts with introduction to new materials and tools, so that folks who play with their minis have a great setting for them too.


As you can imagine, this takes a considerable amount of time.  Between the photography, image processing, writing the articles, etc., it can take 2-3 hours every single day.  Now that I am doing the facbook live tutorial sessions, that can be 5-6 hours in a single day of blog/tutorial maintenance.  

This is on top of the normal work that I have to do, which is a 7 day a week job all by itself.  For almost a year, it had become very evident that I needed to find some way to fund these projects.  I didn't want to 'monetize' the blog or you tube pages, because those ads are very irritating!

The Patreon route seemed to be the least obtrusive, and the most flexible.


The Patreon page has now gone live, as a basic framework with 1 pledge level.  It is $1, because I wanted to keep things as simple as possible at the outset.  There will NOT be exclusive content, because I have also found that irritating on other web pages.  If you feel like you can pledge more, it will help a great deal. I wanted everyone to have a chance to see everything.

I have one 'reward' thus far, and that is the chance to win a raffle of this Nocturna miniature.  All patrons who pledge their $1 have a chance to win this figure.  Should the page grow, I will add more of these raffle figures.

Hopefully the patreon page will do very well, so that I can make the raffle figures larger scale figures like this one from Nocturna!  I really love these, and it would be great to paint more like it.


I want to say thanks in advance to anyone who contributes, as it will be a tremendous help!  I really enjoy doing the blog, the facebook live sessions, and answering questions on facebook, etc.  This will just make it a lot easier for me to reach a greater number of folks!

Here's a link:

https://www.patreon.com/JamesWappel


Sunday, November 5, 2017

Drumbeat


Here's something that I was able to work on during a podcast recording with the folks at Models Workshop.  I had originally worked on it over 10 years ago when I first started up my Lizardman army!


It was interesting to do this, since at that time, I was just starting to develop the Shaded Basecoat technique.  While that has undergone many alterations since, the essential idea is the same.  Start with the light middle tones and work lighter as fast as possible to cover the entire surface of the figure.


Once all the surfaces have been covered, and the lights and darks established, I can do several series of glazes.  The aspect that has changed the most is what I use for those glazes, and that I do more color contrasts in those mid tone areas.

These days, I use a lot of the Reaper Liner paints and Clear paints, along with the new Secret Weapon weathering paints.  All of those are fantastic for glazing, and better yet, they are just as effective for the mid tone work that follows!


He's also here:


Saturday, November 4, 2017

Kennel Klub


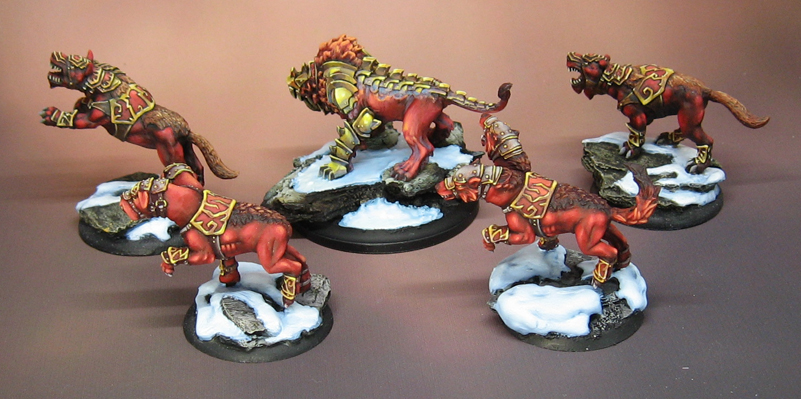
This set of doggies had an interesting juxtaposition of colors and tones, balancing the deep reds, golds and blueish tint of the snow.


These had to match some previously painted units, which emphasized the hell hound theme.


I had to draw on a number of the techniques that I describe in a few of my painting videos, especially the Raging Reds and Painting Gold NMM.  It seems that people have a lot of trouble with reds, both making them lighter and darker.

Making them darker by adding a very deep blue helps to keep them from becoming a 'dead' brownish red.  This also sets up your lighter version of the reds, where yellows are used to lighten it.  The yellows keep the reds from becoming a chalky pink, and now that warmer tone is set against the 'cooler' shadow reds.


The bright yellowish golds are handy for accentuating the darker reds, and form even more of a contrast to the darker blues that were added to the reds for shading.


Finally, the lightest, blueish snow helped to make the reds seem even warmer, but still there is a hint of commonality in the colors, since blues were added into the shadow parts of the red.


This was certainly an interesting set of figures to work on!  If you are interested in the videos that I mentioned, you can get those directly from me on a USB drive.  I have many other colors that are covered as well, along with several NMM videos and lots of basing too!