Thursday, January 14, 2016

Show me some skin


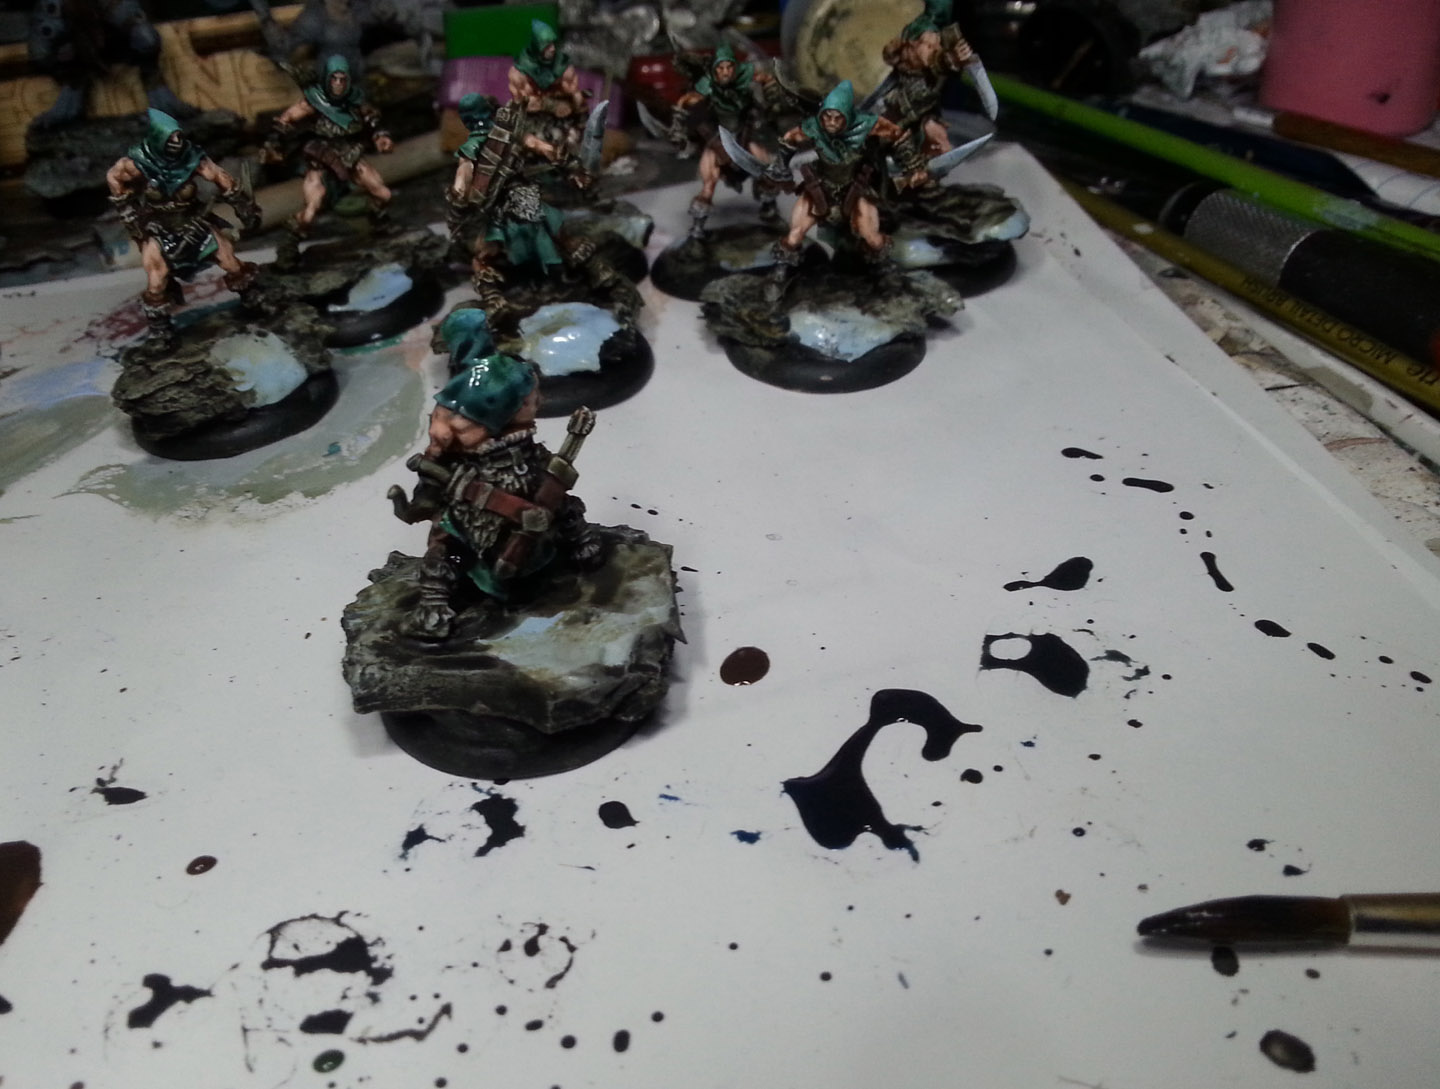
The second phase of the Glazing begins!

Once the 'dirty work' of the general glazing was complete, I painted the snow on the bases.  It was a very basic combination of slate blue and blueish white.


You can see what the general transition looked like in the lower right hand corner.  This is also why I emphasize using the larger palette, and deploying my colors across a broad swath.  It allows me to see the entire transition, making it far easier to match a certain layer.


Snow complete!  This will also give me a good guide as to what my lightest lights should be.  Otherwise, the skin highlights could possibly have ended up a few shades too light compared to the snow.


This is the part of glazing that seems to be more unique to my method.  What I am doing here is mixing a glaze color with 'regular' paint colors.  This creates semi-transparent layers which can do a variety of things.

By mixing the green with the Flesh shade, I made an excellent greenish shadow color.


I also mixed a medium skin color with the Flesh shade.  This would provide a darker version of the skin.


Using the very controlled glazing method, I started to apply these translucent darker shades onto the recesses.  I would emphasize the greenish hue on surfaces that faced the ground, or were near something dark.


This would let me paint a lot of surfaces on a bunch of figures quickly, but also give me the freedom to not worry about paint drying.  My shadow colors were very easy to recreate.  No recipe needed!


As I move along, you will start to see a difference in those shadow areas.


That touch of green in the shadows make the skin colors have more depth, and also reflect the greens of the dark hoods and cloaks.


Again, this is all happening very quickly, since it does not take as much time to place these isolated semi transparent layers.


Once all the darker layers are in place, I can clean up any water marks or rough areas with lighter colors.


In this case, I added a few touches of purple to the skin colors, as purple is a very nice foil against cooler greens.  


At this point, I also went in to detailed areas such as the eyes and lips.


Skin colors complete!  Time to move on to areas such as the greens and the blades!!  Stay tuned...


Wednesday, January 13, 2016

Let the Glazing Begin!


With the Shaded Basecoat technique complete, it's time to get to work on the Glazing stage.  I have a few glazing colors out from Secret Weapon Miniatures and Vallejo.  Each of them have very different properties.

The Vallejo glaze colors are thicker, and even somewhat opaque in a few cases.  But, since they dry to a dull finish, I like to mix those together with the Secret Weapon washes, which can be a little more glossy.


That's one of the things I really want to show here... that glaze colors can be mixed together, or even be allowed to mix together randomly on the surface.  This way, you can make any sort of glazing color that you require.

Also, by Glaze, I mean a very controlled wash.  The idea is to target very specific areas.  You are not taking a giant blob and washing down the entire figure at once like dipping.

I put out a number of glaze colors on the palette, so that I can make those mixtures more easily.


I really like to mix the blue with a sepia color, since that can be more greenish, more brown, etc.  Should I not mix them together too thoroughly , they will do that random color transition that I mentioned earlier.

I applied these glazes to the bases, changing from a black/sepia color to umber to a blue/sepia mix.


While the glaze was still wet, I took a piece of tissue and dabbed away at certain points which I wanted to be lighter.  This is a watercolor technique that I used to employ in my 2D art, and it's very handy here as well!!


These glazes were also brought up onto the boots, so that both the boots and bases would tie together a little more.


This black/umber/sepia and blue mixture was also used on the fur sections.  It's one of the main reasons I used the same few colors early in the Shaded Basecoat phase, because I knew the base and the fur would be very similar in color... and that the same glazes would work to shade and tint them.

Tinting is something that will be emphasized more on the hoods and cloaks.


I also used this same set of glazes on the quivers and scabbards, but I let more of the sepia enter the mix.


The next area I want to glaze is the skin color.  I will let all these glazes dry first, so that it does not get pulled in by the subsequent skin glazes.


The first layer of glazing on the skin involves two of more opaque glaze colors... flesh wash and umber wash.  These are also more 'sedimentary',  in that they tend to deposit more particles of color in the recess areas.

The approach here is very important.  These glazes must be very tightly controlled, so that I don't have to do too many subsequent layers of regular  opaque colors to clean things up!


This mix is mostly flesh wash with a touch of umber.  It is lightly applied, and even removed from highlight areas by swiping it quickly away with your fingers.  It's impossible to show that in the photos here, since I don't have 5 hands :-)  

However, it is shown quite often in all of my painting videos, including the Glazing Away" video that covers all of this technique in depth.  It's available here:


Another thing to remember about glazing is that you can do multiple layers to make a surface be darker... not all at once!  You can go over certain shadow areas two or three times to make them even darker.

The benefit to this is that it's a lot faster to apply than layers of regular paint, and you can tint along the way.  For example, adding a touch of blue wash to the darker layers would give me a hint of green in the shadows.  That's a lot easier than endless layers of color mixing, praying that it stays wet for hours! :-)


Now I will glaze the hoods.  Since these are supposed to be almost black, some tinting is involved.  I will be using some green, some blue and black glazes here.


You can see the comparison already.  Remember, I use my fingers to remove glaze colors from areas that I want to remain a little lighter.


I think I put 3-4 layers of glazing on this section.  The first layers were more about tinting, whereas the last few were more about making the shadow areas as dark as possible.

The glazing stage enters a new phase in the next episode, so stay tuned!!!


Gearing Up


Some of you might have seen the Sophie and Lady Dynamite images that I posted recently from Magic Reality Miniatures.

The figures are in, and they have been assembled and based!  Some extra gears, a few other odds and ends, and it's all set for painting.

She is only the beginning of a continuous stream of new releases that Magic Reality has planned.


This is Lady Dynamite, and she's ready to rock the town with some serious explosive firepower!  Hot stuff indeed.


There will be lots of grease and grime on the gears, which I am hoping will be a fun contrast to the character of Lady Dynamite.


I will try to take some WIP images as I paint her, so you can get another peek into the process!

Here is a link to the Magic Reality website:


Tuesday, January 12, 2016

The Mixing Bowl


So, we move on with the ten ninja archers from Red Box Games.  I thought at this point it might be helpful to get a look at the colors that I was supposed to match.  The dark greenish/blue will be an interesting balance against the warmer black.


Here's the color test figure, where I tried to figure out where I could translate the color information of the piece of art to an unrelated miniature!


I started working on the greenish parts by mixing up a turquoise color along with a touch of the flesh tone.  This would grey it down a bit, and make sure the color would not be too 'unrelated' to the nearby skin colors.


I'm working a little less transparently now than I did with the skin colors of the previous stage.


As with everything Shaded Basecoat, working quickly is the key!  Don't linger in any one area on any figure.


To get a little more snap to the green, I added a little warm yellow green into the mix.  The bright teal color would also make it lighter.


The idea here is only to figure out where I want lights and darks to be.  There is no blending or any high level work going on.  Also, I am not exactly sure what the final colors will be, since I am matching unrelated art to a set of figures.  

Instead of investing hours in painting an area, only to find out it's not going to work out, I am simply spending a few minutes here and there to block in colors and see how things look!


The hood would obviously catch the most light, but as you can see from the artwork, it's also going to be very dark.  Another interesting challenge.


A touch of that green is kept in the mix from keeping it getting too blue...


The greenish colors on the cloaks are not lightened nearly as much.  In fact, at this point, I wasn't even sure they would have that greenish tint, or any freehand designs.  Once again, I can change everything on the fly if need be.

Since I have some kind of color on all sections, I do not have to guess in a 'vacuum' (that is, comparing it to white or black primer). I can get a hint of how these colors compare to each other.

I'm also adding a bit of red accents here and there on scabbards and quivers.


While there are no streamers coming off these figures like the art, I thought I could still work on that red via the scabbards and quivers.


Next up, the Glazing stage!!!  Stay tuned.

As I mentioned in part one, the Shaded Basecoat video is available on Kings Hobbies and Games.  It is but one of the 53 different programs that I made, which includes basing, terrain, color theory, skin colors, NMM, and much more!


Time for some paint!


All right folks, time for some of those step by step images I told you about.  This is going to be a modified version of my Shaded Basecoat technique.

The point to this technique is to allow me to paint large numbers of figures in a much easier fashion, using a simplified mix of colors.  The simplification means that matching something which may have been painted long ago will be a lot easier!  I won't even need the same jars of paint, since I am not relying on any one specific color.

Normally I prime things grey, but this was a unique situation where the figures would have to be attached to the bases prior to painting.  I definitely prefer to paint this pinned to a dowel rod off the base, but the unique set of circumstances dictated otherwise.


I knew from the many previously painted figures that a lot of tans, browns and gray would be involved.  So, I was going to take the same few colors that would be used to paint the rocks of the base right up through the figure itself.


Using the filbert brush, I mixed together a greenish tan, starting at about midtone level, halfway between dark and light.  All of this is done very rapidly.  Keeping inside the lines, so to speak, is not part of the shaded basecoat technique.  This is very similar to blocking in colors as if you were doing a 2D painting.


The plan is to quickly designate areas that I want to be more light, and to drop down the colors needed on the base, fur, and other spots that will be a grayish brown in the end.  Also, I want to have an 'underpainting', which subsequent layers of skin colors and such will be added later.


I moved along each of the ten figures, gradually lightening the mix that I was applying.  It is important to note that I am not dry brushing.  The paint is damp enough to flow cleanly.  The shape of the filbert brush allows me to place these oblique angle strokes in such a way that I can catch details without losing my darker areas.


I will eventually progress all the way to the lightest lights.

Another side benefit of this method is that I am firmly reminded to keep the lightest highlights on the upper surfaces!  Working "globally" across the entire figure all at once in this manner prevents me from getting locked into one area, and ending up with a foot that has the same intensity of highlights as the top of the head or shoulders!


Lighter and lighter I go...


In all this time, I have used the same blue/white color and the same dark sepia.


All of the undercoating is complete, and I have a much better idea of where I want light and dark to be placed.


To this, I will start to add some 'unique' colors, such as the skin, cloak, and hood colors.  This first skin color layer is applied in a slightly transparent manner, so that the underpainting comes through.


Doing so will allow some of the cooler greens to come through this new layer, and add more depth to the skin color with a lot less effort!


I will do a similar 'shaded basecoat' layering on this skin color... working from that middle tone all the way up to the highlight.

Keep in mind, the shadow areas will be created with those later glazes!


Yes, all of these ghostly pale skin tones that you see now will have a host of shading and tinting added to them.  Again, this allows me to not only get through all ten of these in a more speedy fashion, but this color scheme can be replicated over and over again without the need to remember any formulas, or rely on specific colors.


We all have had favorite paint colors be discontinued.  Therefore, I try to keep any color scheme down to 5-7 core colors, usually ones that could be made by my if the need arose.

Stay tuned for the next episode, where I tackle some of the other shades of tans and greenish black!

The Shaded Basecoat technique is featured in all of my instructional videos, but it is also shown to a higher detail in the first of all the titles... Shaded Basecoat Technique.

That is available at Kings Hobbies and Games: