Wednesday, July 16, 2014

They get into everything...


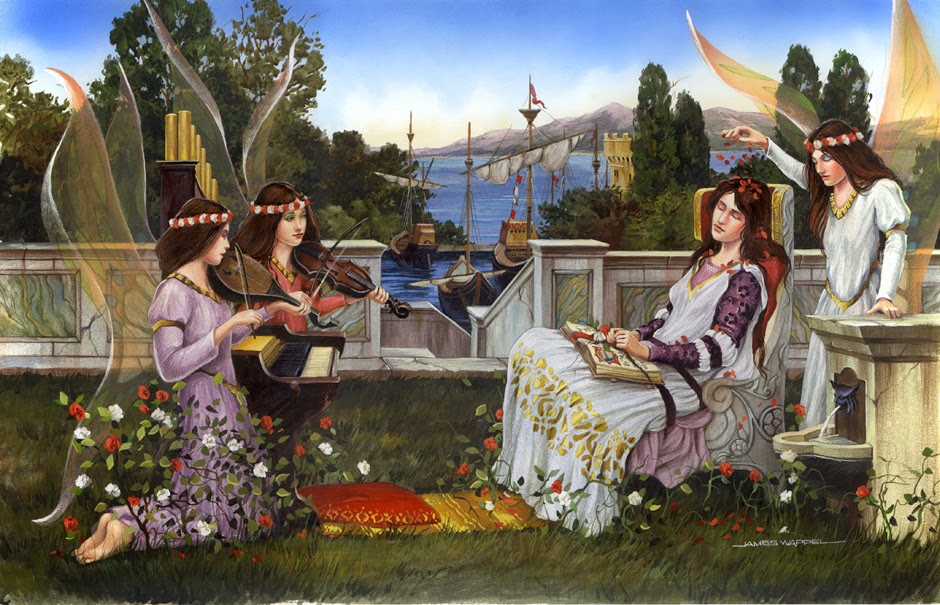
Just like the Arthurian series, I had been trying to find all the images from the homage to John William Godward, one of the last of the Pre Raphaelite artists.

At long last, they are discovered!  And I forgot at least 2 of them entirely!

This was actually one of the last of the series, called Caught in the Act.  Yes, lots of marble, and pesky baby dragons!


Then we have Pool Side Fun, where I had a blast with the reflections in the water.  You will notice that the same dragons keep popping up over and over...


Next up is The Favorite, which was the first in the series.  It is where I first got hooked on painting marble!


The New Toy.  I really enjoyed playing the various colors of marble off the different fabrics.


This was the final painting in the series, called Fairy Symphony.

And Little Rascals.

All of these were watercolors on hot press watercolor board.


Tuesday, July 15, 2014

Climb aboard the Siege Train. Powered by...


While the original concept art did not show any glowing conduits, you know me and my appetite for such things.

Having read some of the back story of the Wild West Exodus universe, I know that a new 'power source' was discovered, and that it glows red.  So, I located a few spots on the engine that I thought might be fun.

With all the dark colors, and varying shades of gray, the extra interest added by such a glow could be very important.


As usual, out come the Vallejo fluorescent paints.  Keep in mind that while they are very thick consistency, they are very transparent.


You also have to be very aware of what colors you are using to lighten them.  Be sure to use high saturation yellows, and stay away from white.  You will be a weird pink glow instead. :-)


You can see the glow effect start to emerge.  I have to remember that all the dark surfaces near it will get darker, thus magnifying the effect.


Also, I will be doing some glazes on the glowing conduits themselves, which will make the lights that much lighter.


Final bits on the lights.  Now to work on the wheels and the back of the engine.


Here are a few more views of the nearly completed Shaded Basecoat stage.  I have tried to leave myself as much room as possible in the value scale to do more contrasts.


The reason I do the Shaded Basecoat is that it gives me a lot of flexibility as I move forward.  I can change things here and there... I am not locked into a certain path.


Even my initial glazes made quite a difference... those coming up next!  Keep this view in mind when you see the Glazing images.


All aboard for some Shaded Basecoat!


Here's something fun.  The very beginnings of the Siege Train from Wild West Exodus.

This item is supposed to be a centerpiece of their display at GenCon!

I was doing some color test on the engine, and these are some images from the initial Shaded Basecoat.


As always, I was working with a filbert brush, moving quickly, establishing where I wanted the lights and darks to be.


I wanted to play off a few different shades of gray.  Some would be cooler, and others would be warmer.  You can see that already.


Even more noticeable now, as I added more blue/gray to the mix.


This mix is now lightened, as I plot the highlights.


By using the filbert brush, I can do a fair amount of wet into wet mixing.  Keep in mind, however, that there is going to be a lot of tinting and shading in the glazing stage!


Highlights and reflected light applied!


I have now worked the cooler shades of gray to the lightest point.


Now for some brass trim.  I began with a greenish brown.


Planning out these highlights and shadows will be very important.  They will form a vital center of interest for the whole piece.


Just starting to figure out what's going to catch light, and what will be in shadow...


I will be shifting the temperatures of this color, just as I did the blue gray.  That will happen after the glazing stage.


Some shape now revealed.


Long sweeping curves such as these can be very tricky when doing NMM, and this is no exception.


Brighter still, but making sure to ultimately leave 'space' in the value pattern for the brightest highlights.


Just about there.  Next up, a test of some glowing conduits and the blocking in of some other colors.

Remember, that's what this Shaded Basecoat is all about.  Just blocking in the colors, and working from there.


Monday, July 14, 2014

What's old is new.


Here's an old timey metal marine that I converted long ago for the Demonhunters army.


I did some green stuff work on the lower legs, the chest and the helmet.  A different sword was added, and some purity seals.  I also added a storm bolter.


He is also here:


And, as a comparison, I shot the figure again using one of the other Hangar 18 backdrops.


It really does make quite a difference!  Wait until you see the Krios with different backdrops.


Breaking out the Big Guns


At long last... the Krios tank is DONE!!  Yea for me!

It was not the biggest thing that I have ever painted, but the "inside out" nature of this piece made it far more challenging than I expected.

It was actually more involved than a land raider, since there are more surfaces to paint.  So much exposed stuff, layered on top of each other.

Even though it was not huge, I still brought out the colossal photo backdrop from Hangar 18.  I think I could have squeezed it onto the 11 x 17, but look at how much room this setup gave me!


I didn't realize until after I had glued the final pieces together that the gun is supposed to be moveable!  Yikes.


Fortunately, the green stuff that I had added between the layers of glue on the two connection points worked out well.  Once I broke the full connection, the green stuff filled the gap just enough to provide some resistance.

Otherwise, the gun would never have stayed in the raised position.


It is nice to see the whole thing together.  There were many elements on this that I dreaded to paint.


I am definitely glad I stuck to the initial plan pf painting as much as possible before ever gluing pieces together.  This can also be risky, since you have a chance of painting the wrong gradations on a given surface.


It is not uncommon for me to have to go back into certain spots and rework them, so that the light looks like it is coming from the same direction everywhere.


I had hoped to use a little less weathering, but Forgeworld stuff tends to force you into that choice.


I am also glad that I chose to do the glowing effect, even if it was limited.  The color had to be red, like the Forgeworld example, but it was one way of making this my own. :-)


There are many more images to come, including a few sets on the other backdrops!  Stay tuned!