Friday, June 6, 2014

Why 2K?


Well folks, I had hoped for something more fancy for the 2000th post on the blog!  Yes, indeed folks.  In just 26 months of blogging, I have reached the two thousandth post!

However, in some ways, a work in progress style post, with a wee touch of 'how to' thrown in, is pretty appropriate.

All the while I was working on this, all I could think of was the Raging Reds video that I filmed for the kickstarter.  So many people have asked me how to lighten reds without them turning pink.


As you can see, this brighter red is being lightened with a touch of orange.  Had this been more of a burgundy, I probably would have selected a grayed down lighter green.


This is the big thing right here.  If you use too much yellow to lighten the red, it will simply become orange.  Use white, and it still will turn pink and chalky.

Therefore, I take this opportunity to use one of those bright flesh tone colors that is lousy for actually painting skin. :-)

This has a tiny bit of color to it... some red, in fact.  This helps to lighten the color further, but not become chalky.


This view of all the pieces shows you how that plays out on the figure itself.


I am still using the filbert brush and the #8 round craft brushes at this shaded basecoat stage.


I am also experimenting with some glow on this vehicle, so that it will look a little different than all the other versions you tend to see.  Obviously, I have one of the Vallejo fluorescent colors out on the palette!


I mixed in a sky blue to tone this down a bit.


As I started to mix in an off white, I had to be sure to toss in enough of the fluorescent green to keep the intensity going.  All I am trying to do at this point is jam all the bright colors down into the recesses.


Time to work on the cowlings again.  I mixed a tannish color with a blue gray so that the glow color would be replicated in a small way.  I will impart some more of the tan in other areas, so that it starts to look even more like brass or bronze.


I took the extra cowling piece and set it on top just to get a few ideas of what I would have to do on it.  Should I paint a lot of reflected glow on the underside?  Or would that be too visually confusing?  Wait and see.

And, many thanks for checking out the blog!  I will try to continue to have fun, informative variety coming your way as often as I can!!!!!!!


Thursday, June 5, 2014

Mages and elves oh my!


Another small collection of Reaper minis from the vault.  These guys were painted about 5-6 years ago.


I know I have painted this Ardynn the Slayer a few times.  He was the subject of a diorama once!


There was always something about the wraiths and spirits from Reaper that is very fun.  I think I could have even more fun painting this with all the techniques that I have learned since then!


Reaper minis always shine!


It's been a while since I posted a Reaper Miniature (which means a few days!), so we have Aviriel Tellerion, Elf Paladin.  One more very fun sculpt from Werner Klocke.


I went with the classic deep blue/gold contrasts here, keeping things simple.


She was actually part of a group of Reaper minis, shown here.  I will see what images I can find of the other members of the party!


Wednesday, June 4, 2014

Locked and loaded!


Here she is!  Base and all.


You can see that I added a bit more weathering to the plinth (from Secret Weapon) and the jeep hood.


Now you can see why I was very concerned about reflecting that green color on the lower skin tones.  I am so glad that I did the plinth in this way, because I love the weathering on the symbol!


There are a number of ways you can attach her to the base.  The last image on the right shows her pointing in the other direction.  I think this would make a fantastic trophy for a Memoir '44 tournament!!


She'll fight her way into your heart.


More work on the Hangar 18 Pinup Girl.  When you see the colors playing out on the palette, you will know why I had been painting so many of the Memoir 44 Americans!


Recognize the colors?  Look familiar?  Yes indeed, the same shaded basecoat colors, and the same glazes!


I was also trying to follow the original art as closely as possible.  Knowing that she is kneeling on the green jeep, I had to be sure and reflect as much of the green onto the shadow areas of the skin as possible.  That would happen on the legs, the closest area to all that green.

You can see me mixing the teal and flesh color together on the palette, mixed in with a little of the Valejo shade.


Then it was on to the face, and bringing out more details!


All the green shading on the legs is now complete.  I put some more extreme highlights on the skin tones...


More face details, and even a few scrapes.  While I had the Transparent Red out on the palette, I also put some rouge on the cheeks, and other parts of the chest.


Moving along!  More shading on the uniform and helmet, as well as the weapon.


I put in the deepest darks at this point.


With the darkest colors and the mid tones established, I could the do those final bright highlights!


Tuesday, June 3, 2014

One more time into the breach!


Well, since internet and printer issues have kept me from doing everything else I was supposed to do today, we have the conclusion of the Martinsville ridge conflict.

Tucked into those buildings are hard line German troops.  One of them is an objective for the Americans, but I will have to simply feign interest in that, so that I can concentrate on the left and center.

We see here some evidence that even the best strategies can go haywire... as evidenced by the equivalent of three '1's'... ouch!  Someone needs remedial target practice.


And this would be one of the reasons I spent all those early turns getting the armor into position, and even why I went ahead with the extra armor unit.  The tide of iron surges forward (with the help of  fighters overhead) and wipes out another unit.  It also means I have an objective!


Some long range artillery shots force the tank units off of that objective... using the "ignore terrain" element.  Other attacks fail to hit home (those darn stars again!)


Another card for the center!  The armored unit go back up onto the hill.


A desperate dash for Hill 122 by the Germans leads to a few dead Shermans.  Hill 122 (indicated by the iron cross) is now open... or is it?


In response to all the deadly artillery fire from the Axis lines, the GI's call in a big barrage!!  Unfortunately, it is just as accurate as the US artillery in Kelley's Heroes.


The Fuhrer himself orders the last remaining Panzers to deny the Americans their prize!


This was a card that I played to shuffle my hand.  I had run out of cards for the center, and this RECON card allows me to draw two and pick the one I want.


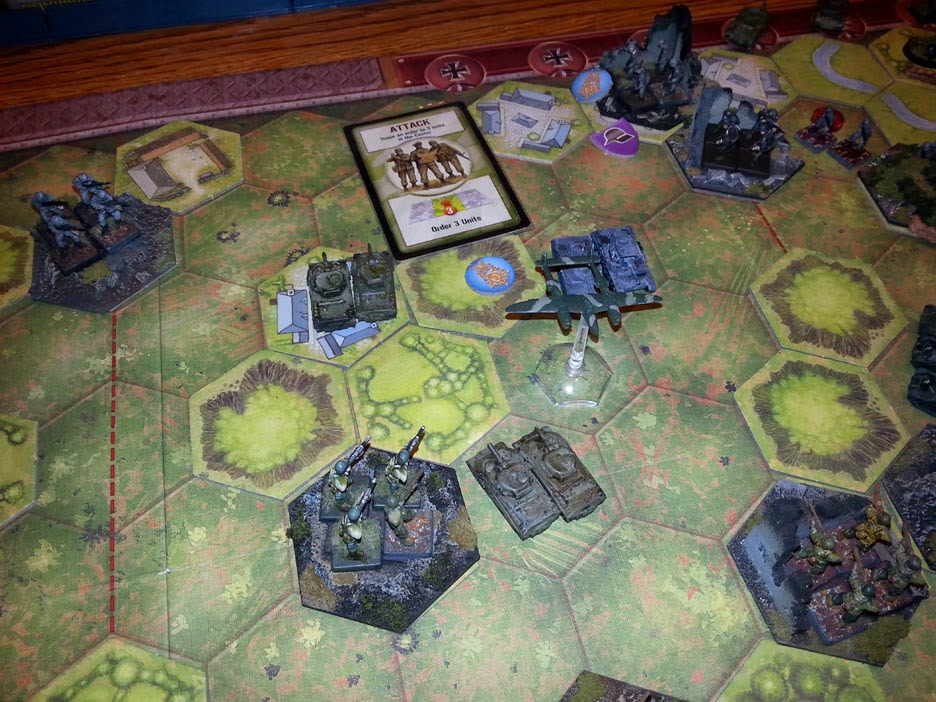
In the meantime, my air squadron continued its harassment of the German units, denying them cover, and also strafing...


Here is the card that I was seeking!  Action in the center... but for the Germans.  Cowed by the Fuhrer's demands, the last armored unit pushes forward into a murderous hail of fire...


Fire from above, from the hilltops, the hedges, and the tank units!  Let the Panzer turrets fly!  Flames burst as ammunition explodes, and the Victorious Allies liberate more of Europe...


Martinsville Ridge


After the failed Panzer Counter Attack in the first scenario of the campaign, it was time to see who would gain control of Martinsville Ridge.

Here is the layout.  You can see all kind of heavy terrain, with one hill after another.  This should be ideal for the dug in, elite German infantry.

However, having been soundly defeated in the first scenario, there would be negative effects for the Germans before this fight would even begin.

This is due to the Victory Event Roll.  The more victories you rack up in a campaign, the more dice you have to negatively impact enemy units, or even his command structure!

I was able to weaken both of the Panzer units, as well as one infantry unit.  In response, enemy actions forced a few American units to fall back.


I was also able to replenish my reserve rolls.  A new tank unit entered the battlefield on my first turn.  While tanks do not do well against dug in infantry, they can be very brutal against exposed troops.


The Germans counter with a move towards the one unit of GI's that has found themselves virtually cut off behind enemy lines!


As that unit retreated, I attempted to move up armor to take advantage of some future card plays.


That lone forward unit of brave GI's manages to survive yet another assault, denying the Axis an early victory point.


As I have mentioned before, setting up future moves is vital.  That is happening here, even though no damage is being done to the enemy at the moment.


Patience pays off, as the German units are drawn to the American objective, seeking to deny an all important victory point.  Even more vital, they must take away the bonus points that are awarded to the US for holding such objectives between games.


Ah ha!  At long last, I get to use aircraft!  These work much differently than the standard air power card.  Your planes don't cause the same kind of damage, but you can do some very nasty strategic elements to your foe.

Denying him his cover bonus, as I would do often in this battle, can make your tanks truly savage.

How handy that I had an additional unit! :-)


Your planes are vulnerable, however, if you leave them too close to the enemy units once their sortie ends.


The exciting conclusion is on the way!

In the meantime, I wanted to show you the difference in the cinematics of an early game compared to this most recent adventure.

Even with a good portion of the figures painted, it is just not the same.  The terrain hexes, as I have mentioned, add a huge visual element.  It looks much nicer, but it is also a lot easier to play.  You can move the units around more quickly, and get a better sense of the battlefield in far less time!