Thursday, August 22, 2013

This was supposed to be Halo night...


You just never know who might stop by unannounced!

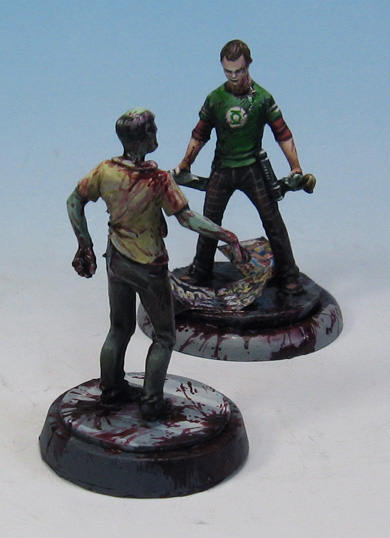
Here's another walker from the original Zombicide game.  I never ceased to be amazed at what they did with all aspects of this.  The minis are really nice and paintable when you consider the low cost per fig.

There are all kinds of fun painting opportunities on them... colors, blood, bases, and so on.


I painted this one very quickly as a warm up for the painting blood video.


I have some more walkers, as well as a few runners, so that should be fun!


Here's a sneak peek at a figure that I painted a while back.  You will be seeing him next week!


Wednesday, August 21, 2013

Blood 'n Guts


I don't think there is any contest for which video wins the "Most Fun" to film award! :-)

This was an absolute blast.  The materials were relatively simple for doing the special effect on this Raging Heroes Gluttony figure.


Here's the mini prior to its blood treatment.


Another sample 'sketch' to show the primary ways to do the effective blood splatters.


Time to paint the Secret Weapon body parts!


Almost ready for the blood on the base!


Meanwhile, we need some blood on those guts!


Blood everywhere!  Even on the palette.


Bloody base!


Gooey blood...


Blood effects finished, and the figure attached to the base.


Group Hug...


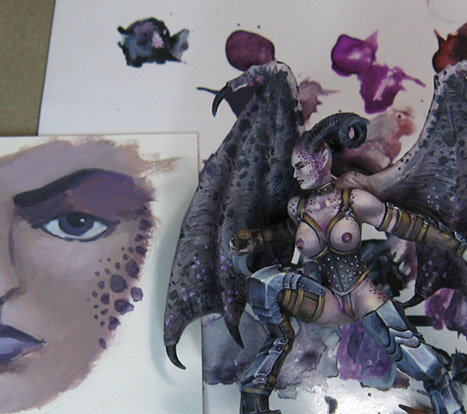
As I mentioned yesterday, one of the things I was trying to do with the Ultraforge Demon was show how you can transfer a color scheme between two similar, but yet radically different, figures.


In this case, it was using the same color scheme as the Raging Heroes Mantis Warriors.  Obviously, the little gals did not have wings, but there were enough surfaces that could be repeated.


I did the armor in a similar set of colors as the claw/hoof sections of the Mantis warriors.


The spots on the wings were a lot of fun.  On the little 28mm figures, all I could do was the much smaller set of spots and such...


There they are!  More pics of the finished Pleasure Demon from Ultraforge when I can add in the final details!


Tuesday, August 20, 2013

When does a house become a home?


When it has that 'lived in' look.

I have been painting many of the terrain pieces from Terrain Week for the packaging artwork, etc.


Just in case anyone was freaking out about seeing only pink, white and light brown :-)  I was thinking of putting a series of images in a slide show form, or something like that, just in case people wanted a reference.


Obviously, many of us have already painted terrain pieces like this before!  It is pretty straightforward.


Using that craft paint is the biggest key, since it flows so well over very absorbent surfaces, such as the balsa wood roof!  It also covers the pink foam well, like the chimney.


Nothing like a Fantasy setting or even D & D with a set if building like this!  


Once the original set of videos are done, sent, etc.  I want to expand on them.  I want to make Inns, Blacksmith shops, and so on.


I hope you have fun with yours!!


No mailbox, though...


Ultraforge Pleasure Demon


Another challenging video.  This time, it was trying to match the Mantis warriors from Raging Heroes to a much larger Demon from Ultraforge.

I got the idea to do this one from my own dilemmas of how do you transfer a color scheme to different minis from the same army... especially when they are radically different in size and shape, such as these.


Yup, still glazing away!


Another sketch exercise as a handy guide...


More and more shading...


It always looks so different after that glazing and shading stage.


Spots!


More spots!


Almost there!  These larger figures have been very different from the 'standard' minis of the earlier videos, with the camera set at different angels, no magnifier, and so on.


Monday, August 19, 2013

Time for some shingles!


Terrain week. House.  Then another house.  Balsa wood.  Foam, Glue.


Raise the roof!!!!!!!!!!!!!


This time...  chimney.  An improvement over early attempts over a year ago.


Putting wood planks on the sides of the house.


And the roof.  Cereal box time!  And more balsa wood.


2.5 hours later... roof!


Once all the glue dried, this darn thing was really strong!!!


But wait... that was just the sample!


More shingles.  But this time, made out of cereal boxes. :-)  Conservation is key!  Very green, as in saving my wallet.


Some Oxide Paste for additional texture and strength.