Thursday, November 22, 2012

Over the river of blood and through the jungle to Babo's house we go!


Happy Thanksgiving everyone!  What better way to celebrate than to go back to the very first Thanksgiving... when the Old Ones walked the Earth, and the child races had yet to be born...

This is one of two Engines of the Gods which I scratch sculpted, using my trusty tinfoil and apoxy sculpt method.  The howdah was made mostly from sculpey.  If you do a search (brand new gadget!) for Lizardmen or Engines of the Gods, the work in progress images should appear in an earlier post.


As I love painting spacescapes, I could not resist the temptation to paint a tiny one on the portal!  It was a blast.  The skink priest can actually be removed if you need him on foot in a regular unit.  Or, if you are me, when he is shot off the howdah on the first turn!  Therefore, the portal can be taken off as well.


This view really shows that spacescape, which was a painting I did many years ago called Chaos and Creation.


I had a lot of fun sculpting the stegadons.  I loved making the scales and the horns... adding the extra bits, etc.


Here are some views of the back, showing the terradon nesting grounds.


My army was comprised of skinks, terradons, salamanders, and these Engines of the gods.  Before 8th edition came along, I did not even have a Slann Mage Priest.


I used some old edition skink archers to fill out the crew.


The base was designed to match the rest of the army, as well as the Temple of Blood display board.  If you are new to the blog, and are not familiar with the Temple of Blood and the Legend of Stikki Wikkitt, I suggest you do a search on that as well. :-)


There was quite the story behind the army.  It lead the way for the Tainted Pharaoh and his legions.  Many games were played with this army, including a very fun four part campaign against the forces of Chaos... who else?


This could also double as an ancient stagedon, with giant blowpipes (you can see the stanchions for them towards the front of the howdah).  I had a skink chief that could also ride on this monster.  I don't think I ever played a game with that setup, however...


I will post some images of the other Engine of the Gods later tonight, so stay tuned!!!!!


Yes, it is Thanksgiving, and that means it's time for Cathy's Cranberry Sauce!!!!! Yummy. :-)


More Angron management... the rest of the shaded basecoat


All right folks!  Time to finish off the last of this shaded basecoat stuff, and get set for glazing and tinting this piece.  

You can see that I did some more work on the chain axe since the last post, as well as the face.  Precise colors are not important right now, since the idea is to tint it during the shading process.  This allows us to make adjustments on the fly.  This is very handy when you are trying to match colors from something you may have painted a long, long  time ago! :-)


Hey, where'ya goin?  Don't run away!...


After all the golds and other metal surfaces are complete, we can get into a nice red accent color!


I mixed the red with a bit of grey to cool it down as it was darkened.


The lighter reds are created by mixing in some vomit brown.  This is a good way to get the reds lighter without becoming pink.


As I work on those reds, I also think about some OSL, as in some glowing conduits on the back of the head and under the chin.


More lightening on the reds...


And for those of you wondering about the rest of the set, here are some images of those other pieces...


Just as with Angron, the whole point of what I have done thus far is to make these ready for that dramatic glazing/tinting shading process.


I will post the images of that process after the holiday tomorrow!


Looks like Abima is getting ready for a game of full contact Uno, Wappel style!!


Wednesday, November 21, 2012

Some Angron management...painting work in progress


As we waited all day to hear from the mechanics at the garage (still waiting, so no word until Friday, I guess) I ramped up the work on the Forgewprld Angron set.  I had been working on the other parts for 2-3 days, but I wanted to concentrate the photos on Angron himself.

This is a gold recipe that I have not used in a long time.  It is modified a bit, but it should still be fun!  It is based on snakebite leather.  There are some Vallejo colors I have been using for the last year or two for this purpose, but I wanted to give this a try. :-)

You can see the snakebite leather (mixed with some very dark brown) applied across every gold surface.


Working with my usual shaded basecoat technique, I thought about how I would get to my lighter colors.  

This view of my temporary palette gives you a sense of the plan... I wanted a cooler light on the left, and a slightly warmer light on the right.  The warmer colors will generally be facing upwards, and the cooler shades towards the ground.


Those warmer tones are mixed in with my lights on the sky facing surfaces...


And the cooler lights towards the ground.


To make sure I don't end up with an 'orphan color", that light color is also applied to the fur cape.


The skulls get more of a red, so that they separate a bit from everything else.


A bit of that tone is used on the face.  Later tonight I will have another post to show the progression of the lightest highlights.  Then it will be time for glazing and tinting fun!!!


Incubating the Incubi... primed and ready


A little bit of primer in between several other tasks today.  It is really nice to see the converted Incubi all one color!  I am looking forward to a color test figure tomorrow or Friday perhaps...


For those who have not seen the previous posts, I wanted to have a squad of Incubi for my Adepticon army.  I had a Raging Heroes miniature (the one in the middle) which made a great Archon.  There were some left over bits, such as two alternate heads, so I used those on some Kabal warriors.


The Klaives were made with plasticcard, as were some of the trophy poles on the backs.


It took a bit of re-working to make the arms hold a two handed weapon, but it was worth it in the end!


Now I have to get back to the Reaver Jetbike conversions...


Kicking things off: the first experiment


Towards the end of the day, I took about 40 minutes to try out a test video.  This was really more about camera angles than anything else.  I wanted something a little bigger, and not incredibly complex.

I grabbed a base, a palette, some brushes, and turned on the camera!

I would learn a lot in just the first few minutes of this attempt.  Keeping the thing I was painting in the camera view (and the palette too) was going to take a lot more practice than I thought.  Perhaps if there was a person behind the camera, it would not have been so difficult.  It is possible that some of the videos will require much more than a tripod!


When I watched a part of the video, it was really hilarious how often the screen was filled with my hairy knuckles! :-)  Not long after that, however, there were fewer and fewer instances of such an eclipse...


The base progressed, and I got more used to dealing with the setup.

Since I work so rapidly, the early stages have lots of wet paint swirling around.  I am sure you have seen this shiny effect, even in the still photos of previous projects.  That is a fact of life that I may just have to deal with.


A similar thing would probably happen with the glazes, so I will have to be very careful which way I face the miniature in the lights


When the real vids are shot, it will be during the daytime, where the ambient light in the room will cut down on the harsh lighting effects.


There is certainly some film for the blooper reel!  There was one portion where I sneezed, and then another incident where I whacked the tripod with my knee.  Apparently the New Madrid fault became very active during the filming!


This is probably going to be a very unusual kickstarter, with all kinds of crazy stuff like this being documented along the way!  Hopefully it will make the eventual DVD's a little more meaningful for those who follow this blog. ;-)

If I get a chance, I will try to watch the rest of the tape tomorrow.  We all think that it is weird to see ourselves on TV, but seeing myself painting for the first time was a strange, nearly out of body experience!!  That is something I will probably never get used to!


Tuesday, November 20, 2012

Dark elf or Drow... which would you choose?


Well, you won't have to, since I will be doing both!

In between many other tasks, I primed those Raging Heroes Blood Vestals.  It is always fun to see figures get to this state (especially when they are heavily converted/kit bashed) of one color!


I will be doing a few color tests on these figures, as they are intended to be the subject of a few painting DVD's


As I mentioned in a previous post, I will be doing a dark flesh tone Drow, and a lighter skin tone Dark Elf.


I will also be experimenting with tattoos and other free hand designs. Who knows, they may be the subject of one of those painting videos as well!


Next I will post some images of my converted Incubi, which I also primed.  They look so different now!


Kickstarting Kickstarter!!! Testing 1,2,3...


OK, I think many of you have noticed in these recent posts that I have been throwing out the hint that we are working on a potential Kickstarter program!  Nearly all of the posts lately have been 'how to' articles, as I attempted to train myself for breaking down all these techniques into information that could be more easily absorbed by you, the viewers!

Many people have asked us for videos and DVD's over the years of our painting techniques, but we never had the time or even the means.  Until now!

We have been planning and researching for many weeks now what would be involved with such an endeavor. It takes a lot, let me tell you!  So much planning, endless lists, etc., and we are still formulating a proposal.

Obviously, the photography element is the most crucial.  Rich was kind enough to drop off the camera yesterday despite not feeling all that great.  We spent hours looking over the camera, checking out lenses, etc.

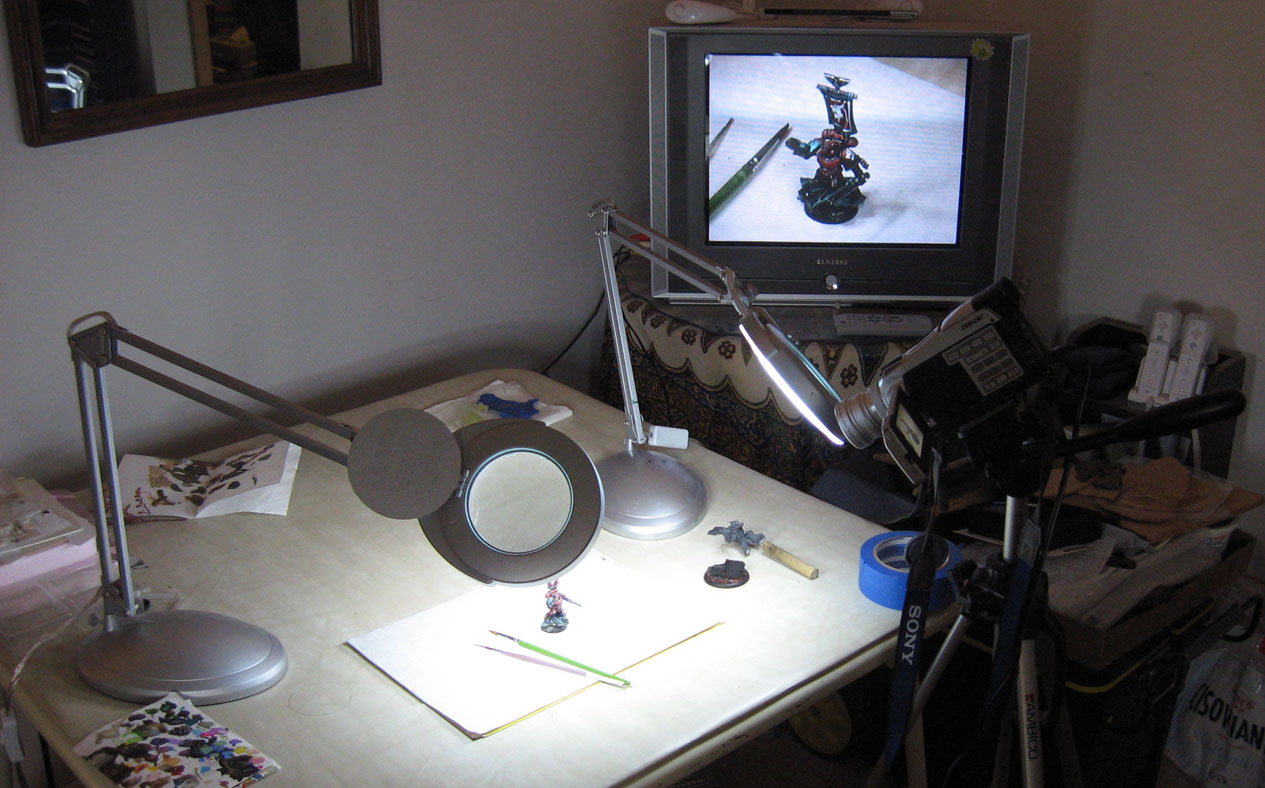
I had set up a crude studio with lights and outlets, etc.  In a happy accident, or Wii TV happens to make a fantastic video monitor!  This is exactly where it normally resides, if you can believe that..

Rich, and Cathy watched closely as I tested to see how close we could get to the miniature, would things stay in focus... centered on the screen, etc.


I will be adding one more light to this set up.  There was even a happy accident, as I discovered that this set up could be very handy for painting very large monsters and vehicles.  

Normally, those do not fit under my magnifier light.  I noticed that the miniature is even bigger on the screen than what my magnifiers can do!  So, I am tempted to do some painting using the camera as my magnifier.


Anyway, there will be many more tests.  Some of them will be posted to the blog.  Over time, I will begin to post some lists of titles which I will be working on, etc.  The initial videos will be of more basic topics as we figure out what will work best, etc.

I can say that we will be adding a voice over, as passing 737's just overhead could really ruin a good take!
Also, I have been in discussions with some other miniature companies about using their figures for our how to DVD's.  That has been very exciting.  I can tell you for sure that Raging Heroes figures will be a common sight!  Urban Mammoth is going to be there as well.  Both companies have great miniatures!


Cathy suggested that I try to mark the areas where the palette and lights work best.  A very good idea!


So, we hope to provide all the loyal Wappellians around the globe what they have been clamoring for...

I will keep you guys updated as this moves along!  Stay tuned!