Tuesday, June 25, 2013

Another trip to Home Depot!


Well, not really.  We did have to go everywhere else, it seems!  My apologies for the delay on the post.  Picking up the new laptop and getting all the polystyrene tubing took a lot longer than I thought.


So, here we have the bases from the Mosaic Tile video.  I love doing these!


In this case, these were done using the painted on method.


I think you guys will have just as much fun!!!


Keep your stick on the ice...


Here's another example of the shaded basecoat in action.


You can see most of the colors that were used spread out all over the palette.


As usual, these colors were made much lighter than they would be in the end.  That's because many layers of glazing awaited!

And here we see some of those glazing colors.  Most were Secret Weapon washes (algae, soft body black, armor wash, dried blood), but there were also some GW washes (the orange and burnt sienna), and a Vallejo sepia...


Even this image really gives you a sense of what those glazes do, even in the first pass.  You will see that I vary my glazing color, usually taking my cue from what color is already on the mini, although sometimes I go the opposite direction.


Each of these subsequent images will show my working my way around the figure.


You have seen me in past posts show how I will wipe away certain parts of my washes, with either my finger or a paper towel.  This helps to preserve many of my lightest shades...


I try to keep working within clearly defined areas, just as I wold with a watercolor painting.  This lets me drag an existing wash into the next area of tinting and shading, so that no crazy edges or water marks occur.


Putting those darker glazes on the 'teeth' really made the glow shine!!


I also worked in some brown liner and some other opaque dark colors into the still wet washes.


Doing so let me get some very nice dark washes that flowed quite nicely.


Here is a new experiment.  I mixed the fallout wash from Secret Weapon with my Vallejo fluorescent paint.  This was to see if it could give me some darker shading in my glowing area, but keep that high chroma feel.


It really did what I wanted, and then some.  I discovered that I could also use this as a way to paint some subtle OSL effects on nearby surfaces.  Normally, I would have to put that in with layers of opaque paint!  Very cool!


I think our treeman is very glad that hockey sticks are made from composite materials now!!
That was amazing.  To go from worry about a game seven, to worrying about overtime, to celebrating a win in mere seconds was incredible.

Many thanks to the Hawks for getting us through so many rough spots in the arena of sports this year!


Monday, June 24, 2013

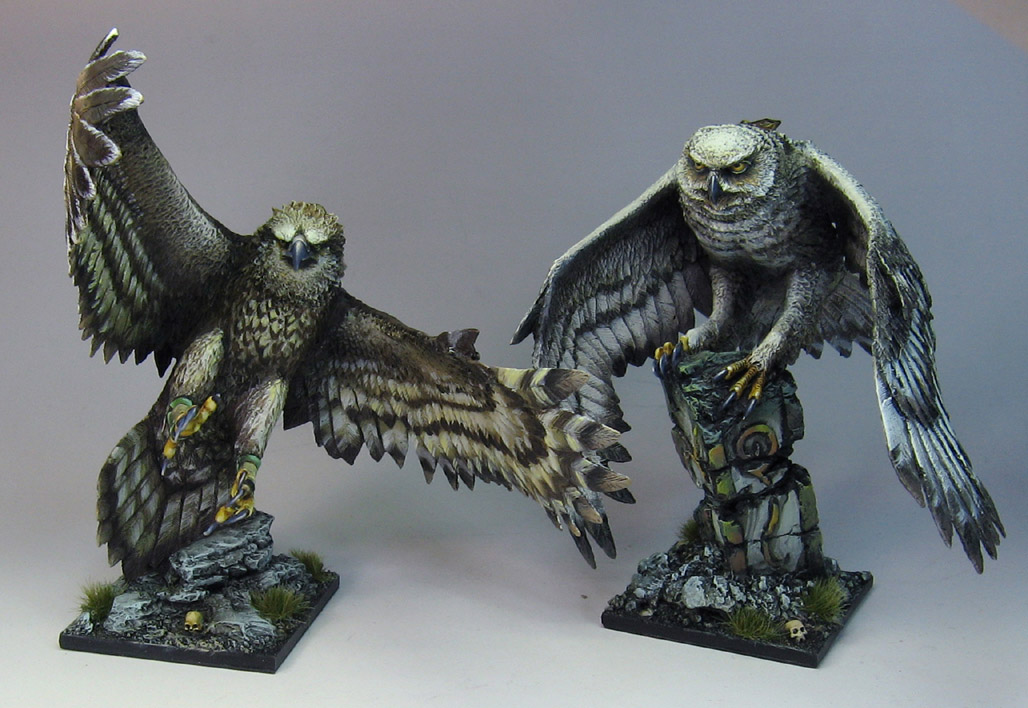
Birds of a feather...


Here we go!  The Griffon.


I think this was my favorite of the CoolMiniorNot Big Birds.


The face was especially nice to paint!


As with the others, there is a lot of repetition and tedium in the wings, but it is always worth it.


Now this is something I never got to do last time around!  Having all these beasties together in one image!!


So, we move on to more big guys... and Tanks!


What should be interesting for people watching the video will be seeing scenes of the palette such as this...


And this become what you saw in the other images.  Patience is the key.  You just have to know that you are building up towards that end goal, and that you will not have that nice little progression from one stage to the next.  You have to set up your subsequent layers of paint with those initial colors, even when they seem incongruous.

So more painting!!!


Sunday, June 23, 2013

Team Wappel strikes again!!


Well, I think you have heard me talk about how, over the years, Cathy and I have bounced all kinds of techniques and ideas off each other.   This really happened a great deal with basing techniques.

It was her idea to bake the sculpey and then carve it, instead of trying to sculpt details into the smushy clay.

You remember that I was baking sculpey a few weeks ago, and that I had tried out something new.  Cathy needed bricks and stones for her project, and I thought that I might be able to make some nice bricks en masse, instead of having to carve them individually from one big block.

I had seen some people make some moulds and casts of bricks, but this seemed to potentially be a much faster prospect.  We thought that you could either pre-weather the stones/bricks, or leave them mostly intact and do some minor cracks and such after they were glued in place.


Cathy was the first one to try out the new technique, and these photos tell the tale!

She took some of the larger blocks and positioned them just so... the other nice aspect of making the blocks this new way!  Pre-assembly!!


In addition, the blocks were all the same height... another benefit of the way I cut them out of the original roll of sculpey.


Cathy positioned her miniature in the scene, and then wisely numbered the blocks.


In the background, we have had lots of History Channel DVD's of the Crusades, as well as Kingdom of Heaven as reference.


She weathered each block one by one with the standard wood carving tools.


The carved blocks back in place!  She saved some of the larger chunks of sculpey to use as rubble and shattered blocks...


It was amazing how closely she was able to make those blocks look like the broken remains of the walls and towers she saw in the videos!


Now it's time to glue them in place!!!


I think you can see the mosaic that Cathy carved on the floor of the diorama base.


A closer view really shows that off!


One more view from behind.

So, kudos to Cathy for working some serious magic with those new sculpey blocks.  I will try to work some of this into the appropriate basing videos, although this calls for a video of its own :-)

I hope you don't mind me posting something that Cathy actually sculpted, but it was a team effort in the end!


Look out below! The Great Osprey


The second of the Big Birds from CoolMiniorNot rises from its perch!


This one is even a little trickier than the owl on the markings, but a fun alternative to a typical eagle, which is why I did it this way.


I have a few "Birds of Prey" reference books, and the Osprey was featured prominently.  It also had several different species of eagles, many of which had similar markings to this guy (some varieties of African Eagles).


Yes, more repetition and tedium painting all the patterns, but it was time well spent :-)


Here he is with his buddy!  The Griffon pictures are coming tomorrow!!


The 'big' invasion continues...


It seems as if this week is all about the big guys!  Big birds, giants, and lots of Nurgly demon princes.

Along with all the other big resin kits, I prepared this Plague Demon from Ultraforge.  Here are the parts...


It was pretty straightforward to assemble, just like every Ultraforge kit has been.  I did need to do a bit of green stuff work on a few sections, especially where the torso met the legs.


The head fit very nicely...


You have the option of putting wings on him, or placing these over those wing joints.


This shows you the joints prior to assembly.  I have done a lot of demons with wings, so I felt it was time to go wingless for a while. :-)


The arms and weapon fit together very nicely, which was a relief.  I have had trouble with that kind of joint with other miniature companies.  It seems like they never line up, and I end up having to cut the handle of whatever the weapon is to make it work.

Not necessary this time!


I added a few pustules around the waist joint to keep the textures a bit more consistent.


With the alternate pieces on the wing joints green stuffed, it was all ready for priming!!!


Raging Heroes kickstarter has unleashed a few new items.  I will love painting these!!!!!


The 'outdoor' faction of my hive city Imperial Guard will love this Lord Commissar...