
This article is basically a preview to future, more genuine step by step articles that I will be working on. I realize these figures are all different poses, but thus is the nature of Bolt Action armies!
None of my figures have two poses or equipment sets that are the same, but that's almost more important, because you need to be able to adapt and translate a color scheme across a wide variety of poses to paint an army... just like this early war Heer force.
In this image, you see the most basic steps side by side, from the initial primer painting to the glazing to the finish.
The "center" figure shows the ends of the Shaded Bascoat stage. This is very crucial, because from there I work with a variety of glazing and tinting to get to that all important uniform color.
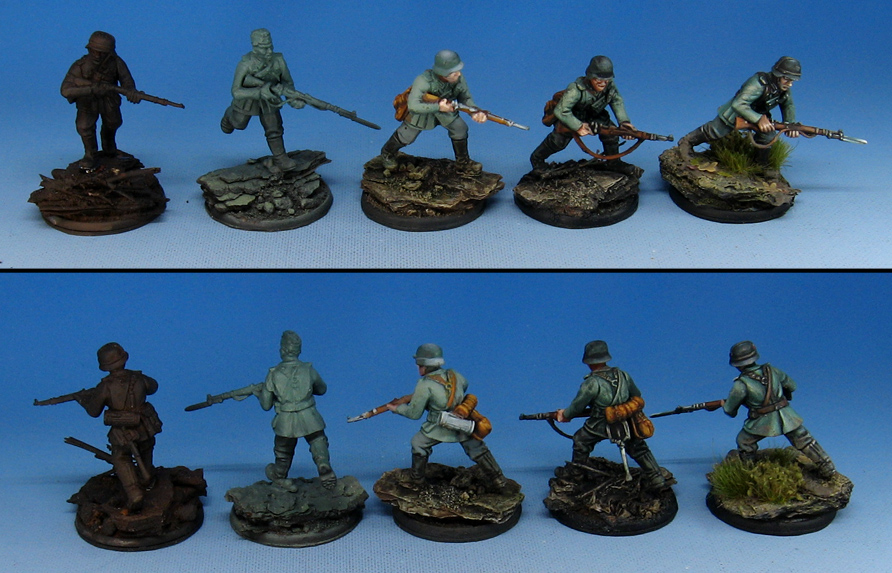
When I first start applying the primer, I am using a Badger airbrush, mixing the Badger black and orange primers together. This creates a default underpainting, which I can let show through, or paint over completely if need be.

The next stage is done by running a few different primers and colors through the airbrush, depending on the army. Since the early war Heer are in the field green, I emphasized those colors more, creating a lighting pattern along the way. I worked in lighter shades, mostly with various primer colors.
Badger has six different primer colors, in black, white, grey, yellow, green and orange. This means you can get a wide array of colors, using nothing but primer! Heck, it worked so well on the vehicles, I thought it would be just as effective on the infantry.

To get to the Shaded Bascoat stage, I went in and added mid to light tone colors in specific areas, such as the rifle, face, hands, and other equipment. This takes very little time, but is great for setting up those later glazes and tints! I can also use the greenish colors as the underpainting, making the skin colors seem more realistic.

The fun really begins with the glazing! This is where I can not only add shadows and darks, but tint the uniform parts as needed. For instance, a blue/black glaze was applied over the helmets and the boots.
This is a much faster way to paint armies, and it means that you don't have to sit there and struggle as you are layering up paint on 10-15 figures at a time, hoping that your paint does not dry out, run out, or the kids are trying to set fire to the dog, etc.
I get interrupted in my projects all the time, but I can step away for months from a given project and never lose my place, so to speak. I can pick up where I left off, no matter where that might be.

To finish off the figures, I go back into the middle tones, add a broader array of tones, more highlights, and make other adjustments. I also add any decals or freehand insignia, the mud effects, and so on.
Last but not least, the flock! Again, I will be doing several more articles on these various stages, along with google hangouts and you tube videos.

Here's a side by side of the very beginnings and the completion. It's amazing how just a few key steps can make a very fun result, and not drive you insane along the way! I have had a great deal of fun painting all of these historical figures, to which the Shaded Basecoat and glazing methods are extremely effective to render. Stay tuned for much more...
