Showing posts with label Reapercon 2018. Show all posts

Sunday, September 16, 2018

Scale and Fire: Part 2


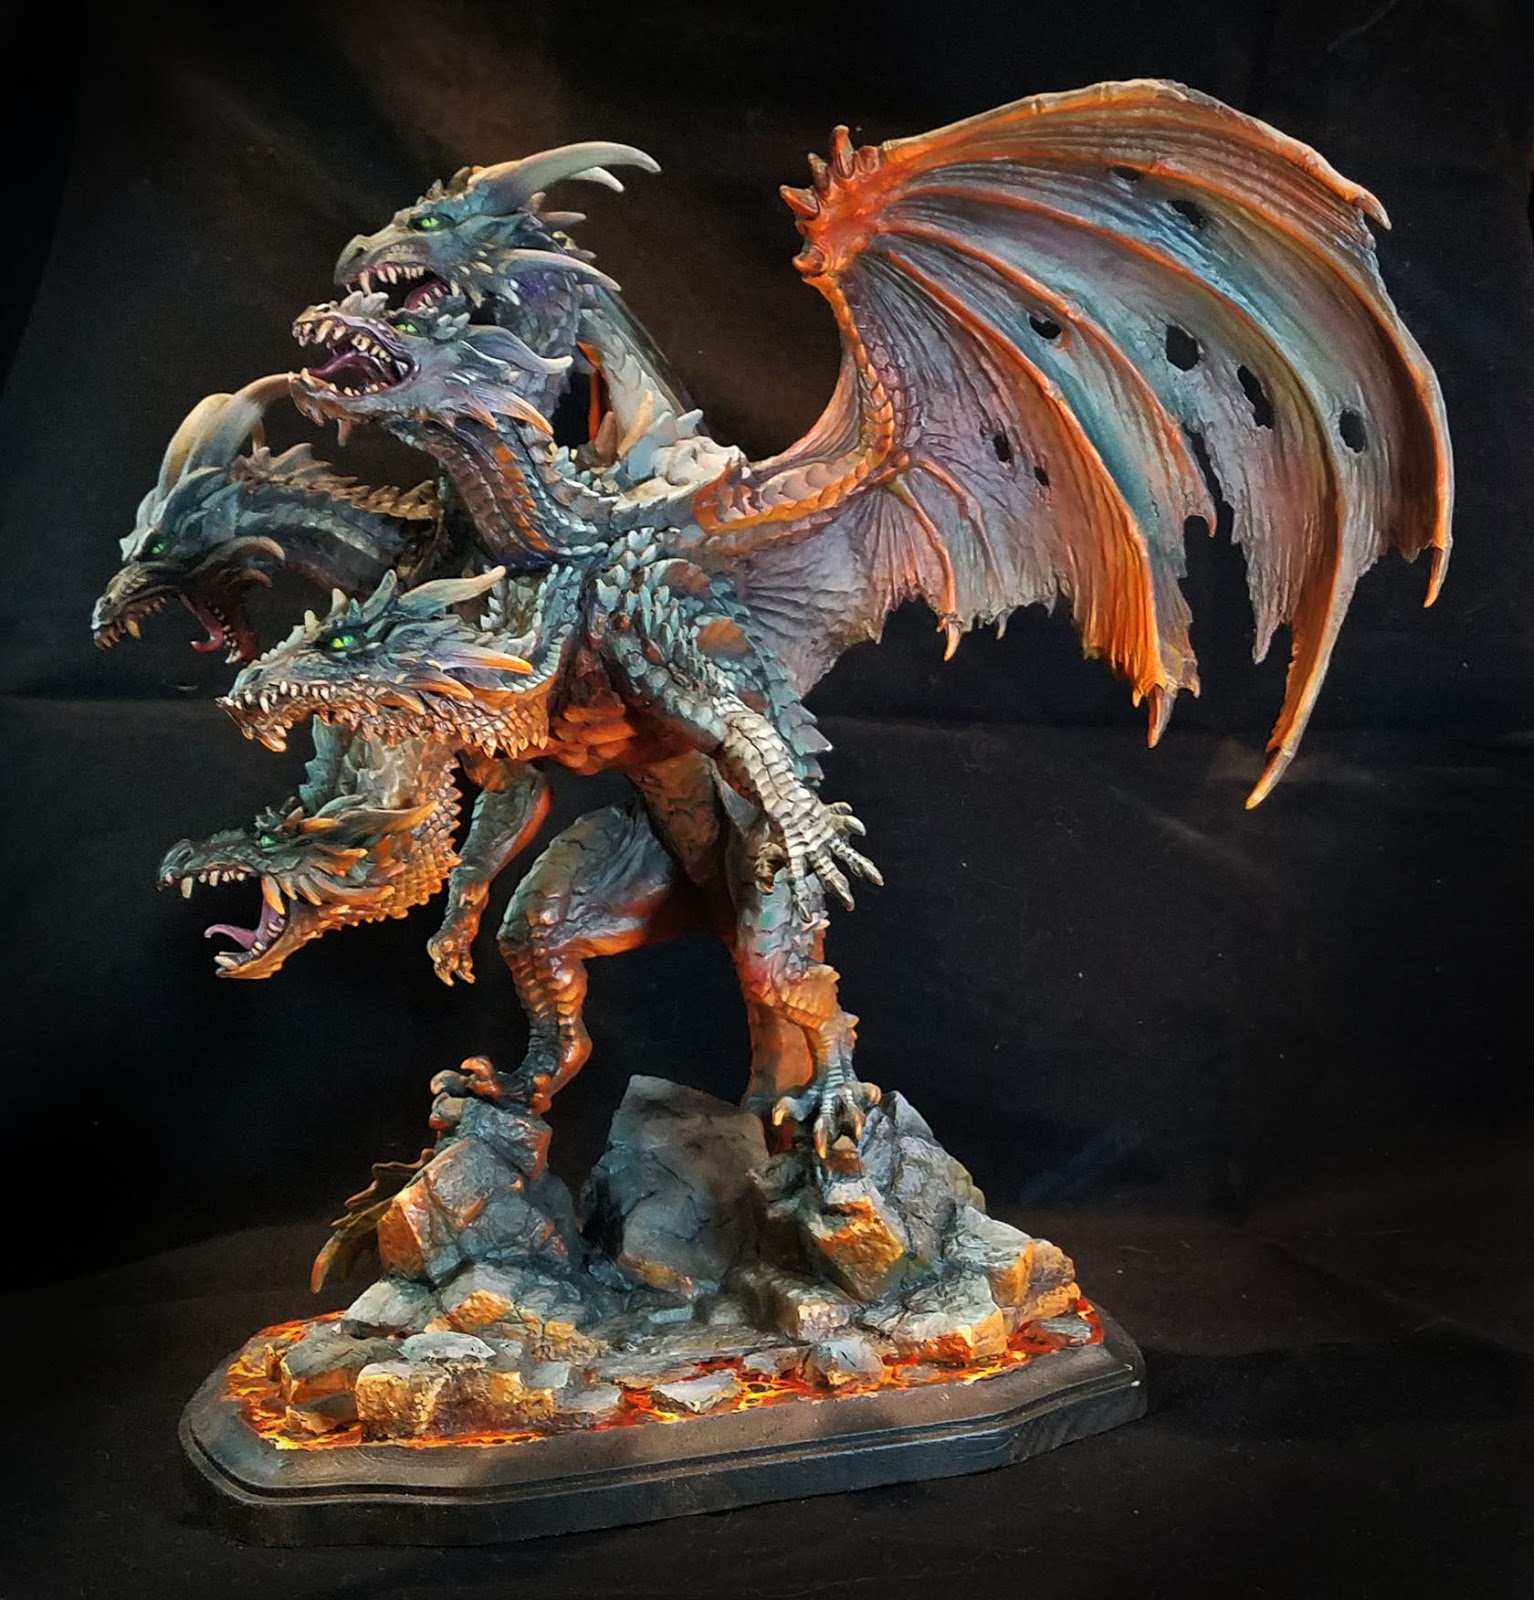
Time for some more images of the gargantuan 6 pound dragon!  As I mentioned in the first post, much of the initial layers were done with a Badger airbrush and Stynlrez primer.  Not only are there 12 colors of primer, you can expand these even more by adding some Ghost Tints.


I also wanted to mention the basing, which was a wooden plaque with some carved pink foam bits added to continue the original BONES base across the lava.


I added a bit of texture to the foam to match the original pieces, and once that was painted, you could not tell the difference!


The same Vallejo Fluorescent paints were used on the base, in combination with the Reaper Clear and Liner paints.  The yellow clear mixed with the orange fluorescent worked well for the lights, while darkening the orange with the Clear red and Red Liner paints made for some expanded value patterns in both the lava and the scales.


One thing to keep in mind about the fluorescent paints is that while they are pretty thick, they are very translucent.  This is what gives them the extra brightness.  There are absolutely no opaque properties to the paint.

So, you can almost apply this as a "glaze", even without thinning the paint at all!


I used this as an advantage as I was able to use my larger brushes and spread out the fluorescent paints very rapidly over rough surfaces.  While it was not a dry brush at all, the result was similar in a way.  However, I was not left with the usual scratchy/patchy brush marks that normally occur with true dry brushing.


I ended up deciding on a bright green for the eyes. This also had to do with the "color harmony" that I mentioned in the first post.  Most of the grayish mixes were created with Clear green and Clear Purple mixed with a lighter color, and having the eyes be a mix of Clear Green and Yellow meant that the lava and the grays were being tied together in a way...


The reason I like to make my own ray mixes is that I have far more flexibility in how  they are tinted.  Having a little more purple in the mix means that I can have some very nice grayed down tones that will appear more purple when you look at them more closely.

I love grays so much, I made it the subject of one of my five Painting Pyramid videos called "Shades of Gray" of course!


If I had more green in the mix, that became a very nice contrast to the deeper reds of the lava reflections.  This also meant that I could have a bigger range of grayish colors on the faces, giving them a little more depth than simple lights and darks.

Deep purple shadow colors against lighter greenish grays makes the faces come alive, as opposed to looking like a colorized photo which has light and dark, but no real color variance.


I hope that you have enjoyed my little discussion on colors here... that is as much fun as talking over the "Arc of History", and I will go on and on about it to anyone who will listen!

Stay tuned for much more!


Tuesday, September 11, 2018

Scale and Fire: Part 1


At long last, some images of the completed Mega Dragon from the Reaper BONES line, sculpted by Julie Guthrie.  I tried to take the best images that I could while we were still at the convention.

I did a few demonstrations on this monster, starting at GenCon last year.  Here's a look at the original post where I airbrushed the Stynlrez primer:


Here's part two of that series, which gives you an insight into how I approach massive beasts such as this:


Once I had the lights and darks generally established, I could start to think about the basing, and the possibility of doing the lava reflections.  All of this work would be done with standard brushes.


Using the same Vallejo florescent paints that I normally use for lava, I mapped out where I wanted the most intense reflections.  I have a Facebook Live episode that might help demonstrate the fluorescent paints as well:


In order to make these colors stand out, I needed to have several types of contrast.  Not just darker colors to show the light, but much cooler tones as well as the muted, grayed down colors you see on the scales and wings.


I used primarily mixtures of green and purple, which can make a variety of gray when a lighter color is added.  Using these simple colors, I can have an infinite variety of muted tones that register to the eye as "gray", but with far more interesting subtle tints.

If I have more green in the mixture, I have a wonderful greenish gray, etc.  On a figure as large as this, it is very important to widen the variety of tones over the wings, scales, and so on.


If you use only the same colors of gray everywhere, people looking at it will get very bored very quickly!  For instance, the wings have grayish greens, blues, purples and even tans.


In fact, each wing has a slightly different set of colors.  When you approach the dragon, that all looks like 'gray', but looking closer will reveal all the very interesting color tricks that are taking place.


I repeated this on the scales, so that one head would be a tiny bit different than the other, but keeping to that same set of gray/purple mixes meant that I did not have to worry about "color unity".

While I could get a very wide range of colors, they were all created from the original batch of just 3, with a few glazes here and there of blue and brown liner paints.


It was great to do several live demos on this dragon at Fort Wappel during ReaperCon!

Next year, I will try to have a much larger monitor, and perhaps even a mic set up so that it is easier to hear me.  Also, I will try to create a schedule of events before the convention.

I go into this type of color theory on just about all the painting videos available on my patreon page, in both acrylics and oils.  You can check that out here:


Monday, September 10, 2018

Reapercon 2018: Painting the Beast


On Saturday morning of ReaperCon, I was handed a rather large piece that needed to be painted immediately for an upcoming CAV tournament. 


This was mostly 3D printed,  and it must have measured at least 15 to 16 inches long!!


I had the Badger airbrush Sotar hooked up, and Stynlrez primers on hand, so I had to dive in right away.

Using the gray primer,  I covered the printed areas and the resin sections as much as possible.  I moved to a black and brown mix in the shadow areas.


After setting up the darkest locations, I used the tan color to lighten the gray primer, and brought out some lighter areas.

Once that was completed,  I started to map out areas of weathering with the orange brown primer.


To deal with the striations in the large printed sections, I knew that I needed to have rust streaks in several places.


However,  it is very easy to go overboard with such things, especially when you're this rushed for time on something so massive!


Since this was such a massive beast of a vehicle, I thought it would be more visually interesting if it had some larger marking or color beyond gray.

Since grayish blue is not an uncommon secondary color, I used a combination of blue tac and Parafilm to mask off a section.

I have a post that goes into more detail on the Parafilm here:


I mixed some of the slate blue primer with a dark blue Ghost Tint, and worked in the shado areas.  Over this, I sprayed a lighter series of mixes to create highlights in this blueish area.


With time counting down to the event, I made a few small freehand designs which would look interesting from a distance but ones that could not be interfered with by the texture of the 3D printing.


I continued to play with some highlights here and there, trying to bring out a few edges.

Since I didn't have any weathering powders with me, everything was done with the Secret weapon weathering paints.


I chopped up one of the craft brushes to turn it into a chopping brush, applying some brown liner mixed with rust along the leading edge of the hull, wings and so on.


The extra color of the blue stripe helped to bring out the rust effects a little bit more, since there was additional contrast to the basic gray.

I also started to paint the tiny cockpit windows. 


All too suddenly it was time to take this away to the tournament room where it was used as terrain/display!


This might be the best way to see how big this was!!


Saturday, September 8, 2018

Reapercon 2018: Part 2


Picking up where we left off from Episode 1 of the ReaperCon 2018 review, where I make a quick mask using a torn paper towel.  The edge was just right for creating the highlighted edge of the dust clouds.

These were darkened a bit at the edges with a shot of dark blue Badger Airbrush Ghost Tint.  It is one of my favorite uses for them.


To make the initial "glow" for the brighter stars, I mixed a touch of blue Ghost Tint with white primer.  I placed a few of these on each wing.  It is important not to have too many.


I placed a dime (any kind of coin would do) over the star, which created a mask.  After spraying a blue Ghost Tint/white primer mix over it, you can see the nice circle left behind.

Once that is set, I painted in a few points of light with white primer.  I also added in a few "spectral lines" emanating from the brightest star on each wing.

The smallest stars were made by spattering a thinned down mix of blue and white primer.


Once all the spacescape elements were complete, I brushed in the metal parts of the wing, and tried to shade/weather them to look like the body of the dragon.


At this point, I still didn't have a base for it, so I continued to weather the body of the dragon, using primarily Ghost Tints.  I made sure to include a touch of the Metal primer here and there, so that the metallic effect would not be lost.


You can get a better view here of what the wings looked like without the metals.  Also, you can see how rich and dark the Ghost Tints are.  It is somewhat similar to using the Reaper Clear and Liner paints.


On this side of the wing, I mixed the Magenta Ghost tint with white primer, and masked off some of the dust clouds.


The magenta tint was a nice change from the brighter blue on the other end of the wing.  I used a larger coin for the circular mask on this 'main' star.


I selected a few brighter stars to emphasize with the painted dots of white before spattering them with the finer, thinned down primer.


As I mentioned before, I did not have a base for this when I began painting it.  This is when I discovered the new series of large plastic bases from Reaper!  I was amazed at how many sizes there were, and shapes.  These will not only be helpful on the ever increasing number of large creatures which I need to base... they will also work for my Bolt Action heavy artillery teams.


I am sorry that I don't have fancier images of this for you (I took these not long before we left the Reaper factory on Wednesday) but I will be doing another one of these under more controlled circumstances here at home.

I can take more step by step images, since I don't have to worry about an audience!

Stay tuned for that, and for the next episode of ReaperCon review!


Thursday, September 6, 2018

Reapercon 2018: Part 1


We were hoping that this year's ReaperCon would be a special edition, given the new venue and the addition of Fort Wappel!

It certainly turned out that way!  A fantastic week of painting fun and hanging out.  


So many people came by to watch spontaneous demos, paint along with us, or just hang out and chat.  It was great to see old friends, and meet all the new people who were attending their first ReaperCon.  In fact, I constantly found myself talking to people who had never been to ReaperCon before.

The location for Fort Wappel was outstanding, with plenty of light, outlets and room to relax.  We had a number of tables across the lobby from us where RPG sessions were being held all day and well into the night.  I think that had a good portion of the massive increase in attendance.

While the venue was enormous compared to previous years, it seemed to be very full.  Let's say there was a very significant increase in attendance from the last few years, because it certainly felt that way!

I was doing demonstrations until 3 am each day, and lots of fun was had by all!!


On Friday night I started a demo on the WyrmGear dragon, using the new MetalSmith paints from Badger Airbrush.  I had been itching to mess around with this for years, and I finally got the chance.

If you wanted your metals to appear darker, you prime with black, etc., and if you want them lighter, you can prime with a lighter color.


As you can see here, I went with my usual "pre shading" of a brownish black to an off white.  This will influence the shading of the 'metals', which is a mix of metal primer and the Ghost Tints.


Here's a peek at what you can do with them.  If you recall, I used the Badger Metal Smith paints at GenCon on this massive bust:


For the wings, I combined the Ghost tints with the Badger Stynlrez primers.  I used to paint spacescapes back in the days of 2D art, so I knew this would be very fun.

I started out with some lighter colors of primer, such as the slate blue and pink mixed with white.  Once that was set down, I could spray over it with magenta, blue, and turquoise Ghost Tints.

You can even mix the two together, which gives you a very nice, brightly colored primer!


I mixed the Midnight Blue Ghost tint with a bit of black primer to make the deepest dark colors on the wings where I wanted dust clouds.


In order to make them appear as if they were illuminated from behind, I ripped up a few paper towels to create a mask.  This uneven edge is ideal for creating the effect!


A few quick sprays of the lighter primer/Ghost Tint mix made parts of the dust cloud really stand out, creating that extra depth.  Stay tuned for the conclusion in tomorrow's post!

Once again, many thanks to the Reaper staff who work quadruple overtime on this event, and to everyone who came by to hang out with us.  The venue is amazing, and I think next year will be eveb better!!