Monday, March 31, 2014

The full set...


So, I promised group shots of the Command Squad.  Here you go!

They are created mostly from Victoria's Highland Moss Guard, but other bits were combined as well.  The medic is an older GW figure from the 5th edition boxed set.

The broken columns are from Secret Weapon Miniatures.


I really had a lot of fun with these guys.  While the regular troops are great to work with as well, you know that these command squads are the place where you can go wild with conversions, bitz, and so on!


These are the only 5 figures with this Tartan pattern, which means they won't get mixed up in a scrum... especially the ones not carrying a huge flag! ;-)


Let's just hope they are effective out on the table as well!


I look forward to creating more additions to this unit.  Or make a higher ranking squad with astropaths and ordinance chiefs, etc.


Time is just about closing down for Adepticon.  Wish I had more, obviously...


On the Wings of Angels


For a very long time, I have been saving a batch of Urban Warfare Archangels to use as Seraphim.  I did a little conversion on some of them, such as this one.  Just a little arm swap.


I have had to do a bit less of the snazzy stuff that I wanted to do, but time is just not there!


I used a chunk of the Secret Weapon Broken Column set, as well as a bunch of powders.  They were not just used to create weathering or exhaust... I used them to do a little painting as well.

If your work it right, you can smooth out blends, or get some interesting color variations without having to go through lots of paint mixing!


Sunday, March 30, 2014

Marble Mayhem!


Today I was finishing off the rest of the statuary.  To do that, I had to get the pedestals painted.

First some generic colors on the 3 sections of marble on each base.


Using a smaller filbert brush, I quickly applied a slightly darker color, making sure to twist and turn the brush to make veins on the surface.


Make sure that each vein has a random shape.  If it's too regular, it just won't work.  So, be sure that some parts are much thicker than others, and so on...


The next stage was to put a slightly lighter color on the opposite side of those dark veins, using the filbert brush again.  There is a little more 'feathering' of the brush strokes now.  

That is, keep the edge next to the dark color sharp, but soften the edge on the other side.  You can even do that by wiping away some of it with your thumb if you work quickly enough.  Also, this rougher surface of the foam will let you get some very nice feathering using that method!


Working a little lighter, trying to keep the two edges hard and soft...


Final stage of feathered light colors.  I used a sharp #8 round craft brush for this part.


Using a liner brush, I started to draw out some lighter veins.  These not only enhanced that edge, but I started to 'cross over' the darkest sections as well.


The light sections are complete... time for some green!  Beginning with the filbert brush, I added some very broad strokes with a color slightly lighter than the original green.


I switched to the craft brush again to enhance those lighter swatches.  You can see that I am trying to create the same definition as the other color of marble.  Remember... keep it as random as possible!!


Getting lighter!  The veins become more and more defined.


For this final layer, I went back to the liner brush with my lightest color, following the patterns already created.


As a final touch, I added some dark colors in a few select areas.  These enhanced the lighter veins running through the green marble.

I hope this is useful for creating some quick marble!!!


Melting pot


Some more hot stuff from Victoria Miniatures, and the last member of the command squad.


Gotta have some kind of special weapons in there!


Group shots next!


Saturday, March 29, 2014

Over there, lads!


Here's another member of the command squad, courtesy of Victoria Minatures.  I used parts from the Highland Moss Guard and a few other bits.


One last member of the command squad to go... and then time for group shots! Stay tuned.


A few statues...


Most of you remember the statues that were going to be an important part of the army board.  This is a quick test figure done to see how rapidly they could be done.  I think this is about 90 minutes.

There are a lot of these, so speed is of the essence!

As I mentioned a while back, the idea behind the statues is to tell part of the story of the army and its history.

Hopefully, I can briefly convey the history of the army, from it's Bronze Age origins to the somewhat rapid transformation due to the influences of Inquisition and Imperial Guard forces.

I will use some Celtos minis to represent some heroes from that early history, while these Dark Age miniatures show more of a middle era between that Bronze Age time and the current era.


I quickly applied some metallic paints (yes, you heard that right!), making sure to have enough dark areas so that the verdigris effect could be seen.

This time around, I used a few Secret Weapon powders to create the effect.  It is a nice way to do that quickly on something that has flowing robes such as this figure.

At least 5-7 more of these need to be done.  Busy times!!!


Friday, March 28, 2014

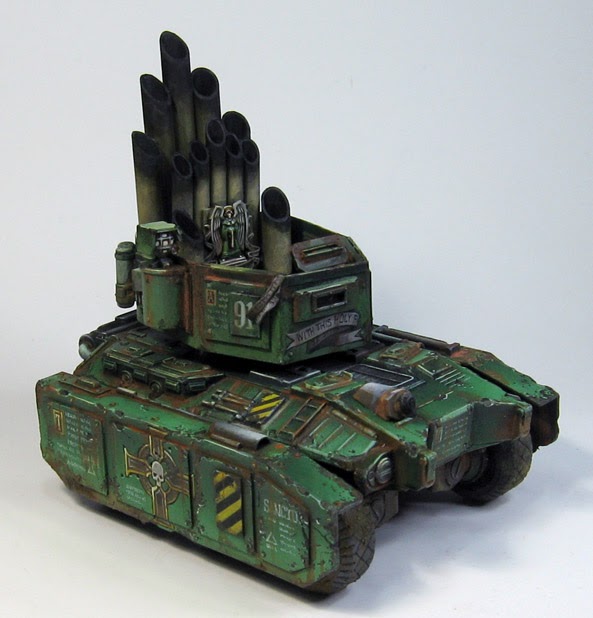
Some serious pipes


While there will eventually be many more hours of painting on this, for now, it is done :-)


Most of you already saw the WIP post with the scratch built turret.


I still wish that I could have put the Sister in the turret playing the organ.  It was going to be a conversion of a Dark Eldar figure.


However, I think this gets across the point!


I was glad that I included those bits from the rhino interior.  The screens were fun to paint, and added a bit more color interest in what could have been a boring area visually.


I was also glad that searchlights come with Exorcists, because I had one, and the sponson added a nice a-symmetrical element to the turret.


I wanted to post this after the Hydra to show just how different this is from the 'standard' RAV 6 x 6 from Secret Weapon.


I will do some side by side shots as well, and a scene with a Battle sister's squad that I almost done!


It always looks so different from the unprimed raw version :-)


All the extra armor plates that I added were great for showing the Sisters of the Raven iconography.


Hopefully it will last past turn one!


I guess this will attract a lot of attention.  I think I will really need it if there are lots of baby titans out there!


Bird hunting...


A few images now of the Hydra.  I have some of the Highland Moss Guard around it for scale.


I have heard a rumor or two that Victoria's Miniatures and Secret Weapon are teaming up at Adepticon... :-)


I really do enjoy the shape of the turrets.  I have some special Highland Guard figs that will be sitting on one of the Chimera versions of the RAV 6 x 6.  You can even put the new resin 55 gallon drums on the sides of the RAV for extra effect.


The kit is so easy to assemble, it creates more opportunities to 'add on'.


Let's see how many pesky planes this guy can shoot down!


The two Chimeras under way...


I also have the Exorcist finished, so pics of that soon as well!