Showing posts with label Photography. Show all posts

Sunday, July 29, 2018

Photo Booth in a Hurry!


Sometimes you just have to take some pictures of your stuff in a hurry, or on the go, or both!

Using one of the TableWar photo mats and a few of my portable LED lights, I was able to set something up to snap images before I had to pack up a number of large critters.


You just saw the Wereshark in a recent post, using the Reaper Pearl White for the first time.  He looked pretty interesting on this backdrop!  I just pointed my phone at the setup and snapped a few images.


These mats are made from the same material as the game mats, which means they are very durable and much more immune to the potential damage from rough handling.


Here's my original post that shows the other mats and the rest of the setup that comes with the kit:


You might recognize these beasties from Cathy's live Twitch streams of late!


They really looked different on this backdrop... more of an undersea setting.


The mat was actually big enough to get all four of these rather large critters in one frame!


Here's a link to the store entry:


Wednesday, September 13, 2017

Big Time Backdrops!


Since our return from the east coast, I have been experimenting with the new MacroMats photo backdrop kit made by TableWars.

I am especially excited, since it has several key elements which will be so helpful for what I am doing nowadays!  That is size (the mats are 15 x 30), portability (see the case below) and durability.


The backdrop setup comes with this rig, which is easy to assemble.  I am familiar with this format, since one of my camera tripods is very similar!


You have a few options when it comes to putting together the crossbar.  You can do one piece, or both, and all you have to do is snap them in place.


Again, this is all very rugged, and that is essential for photographing large numbers of figures, or massive figures, and even terrain pieces as I intend to do.  


Speaking of terrain pieces, I thought I would grab one of the largest structures that I have at the moment and give it a try.  I have not been able to photograph this yet, since I didn't have any backdrop that came close to covering it.  You can see that it was not a problem at all...


I grabbed a few of my portable LED lights, which can be positioned in any number of ways, to snap a few images!


This is only a few minutes after taking the kit out of the box.  I have more elaborate lighting set ups that I will use with this kit.


It comes with 3 different mats, including the blue to white fade, which is great for me.  Over many years, that was the type of backdrop which needed to be used for cover art and blister packs, and it is nice to know that I can add more images of these new large scale things with a similar background.


This large box is my own photo rig that I created for taking pictures of big stuff.  I have 3 under cabinet LED light strips that shine down on all parts of the figures at once, eliminating shadows.


The top bar is the longest at 18 inches, while the strips on the sides are 12 inches.  You can see the nice padded clips that come with the MacroMat rig!


I set down some of my early war German Bolt Action vehicles, and snapped a few pictures.


I was amazed at how nicely the pictures turned out, and that I was able to put so many vehicles on there at once!  In fact, I could have put more on it, but my photo box was actually too small for the mat!  Incredible.  

There is also a larger size photo mat in the works, which will be 30 x 30 inches.  I cannot wait for those!  It will be the final piece to the photography puzzle.

Here's a link to the TableWar website where you can get yours:


Monday, August 31, 2015

A New Chapter Unfolds


Some of you may have seen the original post that I created about the new Foldio portable studio, and that I wanted to see how it might work under a variety of conditions.  I have taken it on the road with me a few times since then, and learned a few things about it.

I will put a link to the original post at the end of this one, so you can see the unboxing.

In the meantime, here's what it looks like with one of the Hangar 18 backdrops in it.  I did have to trim it down a bit, and make some adjustments with the placements of the magnets that hold it up.


There are two bands of  LED lights, which have dimmers on them, so you can really control the amount of light that is emitted.


This is what I got when I took some pictures with the regular light bands.  They were set at around 60-70% of power.

While I liked the result, and the camera seemed to pick up good detail, there was a distinct 'shadow' which was cast due to the light coming from only one direction.

Normally, I like to have light coming from at least three different directions.

You can see some of my other posts regarding this in the photography section of the blog.


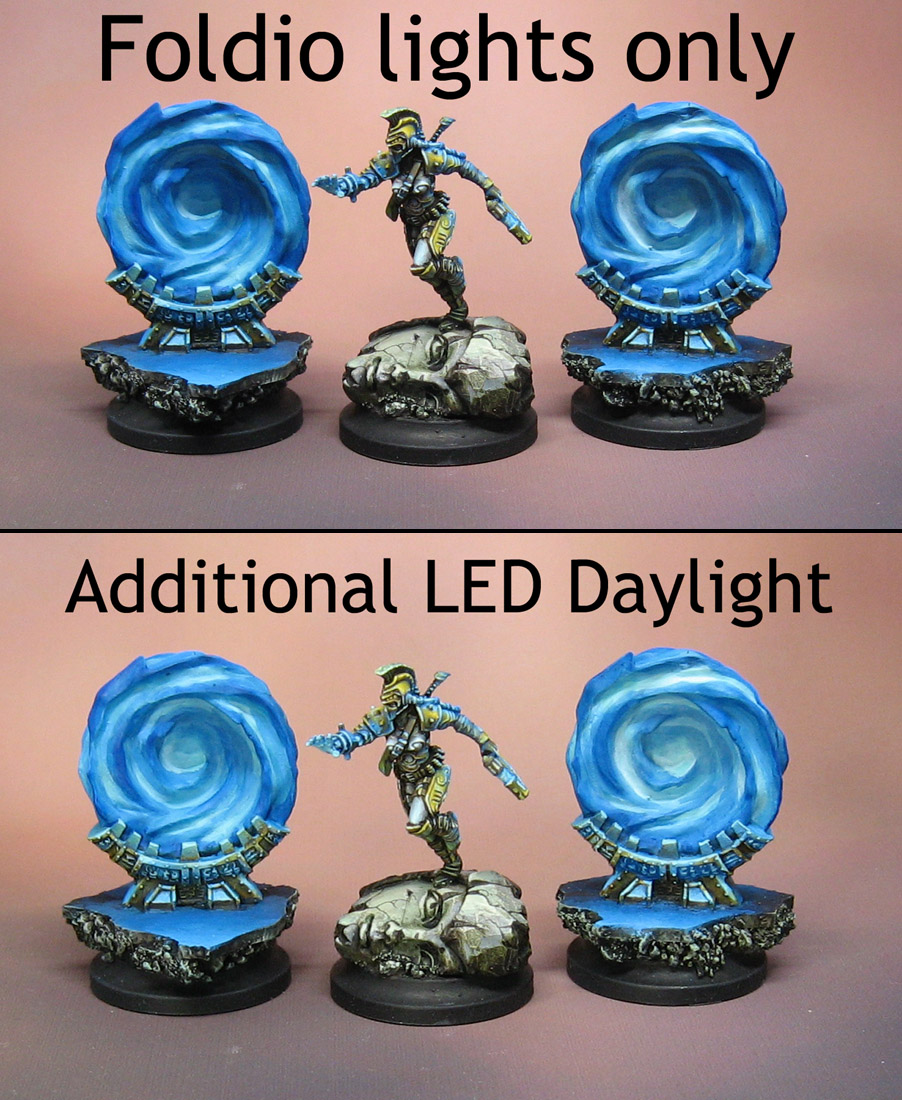
To compensate for this shadow effect, I brought out a few of my other lights which I use to shoot battle reports.  While the above image is fine for times where all I can bring is the photo booth itself, I also wanted a secondary area where I could get regular images.


Here's a side by side of images shot with the standard setup, and then with my extra LED daylight bulbs.  The lower image looks a lot more like my standard type of lighting.


Now for some views of the Judgment heavy support with the additional lights... shadows eliminated.


In this image, I moved the light further down, creating a different lighting.


Here's the link to that original post:


Thursday, June 11, 2015

Know when to fold 'em


This product is something brand new... a photo studio that really is portable.

It's from Foldio, appropriately enough, and I think it will be just the solution to my 'on the road' photography issue. This box holds everything, even the lights!


That was always the bugaboo with my previous "portable" suite.  The backdrop folded up, but it was heavy, and I was still left with two pretty big lamps that would get scalding hot.  This meant that I had to wait for the lights to cool down enough so that I could pack them.


Not such an issue here, as you can already see the LED light strips.

It comes with all sorts of AC adapters, so they will work in all regions of the world.


There were four backdrop colors.  I have a great deal of testing to do with these.  For instance, I am very curious to see how the black backdrop might work in this system.

Furthermore, I am quite hopeful that the Hangar 18 backdrops will work with this system.  My assumption is that the larger backdrops will be required.


As I mentioned before, it is very lightweight, and small.  It uses magnets to allow you to assemble and take it down in no time at all!


You can see the magnets pretty well in this image.


Now the box is turned right side up...


And we have the LED strips.  What's truly amazing is the concept of allowing you to control the intensity of the light!  Those round dials on each strip let you turn the light up or down as needed.


It took a few seconds to stick them onto the surface.


This is the bar that holds the backdrop in place.  It is so much better than my previous system, where the backdrop was held in place by a velcro strip that was tough to use, and didn't work with anything else besides the one or two backdrops that came with the set.


These are the four background colors.  Again, I want to see what happens with that black backdrop!


For my initial experiment, I went with the neutral grey backdrop.


Lights are plugged in, and a figure in the box!!!


Did I mention that this suite is quite large for something so portable?  That's a 40mm base, and it looks tiny.  So, this should fit those vehicles, big monsters, groups shots and even buildings!

My next post will show you all the various test results.  No matter what, it will certainly be replacing the massive, bulky setup that I must drag around with me when the show goes :on the road".

Stay tuned!!!!


Saturday, July 26, 2014

The difficult made easy


Once again I take to the photo area to take advantage of the giant photo backdrops from Hangar 18.  This unit is another one of those darn near impossible units to photograph without having to do all kinds of Photoshop work to clean up the pieces of drawing paper I was using as a backdrop!

First we begin with a few very fun Reaper miniatures, from the Warlord line.  These were the Reptus figures, and they made really neat Kroxigors!  The Champion is a favorite of mine.


And on a different Hangar 18 color...


Look at how much space is left over, even with the giant Skink Tank!!


It made shooting the images of the unit a "snap".  Ouch.


I love how the fades go in an out through light and dark, so some of the weapons are more of a silhouette, and others are light.


And I certainly could not snap this view!

I have noticed that I can back the lights off about 3-5 inches from the old setup, which means I can actually get the camera in here without bashing into one of the lights!


These angled views are also much easier, as I don't have to rebuild the upper right hand corner in photoshop with the smear tool.


At times, there were 44-48 skinks in this unit, with a champion and a chief with a sneaky surprise.  Also a skink priest hid in another corner.


The back rows and the side columns needed a lot of conversion on the skinks to make them rank up and fit.  I used a lot of the old style plastic archers there... cutting off that stuff and giving them javelins.


Of course, making the sculpey bases and the movement trays was BLAST!  I have a number of posts in the Lizardman section of the blog showing the various methods.


The last view.  So many more things to put in front of the camera on these backdrops!  Yea!