Showing posts with label German. Show all posts

Wednesday, May 2, 2018

Panzer Wrecks #1


Now that the Bolt Action tournament has come and gone, I have had some time to take images of the completed objective markers!

This first post will show the wrecked Panzer II, which was sculpted from scratch quite rapidly using the Extra Firm Gray Sculpey clay (which you bake in an oven).

Here's a link to the Facebook Live session where it was painted:


As I have mentioned many times, I heard about the event at the very last minute, so I had to act very quickly.  There was no time to order intact vehicles to turn into wrecks, nor were there funds to do so.  Sculpting them from scratch took a few hours, and the total cost of materials was less than $5.

I took a great deal of shortcuts making these, which is OK as they are supposed to be wrecks!


Speaking of wrecks, one of my key references was one of these amazing books that Cathy had gotten my for Christmas.  Not only did it have a lot of images, but it went into great details on how each vehicle was destroyed, and the effects that had on the metals, interior, etc.

The key element was learning that as tanks burn up, the tortion bars of the suspension are weakened, and the hull settles into the mud.  This meant that I could save a tremendous amount of time on the most difficult part of sculpting any tracked vehicle... the tracks and tires!!


Instead of trying to create an entire track assembly with bogie wheels, sprockets and idlers, I could create toned down versions and sink them into the mud.  Also, the tracks could be broken down into strips of Sculpey, slightly textured and bent into the kinds of shapes that I saw in the photos.


I was shocked at just how close I was able to match actual model kits in such a short period of time as a result.  Utilizing the reference images that I found in a quick web search echoed what I had seen in a few tutorials, that the extreme heat not only burns off the paint, but alters the metal itself.


Initially I would have avoided rust effects, but it seems that the superheating and scorching of the metal cause some instant oxidization, resulting in a band of rust in between the blackened steel and the painted hull.

I would love to do a sculpting video on making one of these, so any support that could be offered on my Patreon Page would be very helpful, providing me with a little extra time to create a YouTube instructional video!


Tuesday, January 30, 2018

Reporting From the Front


Over the last few months, I have been trying to prepare for my ultimate goal of filming battle reports for Bolt Action games.  This has meant a huge amount of work... starting with painting the armies!

I have enough of the early war French and Germans ready for some scenarios, with some variety in the army construction as well.


You have seen numerous how to articles on the terrain, the game mat, and even the painted backdrops.  There are dozens of articles alone showing how this Ardennes forest table was created.

Compiling dice, counters and other items also took a while.


There are even some units that I scratch built, such as this medium 105mm howitzer for the French.  I have learned a lot over this massive project, to be sure.

It is hard to believe how much my approach has changed since I first started.  Now I am using oil paints for most of the figures and vehicles, and these are also demonstrated in several Facebook live sessions.


Here's another scratch built vehicle, the SDK 222.  It is great to finally see it on the table in a game, and not just in my photo booth!


These are the kind of scenes that I had been hoping to see for so very long.  As I have been filming, I have tried to find the best way to balance out the action, the tactics, the mechanics, and the results.  It can be a lot harder than you think!

I have been modifying my approach with each turn in this first game, so if you notice a different approach or different angles, it is because I got a new tripod or made another realization on the fly...


For my very first battle report, there are already some very classic scenes, such as the PZ 3 driving right up to the pesky sniper team (which had been on ambush the entire time), and then destroying a more distant Panhard armored car that was seriously threatening the entire German left flank.

This is the kind of thing I had hoped to capture, which is why I will be using the longer format style.  In this way, you will get to see my reaction to such crazy rolls of the dice, and the suspense of the next order dice, etc.


This will mean a lot of extra work, and a lot more editing, but I think that it will be well worth that additional effort.  Filming those live rolls and draws can mean finding a place for the camera to rest as you use both hands for other things...

You also have to think very quickly on your feet, as you don't have much time to mull over and ponder every possible strategy or action.  In some ways, it  is a bit like a tournament environment.

This picture really shows what I had hoped to capture in video form.  Something that looks as realistic as possible, so that it almost feels like you were watching a movie as opposed to a green board with some dice flying across it.


I try to capture that feeling of reacting live to a situation, such as the very unexpected result of a few random machine gun bursts setting fire to the Opel Blitz transport full of troops!


The other element I will try to bring to each of my reports is how terrain can really affect a battle.  There were so many instances of units being within a foot of each other, but no clear sight lines... just like the Ardenne forest!  

I have been observing forests and hills for a very long time, so see how limited sight lines are, and what a nightmare it would be to move large forces through them.  These games will be very cat and mouse, and also very bloody.


I will try to vary the scenarios, forces, missions, and the terrain as much as possible form one report to the next.  Campaigns will be arranged, and I might try to do the 'flip the coin' style reports, in which the same game is played over again, with the two sides switching defender/attacker, and so on.


Re-learning the video editing software has taken a while, since the original machines where I did this work are now long gone.  I definitely need to update/replace several items of equipment to make this happen as frequently as I would like.  That is why a good portion of the videos will be part of the Patreon Page, so that I can try and get these new items.

It also takes a long time to create each report, with up to 13+ hours of filming and editing, followed by the rendering and upload times.

If you want to support this effort, and be sure to see all of the reports yet to come, here is a link to the Patreon Page.  I will also be offering more raffle figures of a Bolt Action nature too!

Cheers!


Sunday, July 3, 2016

The Experiments Continue...


While this is not actually a Bolt Action vehicle, this was an experiment for future German vehicle projects.  This is actually a 20mm, 1/72 scale tank hunter.

I wanted to see how some of my foliage might work in the future on a larger scale vehicle.  I have some Panzer 4's which will get a few different color schemes.


One of these will be a later war type of chia pet scheme.  When I do the "real" tank, there are other types of foliage which I will use on other areas of the tank.  These would be individual leaves that have clustered and piled into areas between the armor skirts, and other horizontal surfaces.


I employed some Secret Weapon weathering powders on this vehicle.  In fact, almost 80% of the surface is covered in them!  I could not find my usual spray on Testors Dullcoate to seal all these pigments, so I had to turn to a last ditch alternative.


I have a few containers of Secret Weapon pigment fixer, which is designed to seal those powders in place.  However, I had only used this material while applying the pigments simultaneously.  In this case, I would be applying it like a wash over the whole thing.  I wasn't sure what would happen... would I literally wipe away the powders that I had been applying, or streak them, etc.?  We would find out.


As it turned out, it went perfectly.  None of the powders were wiped away, and no crazy sheen was created.  Also, the pigment didn't change at all, another concern that I had.


That is a very important piece of knowledge for all the future vehicles and even infantry which I have planned for the future.  


The coin next to the vehicle reveals that this tank must be 1/72 scale.  It was one of the toy tanks that I had discovered at Little Wars last month.  I thought it was just the right kind of experimental subject, and it worked out that way.

So, stay tuned for future blog posts on those German Tanks!!


Tuesday, March 15, 2016

Tiger Tiger, burning bright


The first views of the completed Tiger!  I had a lot of fun painting this one. :-)


I would definitely like to try another one and test out some foliage to give it even more sense of scale.  The tiny leaves should make appear more massive, despite the fact that it's a teeny little 15mm vehicle!


Having more broad, open surfaces here was a nice change from the more cluttered, small tankettes that I have painted previously.


Next up, some group comparison shots with much older French tanks!  Stay tuned...


Monday, March 14, 2016

Rusted and Ready


With the glazing and tinting complete, it's time to work back into those middle tones, and put a touch of weathering as well.


I like to take the new Secret Weapon Rust color and mix that with the Vallejo Flesh Shade wash.  This has a natural "sedimentation" effect that is perfect for rust effects, as that sinks down into the crevices.


To take advantage of this property, I focused my attention on areas where I felt that rain water or such things would tend to accumulate.


I also tried to get this mixture into joints between panels, and as rust streaks down the sides of the armor.


At the same time, I was taking some lighter shades of green and yellow to lighten certain parts of the camo pattern.  Not only would this create a better sense of shape and shading, it would make it easier to show off streaks and paint chips.

So, I attempted to concentrate these areas of lightest light colors in strategic places where I wanted to feature streaks and chipping.  There are usually obvious places on every vehicle where you would want to do this.


This image might show that effort more clearly, as you contrast how the green looks in this image as opposed to the previous picture.


And you can see how the rust and streaking can stand out much more.  That's important on something which is such a tiny scale.  Were this a 28mm scale vehicle, I might not have to push the extremes of contrast quite as much.


Getting there!

To enhance something like this vehicle, placing some kind of foliage on the upper surfaces of the hull and turret could truly make it seem real.  I will be adding such effects on future projects.


And now for a sneak peek at the finished results.  I will do a few posts on the finished images  as well as some comparison shots with a few other French early war tanks.

Stay tuned!


Sunday, March 13, 2016

Time for Glazing!


Once I was done with the shaded basecoat phase, utilizing the "Primer Painting" technique, I had both sections of the Tiger ready for glazing.

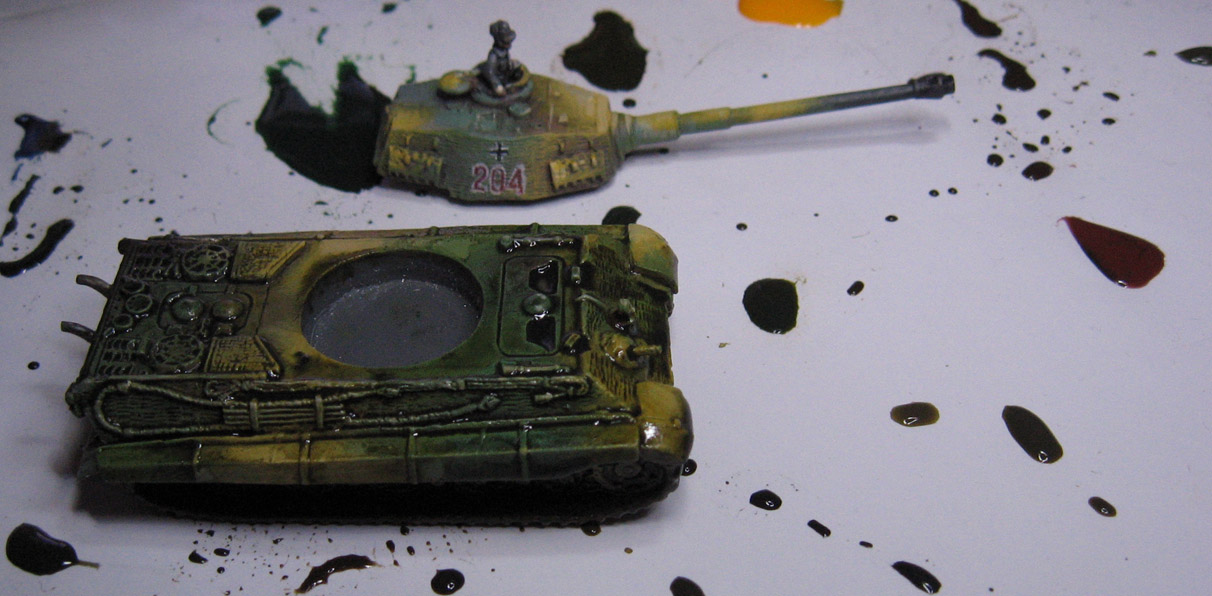
Several different glaze colors are out on the palette... black, blue, green sepia and a few others.  These will be mixed together both on the palette and the miniature itself.

Another note: when I am glazing vehicles I don't exert as much control over the glazes, since I want more random color mixes to occur.  This creates some interesting variations that I can then turn into some kind of weathering.


Over the greenish areas of the camo pattern, some darker green glaze is applied.  I'm using the larger #8 round brushes, so it all happens very quickly.


In this image, you can see that an umber/sepia mix has been applied into the tan sections, but is allowed to mix in randomly with the previously applied greens.


The same concept works on the turret.  There were a few times where more black was mixed in with the green, which is as much of a tint as it is a shade.  It's an easy way to get some variety in the greens, instead of having to paint endless layers of lighter and lighter colors.


Just as I did with the hull, the glazes on the tan sections of the pattern are mixing with the greens.


Here's a quick view of the first layer of glazes.  More can be added to make deeper darks, or tint colors further.  This all takes a lot less time than all those layers of opaque colors, and there is less to remember in terms of "recipes".


I used one of the new Secret Weapon colors to apply some very dark shades, and begin to indicate where there might be paint chipping, stains, soot, and so forth.


I think you can see a lot of this on the rear of the hull, where I wanted oil stains and exhaust scorching.


I did the same process on the turret, using some of the pooled glazing colors as an indicator of where to 'build' on the staining and chipping.


I also added more dark shades to the commander figure.  This image shows how painting the insignia and number prior to glazing darkened those down nicely.


The view from above.  From here, I will work those middle tones that I mentioned earlier.  

I will also be adding some rust and other weathering effects.  In fact, all that will be covered in the final exciting episode, so stay tuned!!!