Showing posts with label Pre Heresy - Warhammer 40k. Show all posts

Thursday, October 12, 2017

Golden Hero


The more I work on miniatures (this is year 17), the more I turn to my original 2D art roots.  

This means that I seldom paint the color that "should" be there.  When you are painting in oils or watercolors, you don't search around for just the right red or green or blue, etc.  Instead, you create the "impression" of those colors.

Instead of painting 'gold', you paint all the reflections of the surrounding areas, with a suggestion of a bright yellow here and there.  This figure has lots of greens, blues, purples and reds as opposed to a bunch of different yellow tones.


I realize that this sounds very complicated and somewhat crazy, but it is actually a far easier way to achieve an effect, and you end up using a very small set of colors.  As I have mentioned before, I seldom use more than 6-7 colors on an army, much less an individual figure.

This is also how I can work on several different genres at the same time.  I don't need a 'clean' set of new colors for each figure... instead I utilize that one set of colors for everything, mixing where I need to.


Of course, beginning with the shaded basecoat technique helps a lot.  This provides that basic framework which my first layers of paint used to on my 2D art.  The idea was always to map out where the lights and darks should be as soon as possible, and then build around that.


These "golds" are made of oranges, greens mixed with tan, muted purples, dark blues, you name it.  This variety in tones also makes it far more interesting to look at, just as looking closely at a 2D painting reveals all the interesting brush strokes of colors that were used to make you believe you are looking at something which is three dimensional.


Monday, July 14, 2014

Breaking out the Big Guns


At long last... the Krios tank is DONE!!  Yea for me!

It was not the biggest thing that I have ever painted, but the "inside out" nature of this piece made it far more challenging than I expected.

It was actually more involved than a land raider, since there are more surfaces to paint.  So much exposed stuff, layered on top of each other.

Even though it was not huge, I still brought out the colossal photo backdrop from Hangar 18.  I think I could have squeezed it onto the 11 x 17, but look at how much room this setup gave me!


I didn't realize until after I had glued the final pieces together that the gun is supposed to be moveable!  Yikes.


Fortunately, the green stuff that I had added between the layers of glue on the two connection points worked out well.  Once I broke the full connection, the green stuff filled the gap just enough to provide some resistance.

Otherwise, the gun would never have stayed in the raised position.


It is nice to see the whole thing together.  There were many elements on this that I dreaded to paint.


I am definitely glad I stuck to the initial plan pf painting as much as possible before ever gluing pieces together.  This can also be risky, since you have a chance of painting the wrong gradations on a given surface.


It is not uncommon for me to have to go back into certain spots and rework them, so that the light looks like it is coming from the same direction everywhere.


I had hoped to use a little less weathering, but Forgeworld stuff tends to force you into that choice.


I am also glad that I chose to do the glowing effect, even if it was limited.  The color had to be red, like the Forgeworld example, but it was one way of making this my own. :-)


There are many more images to come, including a few sets on the other backdrops!  Stay tuned!


Sunday, July 13, 2014

Pieces and parts... where to put them?


Now for some images of the final stage of the Krios tank.  

Like all Forgeworld kits, instructions on how to put the stuff together is minimal at best, non-existent most of the time.  I had to scour the images of the painted version just to get a clue.


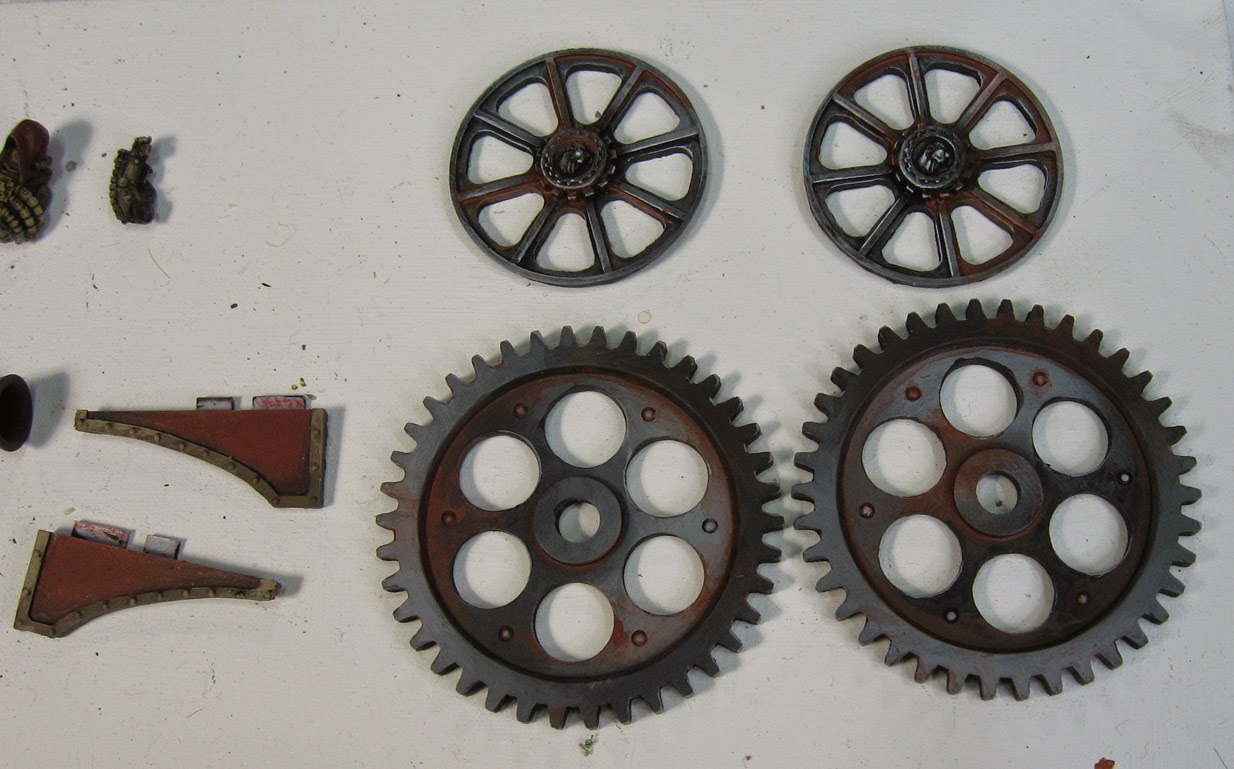
The cogs and wheels now have most of the weathering...


And then the treads, which took a huge amount of time.


You will have to paint these interior sections fully... but beware not to place too much contrast in there, because they really get buried.  Too much contrast here will compete with the other pieces you will place on top of it.


This is the section that was a nightmare.  One of the pieces is not even shown in any of the instructions, and you have to guess where and which way it relates to the surrounding pieces.

Also, do not attach the other side, since you have to deal with the interior large cogs and the weapon itself.


You can't really see it in this image, but it is a cowling that ultimately supports the weapon.


Here is the best view (the piece that has a number of 'V' cuts in it).  It intertwines with numerous pieces, so you have to be very careful when you attach it.

Also, be careful to watch how square everything is, since the parts need to be shaved down here and there to keep things from ending up at slight angles.


I also did some more on the exterior of the treads, adding some rust effects and other weathering.  I tried to set up as much shadow area as I could, since I knew some of the cogs will be glued on top of them... and contrast would be needed.


The same goes for the main weapon asembly.


The left treads glued onto the central hull assembly.


The right treads glued, and the traditional rubber bands in place.


More work was done on the glow effect, mostly adding darks.  I will have to see how this will be working with the secondary housing.


You can see that housing in the background of this image.  Dealing with the pilot was not easy. You can only paint so much of it outside the cockpit... and the arms attach in very odd ways.

So, keep all these tidbits in mind when you go about painting your Krios!

Finished shots soon.  It makes me extra glad to have those Hangar 18 backdrops!!!


Friday, June 6, 2014

Why 2K?


Well folks, I had hoped for something more fancy for the 2000th post on the blog!  Yes, indeed folks.  In just 26 months of blogging, I have reached the two thousandth post!

However, in some ways, a work in progress style post, with a wee touch of 'how to' thrown in, is pretty appropriate.

All the while I was working on this, all I could think of was the Raging Reds video that I filmed for the kickstarter.  So many people have asked me how to lighten reds without them turning pink.


As you can see, this brighter red is being lightened with a touch of orange.  Had this been more of a burgundy, I probably would have selected a grayed down lighter green.


This is the big thing right here.  If you use too much yellow to lighten the red, it will simply become orange.  Use white, and it still will turn pink and chalky.

Therefore, I take this opportunity to use one of those bright flesh tone colors that is lousy for actually painting skin. :-)

This has a tiny bit of color to it... some red, in fact.  This helps to lighten the color further, but not become chalky.


This view of all the pieces shows you how that plays out on the figure itself.


I am still using the filbert brush and the #8 round craft brushes at this shaded basecoat stage.


I am also experimenting with some glow on this vehicle, so that it will look a little different than all the other versions you tend to see.  Obviously, I have one of the Vallejo fluorescent colors out on the palette!


I mixed in a sky blue to tone this down a bit.


As I started to mix in an off white, I had to be sure to toss in enough of the fluorescent green to keep the intensity going.  All I am trying to do at this point is jam all the bright colors down into the recesses.


Time to work on the cowlings again.  I mixed a tannish color with a blue gray so that the glow color would be replicated in a small way.  I will impart some more of the tan in other areas, so that it starts to look even more like brass or bronze.


I took the extra cowling piece and set it on top just to get a few ideas of what I would have to do on it.  Should I paint a lot of reflected glow on the underside?  Or would that be too visually confusing?  Wait and see.

And, many thanks for checking out the blog!  I will try to continue to have fun, informative variety coming your way as often as I can!!!!!!!


Monday, June 2, 2014

A Curious Object indeed


This project will be one of the more unusual items I may ever paint.  This is the Krios Mechanicum battle tank.  The parts are not exactly like the usual Rhino and Land raider pieces!


There was no other way to deal with this but to paint all of the parts individually, and then deal with assembling them later.


There is going to be a lot of brass, bronze and copper on this.  Most of that will be done with tinting glazes, both dark and light.


You can see some basic work done on the gears and the interiors of the tracks.  I also need to think about the future weathering that will take place.


Many more colors will be tinted here.  More towards reds, purples, greens, and so on.


I know that some of these parts will be nearly invisible once this is assembled, but they all have to be rendered equally nonetheless.  That was another thing I knew would happen with this 'open' vehicle.


I chose some deep transparent reds to start out with the various sections of the hull that would be this shade.  It will become much brighter in some areas, but there will be freehand designs as well.

This should be a nice contrast to all the greens of the brass.


A hint of the brighter reds to come...


Here is the juxtaposition I mentioned.  Once some of the weathering gets involved, it will provide even more layers of contrast and intensity.


Lots of gears everywhere!  I predict a lot of green stuff, glue, and cursing in my future this week.  Wish me luck!