Showing posts with label Free Folk. Show all posts

Wednesday, May 29, 2019

Savage Blood


I have been having a great deal of fun basing my Song of Ice and Fire miniatures using a variety of Green Stuff World products... the latest of which are the "Crunch Times" texture sheets.  I have been using the skull piles and skull and bones sheets to base my Free Folk units.


It is possible to break those up, and then use them for bot the bases and the movement tray!  In effect, you are creating a moving diorama.


In my latest basing video, I demonstrate how this process works: https://youtu.be/nnAX658rMd8


I also take you through some steps to magnetize the figures to the tray, which I have been doing for all my units.  This makes them so much easier to deal with as far as transport, but even on the table when you have to constantly move a tray around some obstacles or rotate them.  I have seen "explosions" in every battle report so far where a batch of figures go flying.


The priming process is just like this tutorial using the Badger Stynlrez primers: https://youtu.be/5pfwjapw98A


This "Pre Shading" process can make things much easier and faster when it comes time to paint the rest of the unit!


Here are a few of the "Color Test" figures.  This is an important part of the unit or army painting process, and something that is always covered in the second episode of every 5 part Army Painting series on the Patreon Page.  It is here where you can determine how long a given effect might take, and then you can multiply that by the number of figures.  

This way, you know in advance how much extra time that could add to your project, and you can either eliminate that effect, or save it for select figures such as champions.


I have a number of videos showing how I do the snow and blood effects, such as this one on Shaggy Dog: https://youtu.be/W8MCJm14IYs


I am almost finished filming Series 9 of the Army Painter Patreon sets.  As I mentioned earlier, each one is usually 5 episodes long, and takes you through each step of the process from initial basing to finishing touches!  By signing up for the Army Painting level (which is $15 per month), you also have access to all the other tutorials done for that month, and that means about 20 hours of video tutorials!!

You can sign up for the Army Painting pledge here, so you don't miss out on dozens of unit and army painting content!:  www.patreon.com/JamesWappel


Wednesday, April 10, 2019

Skulls, Snow and Blood!


One of my latest tutorials loaded to the Patreon Page showed off the traditional crushed glass snow technique... but with a twist!  This time, I added some blood effects.


You can see those strategically positioned not only on the bases of the figures, but the movement tray as well.


I had been looking forward to testing this out for a while, and it was well worth the wait.  I combined the Bader Airbrush Ghost Tint called Fresh Blood with Green Stuff World's True Blood.  I added a bit of Reaper Red liner for added darkness in the driest areas of the blood pools.


The wonderful aspect of the crushed glass snow is that it is crystalline and transparent.  This means the blood actually 'seeps' into the snow, as it would with the real thing.


This view gives you a great look at the overall effect. This was done for the $10 Basing level pledge on the patreon page, but it was also meant for the backers at the $15 Army Painting level.


Here's a link to the Patreon Page if you are interested in tutorial/experiments such as these.  I have many more experiments on the way, since Green Stuff World sent me a host of new products!


If you want to get a peek at the figures themselves, I have a live session where I was painting them with the Mig Ammo Oilbrushers:


Sunday, March 10, 2019

Primer en masse


With Adepticon approaching, it is time to get a lot of Song of Ice and Fire miniatures ready for painting!  I have some NCU's, activation banners, combat units and more that need to get that basic "pre-shading" which you have seen in previous posts.

Lately I have been starting with the reddish brown Badger Stynlrez primer.  It is an all around handy shade, as it is relatively dark and with a strong tone.


I had used the Ebony color for this first layer, but I happen to end up with more of the reddish brown after the Ebony had been used up!  In any case, my primer painting does not really rely on any kind of specific colors.  You could use whatever you wanted (something that matches the overall color of your army, etc), but this is more of a "take on all comers" scheme.


Most of the colors that I end up painting on my units these days tend to be more aligned with earth tones.  The historicals, Lord of the Rings and Song of Ice and Fire minis have more muted schemes, and need to blend in with their environment more than a sci-fi figure for instance


The units of 12 could be primed while they are still on the trays, but in the end it takes much less time to do them individually.  I can pick them up, change the angle that I am holding them, etc.  This lets me get to the hard to reach areas under the figure.

Also, this is the point where you save a lot of money using the airbrush (or brushing it on directly as we did for many years).  When you spray prime with cans, you are usually outside, and all you can do is tip the figures over, or roll them over in the cardboard box.

Of course, that is if you have the ideal weather for it, which in Chicago is never.


After getting a general coat of the reddish brown, I start to dust other lighter colors over the top.  I like to hit it with the olive green next, since greens are so present in my shadows, skin tones, bases, etc. anyway.


It is very helpful on figures such as the Free Folk, where I will be doing a lot of leather and fur.  If I do some glazing of reds or yellow browns, I can still have a bit of that green color show through.  The same goes for the skin tones.


I also hit the movement trays, not worrying about getting things very dark.  The first stage of painting is to do my oil washes over them (I will probably be using oils on these), so I can more effectively establish exactly the type of colors I want in those areas with that initial stage.


The light tan color is the next primer that I dust over the top of the green.  I try not to wipe out too much of the original reddish brown or greens, but it is not a huge problem if I get a little too much on a given figure.  By this time I am simply waving the airbrush over the top of the figures.


The trays are ready to go.  Another key thing to remember is that plenty of snow will be covering these.  Yet another reason why I will be doing a lot of shading/glazing in the initial stages!


 I have also been dusting a final layer of white on figures.  As before, this is more gently brushed on... even to the point where I turn the air pressure below 50 PSI! ;-)


The units are all set for painting!  If you want to see how I do some of this basing, I have a number of tutorials on the Patreon Page, very similar to this:  https://youtu.be/INPfPLCTZcE


Here's one of the wolves from the Night's Watch set I believe.  As I mentioned earlier, you can change out one of the colors along the way to get an interesting result.  

He will be the subject of another tutorial for the Patreon Page.  Here's a link to check that out:www.patreon.com/JamesWappel


Tuesday, March 5, 2019

More Skull and Bones


Last week I experimented with the Green Stuff World texture sheets for the first time, and the results were very good.  Those bases were sightly larger, and I was curious to see if those textures could be used on smaller bases.  

The Boltons and Free Folk Raiders seemed to be the ideal candidates for these tests!


In addittion, I tried out another texture roller sheet for the NCU's.  It is one that I had been saving for just the right miniatures and what better than Song of Ice and Fire!


I have many articles showing how I work with the Sculpey and the rollers, such as this:  https://wappellious.blogspot.com/2018/04/rolling-on-to-victory.html


Now to the skull and skeleton textures!  The Roose Bolton had to go on a base like this after I was shown a few scenes from a Game of Thrones episode...


I used a little bit of the oxide pastes to mesh the edges of the texture sheet with the cork and base.


I had to try it on one of the Savage Giants too!  You can see what the other type of basing looked like in a previous tutorial: https://youtu.be/1LvJv3dyjEw


The biggest challenge would be one of the units, since whatever I did with the bases would also have to work on the movement tray.


I discovered that the material could be snapped off in pieces far easier than I first anticipated.  I thought that you had to use a clipper or snip of some kind, but it turns out that there are some natural "break points" where it is thin enough to snap off a small piece without ruining a key texture.


Just as I would with the tree bark, I made several pieces that could go in the gaps on the tray between the figures, trying to maintain the same sort of texture that was placed on the closest figure's base.


A few types of cork also filled out the tray, giving some of the same poses a different look just by changing the height.


Once again, I employed some of the texture paste to blend things together.


Here's the movement tray and miniatures!  Ready for priming!  You can see how I have done the basing of a typical Song of Ice and Fire unit in this video:  https://youtu.be/INPfPLCTZcE


Basing episodes such as these are part of every Army Painting series on the Patreon page.  That pledge level is $15 per month, and brings you 15-20 hours of content!  Not just basing, but plenty of painting as well!


Here's a link to the page... I cover every type of material, technique or combination of those in every single tutorial! www.patreon.com/JamesWappel


Wednesday, February 20, 2019

The Lady Val Live!


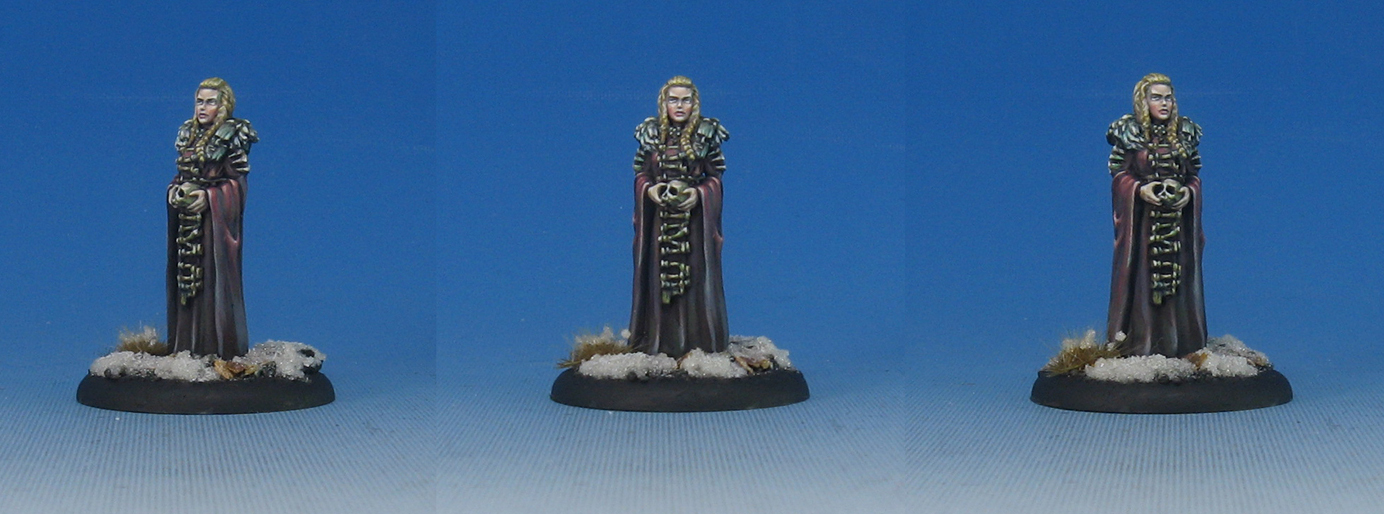
My latest YouTube Live session showed how I painted Lady Val from the Song of Ice ad Fire Miniatures Game.  She's another NCU, and now joins Craster and the Savage Giants!


I tried to show how to get interesting and unexpected colors in the shadows, as you can see in this image.  Grays, blues, purples and even greens were used, although the cloak registers to the eye as "red".  This kind of subtle addition makes what could be a bland area far more interesting!


I even went into the use of the Green Stuff World leaf cutters and the Secret Weapon crushed glass method on the base.


Here's a link to the live session!  https://www.youtube.com/watch?v=DAU3njr2Qc8