Tuesday, June 4, 2013

Mounted Brunhilde shaded basecoat.


Well, this figure is actually finished now, but I will be showing a few phases of the painting.  Here we have the Shaded Basecoat step.  As usual, setting up all the glazes and shading that will come later!


Speaking of Raging Heroes, the pledges have been coming in fast and furious!  Please be patient with them, as they are already exhausted... and that was before they pressed that start button...


I will post the glazing images next!

Sorry to be so brief tonight, folks, but I have lots of painting to do.  Stay tuned for finished images of the Abbadon and Loken set as well!


The Raging Heroes kickstarter begins!!!!!


All right!  The Toughest Girls of the Galaxy are HERE!  As you already know, I have been waiting on this moment, and now it has arrived.  The fantastic new range of miniatures is on its way.


We will be looking at nearly 150 unique sculpts, with all sorts of goodies!!

I have included this example to give you an idea of how magnificent these are.  This is the Kurganova Sisters set, including their loyal companion Charlie.


I have many more posts on the blog showing numerous figures from the range, all located in the Raging Heroes area.  You will love how easy these figures are to deal with!


I have put together many resin figures, and these are the only ones that I don't even need to prime, much less struggle to wash without breaking or losing parts.  So much easier!  I have no idea why other companies can't do the same :-)


I think you will love these minis just as much as I do, especially when you see how easy they are to deal with.


Get in fast... I think it will be crazy!!!!
So, here is the link!


Monday, June 3, 2013

Using Secret Weapon pigments of for the Painting with Powders video


Among the many things I was doing today, I worked with the Secret Weapon pigments on the Painting with Powders video.  As I did so, I set up some other bases to test out various techniques.  Here we have some Dark Eldar bases...


You can see the base for the video miniature sitting on the palette.  I wanted to see if the powders could be used as a dark wash as well (mixed with rubbing alcohol), so that one did not get the usual dark washes as the base on the left.


This closer base was done for testing the rubbing alcohol blended powders.


To avoid some of the messes I have caused in the past when I used the powders, I set them on a board off to the side, which would hopefully keep them out of the danger zone!  I let the caps open as well, so that I could dip back into some of the colors when needed.


This is part of my pigment collection :-)  Many of these colors you see are going to be used on the miniature itself, which is a Raging Heroes sci-fi Gluttony.


The pigments arranged on the palette.  Looks kinda familiar, eh?  The blue cap on the left has some of the new Fixer in it.


One of my first tasks was to paint the base for the Gluttony miniature.  You can see all the powders being mixed with the fixer ad rubbing alcohol.


Here are some shots of that base.  Most of the 'painting' was done with the pigments.  I used some gloss medium and fluorescent paint for the ooze.


Here I did a different test.  Putting the pigments on dry, and then washing the fixer over them.


I did a little of each technique on these.


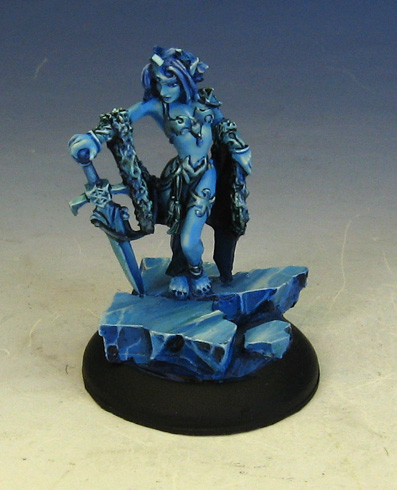
Ice Queen for an icy day...


There was a certain amount of irony painting this figure on one of the coldest June days ever.  She is for the "Painting the Blues Away" video.  I suppose that is somewhat obvious!

This is another miniature where the painting of the base is a big part of the action.  The idea was to be able to show as many shades of blue as possible.  Running the gamut from purple/blue to a seafoam teal, I packed all sorts of blue shades into this figure.

The ice block was perfect for this!


The figure if from Reaper Miniatures, and the base is part of the Groundwerks line that I sculpted for Cool Mini or Not.  I put a coat of gloss on the ice, just for fun.  It added a bit of textural difference, which helped to distinguish the base a little more...


More on the way!  Stay tuned!

And by the way... this is post number 1300!!  Not bad since February 3rd of last year ;-)


Sunday, June 2, 2013

Work continues on Abbadon...


Now for the set of pictures showing the glazing stage.  The previous post showed all the shaded basecoat work.  The idea here is to shade and tint all the colors darker.

With Abbadon, it mostly involved blue/black glazes.  There were some other shades done with the golds.


On this guys I used Secret Weapon Green and Algae washes.  They were just right for what I needed.  I also did some greenish brown washes on the golds.


Once I had everything darkened completely, I went back in with some fluorescent paints to work on the orange colors in the 'eyes'.  I did this with both figures.


I also went in to the faces and did some detailing there.  My next stage has been using the powders to reestablish the lighter colors.  I will post those pictures when they are ready!!


Reaper Yvonne for SE NMM


Here is the Reaper Yvonne figure for the painting video concerning Sky Earth Non Metallic Metals.  A classic older figure that was just right to show a variety of surfaces.


I don't get to so the shiny steel much these days, except for that regiment of handgunners that I painted last year. :-)


Ice Queen for "Painting the Blues Away" is next!


Saturday, June 1, 2013

Abbadon and Loki continue...


You have seen me working on the base for the Forgeworld Abbadon and Loki set.  This set of images shows what they looked like during the shaded basecoat stage.

As usual, the goal here is to make the colors as light as possible... as quickly as possible.  


Once all these lighter layers have been established, then it's time for glazing and shading!


For those of you not familiar with what I am talking about, the top bar of the blog has a shaded basecoat article.  There are also numerous articles of a similar nature in just about every category!

Stay tuned for that next exciting episode :-)