Tuesday, January 24, 2017

Tank Wars


You have seen me post a few articles before about the use of Badger airbrush products over the last 10 months, mostly in the form of trial and error to see what might be possible.

In the intervening months, I have been testing, prodding, testing again, various materials and methods to see how I might be use this new set of tools.  I have also been changing the physical setup of the work area over and over again to see what works best, to figure out how to deal with the spray dust, and all the things that go along with airbrush use.

At this point, I have determined that the Airbush is ideal for mass application of Shaded Basecoat on figures and vehicles alike.  There is almost no difference in how I would do the Shaded Basecoat with a 'regular' brush, except that I can now work on 100 figures at a time instead of 20!


In fact, I work on so many simultaneous objects at once, that more time is spent figuring out ways to stage it all around the actual work area!!


In this post series, there will be a number of different vehicles and manufacturers.  There are Warlord Games tanks, Rubicon and Mad Bob's included.  There's even a Konflict '47 mech in there!

Starting with the black/orange primer blends, I did my darks and "pre weathering" as I normally do.  Since Badger makes so many different colors of primer, the vast majority of my painting is done with these primers.  You can check out those other articles in the airbrush section.

Over those darker tones (you can see those in the image above), I spray the green primer mixed with a slightly darker olive green paint.

Those initial layers of dark brown colors instantly create a perfect shadow color for tracks, treads and drive wheels.


The light yellow primer color is mixed in with the green to begin establishing some lighter colored areas.  The inset shows a Stug and Tiger which got the yellow treatment.  This is another reason why I need such a large staging area, because I am trying to maximize the use of every color.

Starting and stopping again while working on just one or two tanks at a time would not be a very good use of such a powerful system!


As more yellow is added to the mix, the lights keep getting brighter.  Keep in mind that you have to make the colors lighter than you want them to be in the end, just like the regular Shaded Basecoat!  You will be adding darker glazes and washes, plus weathering.  This means you need as light of a base as possible.

I even managed to sneak a French truck into the mass of vehicles!  You can really see the brighter yellow at this point.  Since I am not washing out the cup between layers, it maintains a grayish appearance.


You are not limited to working lighter only!  If needed, you can go back in with darker tones if you need to reestablish a shaded area, or tint something a bit.

I think this shows up most on the aft deck of the Tiger, where I wanted to see what kind of exhaust soot I could create by lightly spraying black over that zone.


To create the camo pattern, I started with the brown, and that's a mix of the orange and black primers (from Badger).  Like I mentioned in the beginning, I want as many layers to be primer as possible, since there is no base to grab onto these vehicles!  It will make the paint much sturdier in the process.


The mixed paint is placed in the cup, and I start spraying that part of the camo as needed.  If I want a sharp edge, I could apply some blue tac or other masking agent.


Quite a difference already!  I have carefully set up all the other vehicles in this set to be ready for painting this stage.  The Stug is ready for it's camo...


I tried to leave zones for the green part of the pattern.  Also, I was trying to leave the "leading edges", or other parts that would get chipped, scraped, etc., with the lighter parts of the pattern.  It's a lot easier to have your chipping and rust show up on the lighter colors, so isolating those zones lets you get a lot of chipping bang for very few bucks :-)


And now for the green vehicles.  By the way these are for my Hungarian army.  Most of them are from Mad Bob's Miniatures, but the PZ III is from Rubicon.


This view starts to give you a sense of how many things are finding their way in front of the nozzle!  Not only is this very efficient at getting a lot of things done rapidly, there will be a lot more consistency across the entire army.


At this stage, all of the vehicles and the extra armor have the brown part of the camo applied.


I will close out this first article with a peek at the next stage.  I will add the yellow bits of the pattern to all the Hungarian vehicles, so stay tuned!!


Monday, January 23, 2017

The Prowler


I enjoyed utilizing my typical green/purple mixes on this guy, for almost every surface.  Those two colors found their way into skin, metal and cloth colors.


These are more muted greens and purples, of course.  Some are warmer of cooler, but balancing them next to each other is always a fun challenge. 


You can see these transitions quite easily on the skin, as some areas are almost purple... and others sections punctuated by greenish grays.  Those two colors are very complimentary to each other.  When you mix them to make a gray, you get a gray that will be tinted one way of the other, depending on how much of each color is mixed in.


He's also here:


Sunday, January 22, 2017

Skink of a Different Color


This little guy is another blast from the past, part of the massive Skink contingent from my original Lizardman army years ago.  It was the search for a way to get all of them painted which led me to the Shaded Basecoat.


You can see more of the turquoise versions here!


Saturday, January 21, 2017

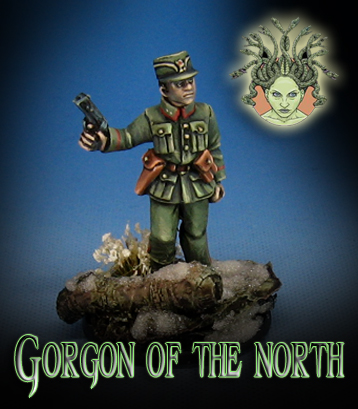
Gorgon of the North


Next up from Gorgon Studios is the Norwegian army.  Just like all the early war forces in their selections, there is a full compliment of officers, gear, etc.


These figures are sculpted by the same artist who does the Artizan Designs sculpts, so you will see a lot of similarities in the style. They are easy to clean, and there is plenty of nice detail on each figure.


I found some rather humorous reference sources in a Google Search...


But here's a live source!  I will have to balance the two sources...


As I usually do, I will vary the colors on each figure, with some greens being darker or warmer, giving them the appearance of more or less worn uniforms.


Figuring out where to place the red stripes was interesting, but that is a wonderful contrast to all the green, and it makes them distinct from other armies that I am currently working on.


As for the bases, the snow will be less heavy on these forces. In fact, I want it to seem partially melted, which is possible to do with the crushed glass method.  I didn't want this to be the dead of Arctic winter, but more like the alpine snow which is still around even when the temps are well above freezing.


This is just the first of the defenders of Norway, so stay tuned for much more!!!


Friday, January 20, 2017

Druid's BONES


I always have fun working on the BONES minis, since they can be chopped up if need be, or balanced on all kinds of interesting bases.  They don't weigh much at all, so balancing them is never an issue!  Plus, you could not break them with a hammer :-)

This druid figure is perfect for any kind of RPG adventures!


I had a lot of fun doing some color variations on the robes, attempting to work in as many browns and tans into the green as possible.  This was meant to have him blend in somewhat with the base.


The base has some fall foliage, which was simulated with mica flakes.  That is a very handy way to make rapid fire ground cover that can be painted up to seem like individual leaves.


He joins the rest of the BONES collection, which continues to grow!


Thursday, January 19, 2017

Mud and Guts


The early war German Heer forces have been an interesting laboratory for various basing materials.  While I need to continue that May/June forested look to match the French and BEF, I have been working in various foliage and Mig AMMO products


Since I did this artillery piece, I have gone back to using the Woodland Scenics fine foliage.  It is perfect for the forested gun emplacements.


I have also included the use of the heavy mud paints from AMMO on all of my bases, since I love the textural difference that provides, and it also helps to tie in the figures to the base, as if they are genuinely interacting with the surface.

This also has more of a fresh turned earth appearance, which is even more important on these weapon teams.


The positions look more like they have been freshly dug... especially if I can save a few shovels from the infantry sprues!!!


The view from above shows off the mud.  While you can make the usual sand and gravel look like dirt when it's painted, that still does not have the extra touch of the Mig Mud.


Many more gun teams are on the way, including the heavy howitzer and its five man crew.  Stay tuned!!


Wednesday, January 18, 2017

Hail the Chief


This Skink Chief was one of the little surprises that I would have in my Skink and Kroxigor units.


He, along with a Skink Priest, would be embedded in the largest of my "Skrox" units, which contained 36 Skinks and 4 Kroxigors.  This was known as the "Skink Tank".

Despite it's size, it was very fast.  It had a lot of firepower with 36 shots, and had the 4 big beasties to lend some heavy hitting in combat.


It also had lots of ranks, banners and so on.  By placing a Skink Chief and Priest in the unit, it also had magical protection along with whatever special armaments the chief had.


I varied what each Chief would carry from unit to unit to match a certain purpose.  I think this guy would take the Ogre strength weapon...