Thursday, November 10, 2016

The Great Horned One


This figure was a test of the Reaper clear paints, to see how much mixing you can do with them and still maintain the magical glazing effect that they have.  As I have mentioned many times about the clear paints... you can thin them down with nothing more than water, but they do not leave behind water marks, and get down in all the lower crevices very efficiently.


Those colors are very highly pigmented, and quite intense.  I wanted to see if I could grey down the colors (by mixing opposites such as red & green, etc.) and still get that translucent application of washes and glazes.


Since the set of clear paints includes red, green, yellow, blue and purple, you can mix any color you need!  Also, combining them with lighter, opaque colors also gives you the same semi-translucent middle tones that I love so much!  It is along the same lines as the previous post about mixing the opaque mud colors with the oil washes.


He's also here:


Wednesday, November 9, 2016

More than Mud!


A while back, I posted some initial articles using the Mig AMMO products to paint vehicles in some new and different ways.  Primarily, I discussed the use of opaque, lighter pigments like the Mud that are mixed in with the thinner, transparent washes.


As you can see in the inset image, mixing the Mud with the greenish filters and washes creates a semi opaque middle tone.  This can give you some very interesting effects, and can be used to work into the prior layers of washes wet into wet.

This Laffly Tank Destroyer is made by Mad Bob's Miniatures.


The upper surfaces of the Laffly have been treated with this technique.  Normally, I would have waited a bit for the glazes to dry, and then go back in with 'regular' acrylic paint to lighten things up and create more interest in those mid tones.

However, I like the idea of working this way with oils.  It will not replace my usual method, but having the option is very interesting!


The other added detail is the "light over dark" streaking effect.  This needs to be set up by the application of the original dark washes, in order to make these light streaks show up.

Since all of these are oil pigments, they can be easily modified, feathered, and even removed with white thinner!


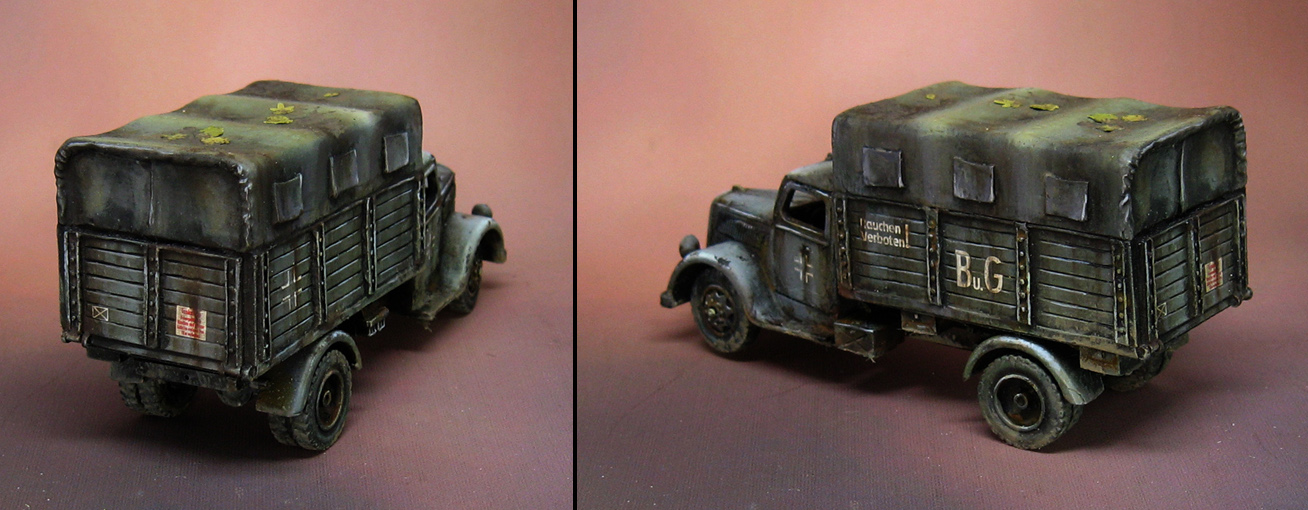
This roof panel is a good example of some stippling of these semi-opaque midtones.


With the roof in place, you get a better picture of the overall appearance.  The stippling brush strokes of that middle tone can be used to emphasize the weathering, making the darker chips and rust effects more pronounced.


Hopefully you can see in this image that I have been mixing that lighter opaque color into the brown shades in addition to the green.  This creates more of a grayish tone, which also works well for those light streaks on the dark shadows.


And yes, the Mud paints can also be used for real mud!  I started working on the tires, beginning with the lighter, thinner splashes.  The heavier, thicker and darker Mud was applied over the top.


Since a key weapon like this anti-tank vehicle is very vulnerable, I thought it would have to be camoflauged as much as possible.  Also, this would create a potential ambush situation.  So, I grabbed some of the Hangar 18 leaf foliage and started placing a few pieces on the roof, and scattered leaves elsewhere.


The coloration was too basic on this, so I went in with extra washes to darken certain areas and break up the uniformity of the original colors.

Many thanks to Mad Bob for providing a key weapon system to my Defenders of The Republic!  Stay tuned for images of the finished vehicle soon!


Tuesday, November 8, 2016

The Acrobat


This very agile Dark Eldar figure was part of my 2013 tournament army at Adepticon . 


These bits of terrain were very handy... not just for the basing, but the display board as well.


I had several of these leaping characters dancing around on higher bases such as this.


There was something irresistible about having a pose like this poised on top of the rubble of an Imperial city.


Monday, November 7, 2016

Wild Magic


I think this character has to be my favorite of the Norsgard figures that I have painted.  So far, I have had a chance to paint four of these fantastic resin figures!


Check out their website here:


I continues the same style of basing (tree bark) an each of them, which means I have some nice group shots coming up for you!


The previous wulfen characters were a combination of blueish/green greys, while this lady had more of a purple tint.  I even did a few glazes of deep purple in the recess areas.


Sunday, November 6, 2016

The Long Haul


This Opel Blitz truck was one of the first vehicles for testing out a number of tools and materials.

It was the first 28mm scale vehicle that I had ever used the airbrush to paint.  In addition, it was the first time I had used the Mig AMMO oil based products, and the initial crack at using decals.

In the past, I had always done such markings and insignia with regular freehand.


The plan was to continue along these lines, until I started to learn about the secondary markings which are used on most vehicles... trucks in particular!

This page alone made me realize that I was going to have to get used to working with decals, and make use of Google searches to nail down what kind of markings I should use.  I was using a sheet of Rubicon vehicle decals, and many of them were shown on this page.

I attempted to replicate one of these as closely as possible.


The side view gives you an indication of which one!


I noticed that the purpose of the truck made a major impact on what decals I needed.  Of course, this will add yet another layer of complexity when I choose which era and theatre my future vehicles will be taken from!

There are a number of other Blitz trucks under way, but a few of those will be for my DAK army, and a few others saved for my winter Germans.


I had a few leaves around from my leaf punch experiment, and some of those were placed on the roof to break up that open space.  I will probably add more of them after a while, but I was more interested in continuing with the rest of the experiments!


On future Opel Blitzes, I will attempt to add some windshields, complete with mud spatter and perhaps windshield wiper marks.  Stay tuned for much more!!


Saturday, November 5, 2016

Fear the Orcs


Time to meet some fearsome Orcs on this college football Saturday!  These guys will certainly reach the playoff... perhaps by simply scaring their opponents off the field.


These are high quality resin sculpts, and they usually have very little prep work involved.  Nearly all of them are just one piece, which also means that they will be very sturdy and hold up to the rigors of playing Blood Bowl.


This is a star player, or he could be used as a Black Orc with a bunch of SPP's.


Here's a link:


Friday, November 4, 2016

Miniature 13


Here's something a little different for you!  It's been a while, but I have some more images of Miniature 13 figures on the way.

A link to the website:


These are very highly detailed resin figures, which are done in both 28mm and 54mm scale.


Here's a peek at an earlier version:


I also had a lot of fun painting this Overseer: