Wednesday, March 26, 2014

A no fly zone


I have to say, I am really looking forward to shooting some clay pigeons this year.  Of course, the meta may have changed so much that nobody takes them anymore... or not span them as much.

It is my belief that this year's tables are going to see much more terrain on them.  Along the lines of previous years.  That would have been way more helpful last year, but I think it can still assist this group.


While the crazy conversions/scratch builds look fun when they are in the unprimed stage, I really like seeing them all painted!


This was a fun little project, and one that will make the army board look even better.  It should also help out a bit during games.  The ADL was huge in the test game that we played.


Yes, the Highland Moss Guard approves!  Victoria's finest have claimed this for themselves!


Ready, aim FIRE!


Up on the rooftops


After allowing the glue to set up for a while, it was time to start working on the roof.  I used a half inch thick piece for the base of it, since that would let me set the LED lights into it very easily.

I need to be able to get at those things very easily, and I learned last year that cutting the holes a tiny bit short means the flexible foam will hold the lights in place.  The flexibility of the foam has just enough give so that I can pull the lights out of there to replace batteries and so on.


The roof is going to be fairly basic.  Most importantly, it needs to have some flat space to hold more miniatures.


By making all the elements hollow cuts down on the weight, but will provide some extra strength.


I will be using some heavy paper on the angled roof pieces to create a little texture.


In the original plans, there was supposed to be a landing pad on the army board.  The drawings had it in a separate area from the cathedral, but the changes in dimensions meant it had to go somewhere else.  For right now, that is up on the roof.


I tried to keep a squad size of ten in mind as I cut that piece.  Once again, I used a thicker piece to make sure it would be strong enough.


There will be a number of little extra pieces put on the roof for effects.  I planned to put some ribs on the top of the angled sections, so I had to keep the tops as flat as possible.


In the late afternoon, the sun actually came out, and it flooded the kitchen.  The cathedral was also flooded with light, which was very fun!


This was very fun!  It is pretty wild to see the concept of the tall thin walls opened up with windows work in miniature (and pink foam) as it did in the Middle Ages. :-)


Tuesday, March 25, 2014

Always police your brass


A few items here.  First, another wonderful mini from Victoria, part of the Highland Moss Guard series.  The kneeling versions offer so much flexibility.  They can be used for weapons teams, or for fun poses such as this, interacting with the base.


In addition, there are some shell casings from Secret Weapon miniatures on the base (which was made from backed sculpey, by the way!).

The shell casings add a wonderful extra detail.  Just a few here and there enhance the theme greatly.


I am working on the last tartan pattern now... pics of that either late tonight or tomorrow!


Let there be light!


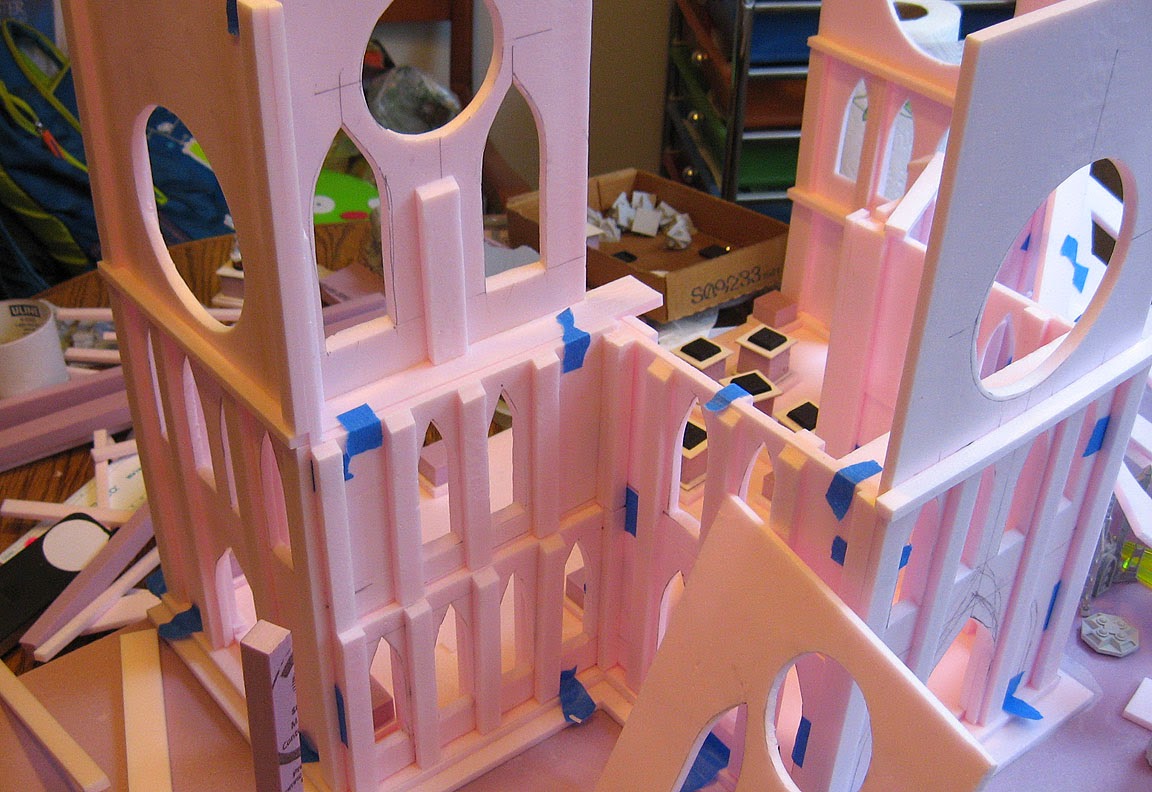
With the lower walls complete, and the interior ready as well, it was time to complete the highest level.

Many functions are expected from this level.  It will provide the majority of the light on the inside of the board... from outside and within.  Any false moves here, and I might cancel out one or both of those light sources!!


I worked my way around the top level.  Mostly at a disadvantage, since I could only glue so many of the pieces together.  Some painter's tape is all that is holding these semi-assembled sections together for now.


At last!  Upper level in place.


Interior bracing.  Just like the lower levels, the idea is to increase the thickness of the walls with those decorative pieces.  Ideally, tripling or even quadrupling the width in places, while still allowing as much light as possible into the structure.


More bracing on the exterior.


All the struts and buttresses in place.

At this stage, I would have to transverse the central knave with arches.  These would have to reach all the way down to the columns, but no block too much of the light/views of the interior.

This would be complicated by the size of the LED lights that I was using.  You will see why later.


Here are the first raw cut sections of those arches.  There will be lots of details and secondary arches added to these which will make them more interesting and much stronger.


Here is a hint at what they would have to support.  Keep in mind that the roof is, in it's own way, going to act like a cantilevered bridge.  The structure of the roof itself is designed to be self supporting... or as much as possible :-)


I wish I could have glued these in place, but they will be one of the last things added.  I will have to add much of the details to them separately... making it more of a challenge.


The three basic pieces are done.  There will be lateral arches which sprout from them, and bracing will be supplied in that same sneaky method of 'details'.


Here is a shot with just one bank of lights turned on.  You can see how dramatic the effect is against the backdrop of the very warm kitchen lights.


The source!  I found these at the Home Depot last week.  There is a second bank like this on the other side of the knave.  You can see how I didn't have as much room as I was expecting (a fraction of an inch, but is was a key fraction!)


All in all, there are four sets of LED lights going into the ceiling.  I think it will provide the most light of any of my previous structures, which actually had more lights!

I am truly hoping that people will be able to see the stained glass effect.

Next up, building up the roof section.  Stay tuned!!!!


Monday, March 24, 2014

The rockets red glare


After numerous changes to the list here and there for a variety of reasons, it has been determined that there is only one Exorcist tank.  Time is definitely a consideration, as it took a number of hours to create this conversion.

Obviously, I used a Secret Weapon RAV 6 x 6 chassis for the basis of the vehicle.  Some of you might be familiar with the extra armor skirts that I created for it a while back, which I used for the Weathering and Battle Damage video.

Using some bits, some plasticard and polystyrene tubing, I worked furiously to get this thing completed.


There were some other things I had intended to do with it.. such as creating a driver (I had even saved some parts), but the clock has run out, and I have to move on.

Still, I think it gets the idea across!


There was something else as well.  I used up the last of my large gauge tubing on this turret, and there's no way I can get more in time.


I put a hatch in place of the driver for now.  Again, more stuff was planned, but I had to be able to get at everything with the brushes in a limited amount of time!


Some shots of the turret primed, which helps to eliminate all the distractions of the kaleidoscope of colors!  I am painting this now, so pictures late tomorrow night!


What's on the inside...


Time to get these walls a little higher!!  Here's where I left you in the last post.


I continued to add the exterior elements, such as the bracing, so that the lower levels would be more stable, allowing me to go higher.


It did get somewhat tricky, as I tried not to glue the wrong parts together!  I had to wipe away glue more than once.


Now that all the exterior bracing was complete, I started to add the same elements to the interior.  Those were more complicated, since they would have to bear more load.  The pieces on the outside were as much for decoration as for support.


The most complicated bit was going to be these upper sections of walls, which would have to be set back about an inch.  The roof is going to be relatively heavy, since it will hold a bunch of LED lights (chock full of batteries!) and a bunch of miniatures.


I think this view gives you an even better sense of the 'verticality' that I am after.


Some of the upper sections are in place.  Keeping them aligned was definitely a challenge.  Even more so when I could not glue the main pieces together.


A view from the inside.  While I need columns to support the weight of the roof, I need to make sure there is enough room for all the statues, which will help tell the story of the army.

Oh yeah... and there are supposed to be miniatures in there!! :-)


The corners of the knave were encased, which set the level for the height of the support columns.


Speaking of which... time to make some columns!  These are going to be relatively simple, since there is already a lot going on in that space.


These four spots will carry a good chunk of the weight.  The two on the edge of the board will have to hold up even more, since the back of the structure needs to be wide open.


The upper sections are braced with decorative elements, similar to what I did on the lower levels.

With these extra pieces glued to either side of the thin walls, I have now effectively tripled the thickness (and the strength) of the walls!  Now I have the open feel of the thin .25 inch walls, with the structural integrity of .75 inch walls.


Starting to put the columns in place.  Stay tuned for more!