Wednesday, October 31, 2012

Memory lane and Wrath of Kings


Today we have some more Wrath of Kings figures.  Don't these guys remind you of the glory days of Rackham?  I always like the wolfen guys the best.  It really takes me back to 2003-04.

Nice to think that the wolfen are not completely lot to time and history!


Look... he has a girlfriend!


Making and painting an Apoxy sculpt base


Here are a few quick shots of an apoxy sculpt base.  First, the sculpted bits...


And now for the painting.  It was fairly basic.  I had a grey, a brown, a yellow, and a seafoam green.  Using a larger brush and working rapidly, I started out with a yellow/grey mix .  The grey/brown mix was used on the rocks themselves...


You can see the seafoam green mixed in with the grey on the upper surfaces of the rocks.  Eventually, I mixed in a yellowish white to begin highlighting them.


The highlighting continues.  I also mixed this light color in with the yellow/grey mix to highlight the 'ground'.


At this point, it was ready to be shaded and glazed darker.  I used a black, a sepia and a bit of green.  I focused on the lowest areas making sure to vary how much green or sepia was used.


Here's the finished results!


Tuesday, October 30, 2012

Reach out and touch someone: Angels Solarus Dreadnought


Here's another set of images on a Dreadnought form the Angels Solarus Blood Angel splinter chapter.


As I have mentioned in previous posts, this was not the easiest color scheme to paint on any of the miniatures, but all the vehicles were even more challenging!


Plague Coptas! Slime kites?


I have painted some unusual figures in the last 12 years, but these were definitely in the running for the most bizarre. :-)


This was the first time that I used the fluorescent paints to enhance a 'flesh' tone... in this case, using the magenta to make the soreness around the pustules really be toxic and inflamed.  I was very happy with that, so it's something I will definitely try again.


I had restricted the Fluorescents to glowing effects or toxic slime, with the occasional use on NMM, which I will be doing on the Easterling Black Dragon armor...


It was also fun to develop some new color combos, mixing sky blue with certain camo greens, and contrasting those by mixing bright yellows with browns and olive drab colors.


Monday, October 29, 2012

Racing towards the finish line: Trying to get ready for Bilbo's Bash!


Sorry for the delay folks!  It was Cathy's birthday today, so it was a busy day in Wappelville.

You saw in the previous post that I made a bonehead mistake on my Evil roster, somehow adding 2 extra war drums!  I guess I should not be entirely surprised with the pace of things these days.  Bilbo's Bash is this coming weekend, and a ton of work remains to be done... Yikes!


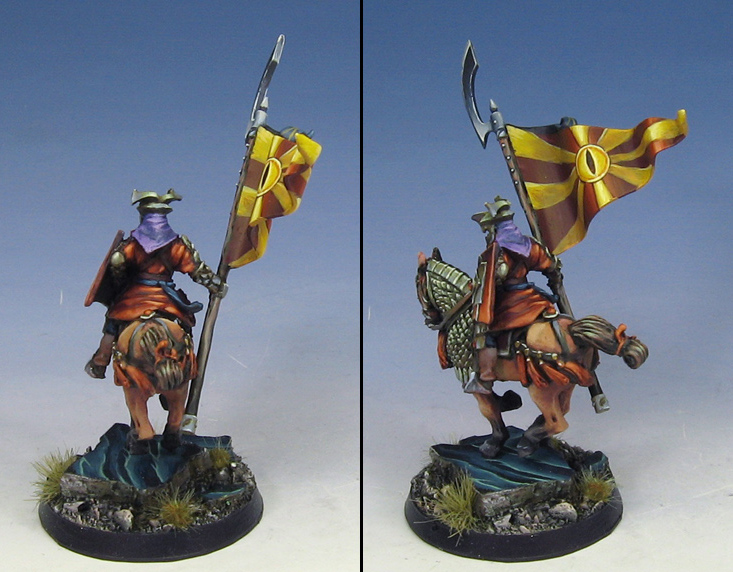
I tried to show how I went about making the banner figure as quickly as possible, utilizing a partially painted Kataphract.  I added a banner made of a Tomb Kings halberd, tin foil and green stuff.


This had to be painted in a slightly different color scheme than the other Easterling cavalry you have seen, since this guy does not have the Black Dragon upgrade.  In the heat of the tournament, I don't want to forget something like that, as it it is not very fair to my opponents.


The banner was painted as close as possible to the 'official' metal version, but I wanted to add a serpent (following my story line), and have a stronger association with Sauron.  Thus, the Eye of Sauron is featured, as it was on the Khandish banners.


The armor was painted less gold than the Black Dragons... almost more of a brassy look.  The idea was to have them be a lower class of warrior


And yes, all the Uglies love a party!  Especially when there is CAKE!


Not all terrain projects are the same.  This is one of the more unusual terrain pieces I have built. :-)  The little guys need a place to play, after all!


A grand old flag... what you do when you mess up your list!


When it was pointed out to me a few days ago that I had messed up my Easterling / Khand roster by putting in 2 extra and unwanted war drums, I had some serious reworking at hand!  Unfortunately, time was not on my side.  Also, I could only add what I had available in terms of miniatures.

In the end, I subtracted an infantry, took the 30 war drum points and added a Kataphract with a banner.  The ruling on the Khandish King's banner meant that I was giving up 2 Victory points no matter what.  This would give me a highly mobile banner that could keep up with the rest of the Mad Max road warriors.  I also saw it as more survivable from shooting, since you might only get the horse,  Even if you did, once on foot, he could pass that banner to someone else in base contact with him.

I had one unused Kataphract, but he needed a banner.  


There was not way I was going to use that giant metal hunk that GW called a 'banner', so I set about making my own,  First, I used a Tomb King halberd...


Then I used my tin foil and green stuff technique to create the actual banner.  The tin foil would support the flowing green stuff until it cured.  Once it did, I could attach it to the banner pole.


The two halves of the banner pole were pinned together to the hand, making it ready for the banner...


Now it is ready for painting!  This is going to be in a red color scheme, as I did not have the points to do the Black Dragon upgrade.  Besides, He's already at a -1 n his to hit rolls because of the banner.  Stay tuned for the painted images!!


Sunday, October 28, 2012

Eye Khandy: Chariot right 'out of the box'


Here is that "official" chariot I told you about yesterday!  I made no modifications to this... it is exactly as it would come out of the box.


While this one was neat, it was a lot more difficult to paint than my own conversions.  The chariot and the horses were not as "independent" as my own Tomb King converts.  Plus, the weight of all that metal just made it a lot harder to maneuver.


Another factor was how compressed everything was.  In order to make it fit on the 60 mm base, they kinds shoved and squeezed everything together, and that also made it more difficult to deal with.


I also like the shape of the TK wheels, and the howdah itself.


Stay tuned later today, when I post some group shots of the last 3 chariots!


Saturday, October 27, 2012

The view from above...


Time for a different perspective on the newly completed chariot.  These top views give a better look at the base.


Here are a few images with both of the converted Tomb King chariots!