Sunday, January 4, 2015

Expending lots of energy


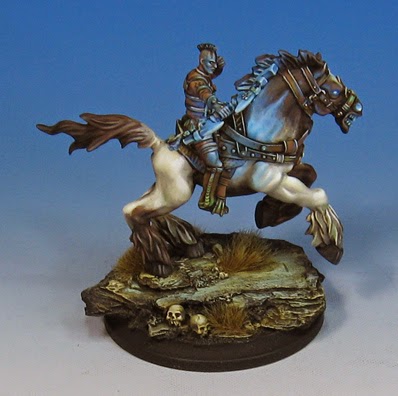
For some reason, these are among my favorite Wild West Exodus minis.  I believe there are 3 different poses of the Warrior Nation Energy Beast.

The concept behind them is that they are creatures that channel energy from the Great Spirit, becoming monstrously strong and fierce.  They sacrifice themselves in the process, as this energy also destroys their bodies.


The Warrior Nation also sport bows which channel that same energy.  It gives them the very valuable Spirit Aim, which I intend to make great use of!


The incredible speed of these creatures allows them to fill a variety of roles.  I intend to have as many of these as possible in my Warrior Nation force as part of my Speed and Violence group (an homage to Marty's old Chaos fantasy army).

They will be hooked up with the Great Elk and other beasties, clearing out some of the chaff with the ability to shoot and scoot.


Once I heard that these beasts get a free 8 inch move at the start of every activation, I knew that the Spirit Aim would be all the more valuable.  They can also contribute something in close combat, as they could potentially stay with the Great Eagle, and prevent him from being overwhelmed by masses of Hired Hands.


Are you of Age?


Never too young to get started on Age of the Renaissance!

As you may remember from previous posts, this is a game of research, expansion and economics.


In this session, Dave, Tina Cathy and myself would be joined by new recruits Natalie and Jack.


Everyone is getting set, preparing for their capital bid.  That is, deciding which nation you want to play, and what you are willing to shell out to play it.  It is a very unique pre-game ritual.

I always go with $0 for my capital bid, which means I will likely end up with London or Hamburg.

Since my pre game card was the Crusades, I knew that I might have a chance with one of those more challenging nations.


In fact, I was very fortunate with my card draws.  When I needed leaders, I got them, such as this fellow..Rashid Ad Din.  I was also able to get the correct resource cards at just the right time.

This meant that I could afford to do high level research!  Normally that doses not happen with London, Paris or Hamburg.


The Crusades!  This would mean that I could get into the Lavant before everyone else, even though I had little more than meek caravels.


The early expansions are rapid and furious.  Once these territories are soaked up, however, things begin to get 'testy'...

Most early game commodities, such as wool, don't offer those big payouts, so you have a hard time keeping up with Barcelona, Venice, etc., who can reach those mid to late game resources far more easily.


There are a great many things to keep track of... your income, your level of ship upgrades, misery, commodities, research advances and so on.

That's why you see those player mats and score sheets in front of us!


Even at this stage, the misery is piling up.  It is that long bar on the right of the board, which goes from blue to yellow.  A variety of things contribute to misery.  Famine, wars, piracy, and other natural/man made disasters all conspire to make your people miserable.

Let this go too far into the red, and you will lose a lot of scoring points.  Even farther, and your people revolt!


Even with the Crusades, other nations quickly occupied the near and far East.

Due to a number of circumstances, I had to resort to the Religious research gambit.  This meant that I pushed things such as Holy Indulgence and Cathedral on the other players many turns earlier than usual.

Now they were forced to spend the little cash they had on keeping up with me, or risk giving me free tokens and even cities.

I was not after the usual mid to late game resource cards.  Instead, my interest was in good old fashioned wool!

If I could hang on to enough territories of wool and play my one payout card for that commodity, I would have a large amount of cash.
Being in possession of the dreaded Alchemist's Gold card, I would not have to be so fearful of a big pile of loot in front of me.


Using that wad of cash, and a huge hand of leader cards, I was able to streak forward in my research, narrowly catching Venice and Barcelona in the Far East.  These advanced technologies also reduce your misery index, thus providing additional points.

The Black Death struck the Lavant, which wiped out many English settlements.  However, the English had many nasty tricks up their sleeves.  These were unleashed on the southern Europeans without mercy, ensuring that they would not benefit from London's misfortunes.

We had to turn in early, but it was pretty clear that the Island Nation was going to reign supreme after all!  One more Age of Renaissance victory for the Wappels!!


Bitey was quite pleased, as London's tokens were the same green as his soft fur!  Very soft, especially for a dinosaur...

Saturday, January 3, 2015

Ground Pounders


Back to the foot versions of the Easterling Cavalry!

This is a substitute for the banner bearer for the moment.  I have a much more accurate one on the way...


Here are a few representations of the unit Captain...


And now for some more views of the Sorcerer...


Beware the Eye!


That was one of the things about the Easterlings that I thought would be interesting.  They are "True Believers", following Sauron willingly... not through fear.

For this reason, they are rewarded with the best weapons and armor.  They are more than a match for any Gondor pushover, which they proved quite often!


This would be the foot version of the command staff.


A little comparison with the cavalry versions...


And now with some 'regular' infantry.


Stay tuned for more!


Foot and hoof


Here's an example of the mounted and unmounted versions of a character, in this case, a sorcerer.

As I mentioned in the last post, it is entirely possible for a horse to be shot out from under you, so you must have an infantry style figure to represent them.


I tried to make this guy match up to the mounted version as much as possible!


Friday, January 2, 2015

Happy Easter! Well... Easterlings.


Here's something I have been itching to do for a while... shoot the Easterling minis on the new backdrops!

I still love my Easterling cavalry, especially my converted cavalry standard bearer.  He was an important part of my command staff.


This minor Easterling sorcerer was also a big part of the army.  His Fury could be a key game changer at just the right moment!


Here's the converted Captain figure.


The War Drum was crucial to everything, contributing to the speed and violence by giving everyone a plus three movement!  Combine this with the Khandish Chariots and the rest of the Kataphracts


This is the Group of Death, which dealt out a lot of punishment in combination with the Chariots and even the infantry.


The two bladed Champion could provide some nice attack bonuses on the charge.  There was a lot of synergy, which made it fun!


I believe a good number of these were upgraded to Dragon Knights, so they were even nastier...


The whole crew again, from a different angle.


And from above!  My next set of group shots will show the infantry.  Not only were those extra pikemen important on their own... but you needed 'on foot' versions of the Kataphracts in case the horses were shot out from under them!


A peek into the Palantir


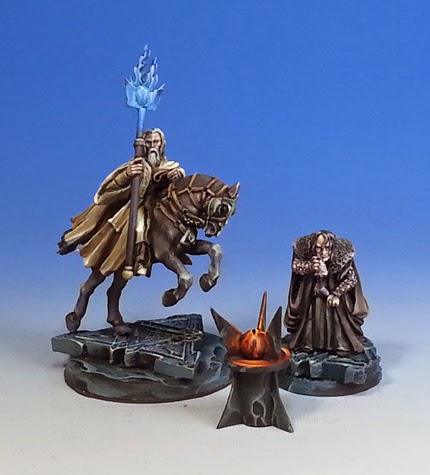
This was a very fun set of figs that I made for our Lord of the Rings games.

I wanted to set up the Sauruman/Grima whammy on the opponents might, along with a few other nasty tricks!


I converted a Wraith figure using some Empire bits to make a mounted Sauruman figure.  This was to be sure that he could keep up with the Khandish chariots and Easterling cavalry.


He would knock down the hapless opponents (usually Gondor), taking them down like bowling pins.

This meant that the chariots and Easterling cav could jump all over them.  Yes!


Grima was there to cancel out the might points of big time guys such as Aragorn, etc.  Crying into his hankey was just the trick, as Aragorn ended up with some Khandish tire tracks on his face.


There are a number of significant trophy heads on the Khandish King's chariot due to Sarumon.


I was really curious to see what these would look like on the various Hangar 18 backdrops.  The red one for sure!


I thought it might compliment the blue/black marble, and even enhance the Palantir.


I thought I would try this one as well.


It's a bit like Orthanc... showing of the marble nicely, along with Sarumon's robes.


I do hope to try out these guys again... perhaps at Adepticon!!!