Friday, September 6, 2013

Why does it have to be snakes? Again.


We continue with the bases and movement tray for Kroak's Temple Guard unit.

By this point, I had glued the pieces of sculpey to the foam core pieces.  I also cut the 'edging' pieces, and glued those as well.


With all the edge pieces glued in, I made sure that all the individual bases fit OK.


Once I knew that all those bases were where they should be, I placed the ring around the Sacrificial Pit.  This pit will be filled mostly with the chopped up body parts and skulls from Secret Weapon.  I think I will be tossing in some Empire heads as well for good measure!


I started to do some preliminary 'ageing' of the edges on the bases.  I didn't get too crazy with this, since I wanted to make sure the designs would have plenty of space!


Soon all the bases had been aged around the corners.


There will be designs radiating out from the central pit.  You can see the sheet metal through the hole cut for the pit.


I am hoping to have four snake heads emerge from the four cardinal directions that go all the way out to the edge pieces...


Time to magnetize these bases!  Out come the refrigerator magnets.


Each base gets a magnet.  Next they will get numbers.


Remember the little snakes from the last post?  Here they are!


Stay tuned for the Pit filler and the designs being carved into the bases!

While I'm at it...


I needed to film a new segment on Baking sculpey for the basing videos, which meant rolling out lots of new sculpey.


Since I did not want to simply roll out a pound of sculpey without much additional purpose, I tried to gear it towards current projects.  Among these was the new experiment with more unified movement trays for fantasy units.

In this case, it was the new Kroak/Temple Guard unit.


The concept it to have Kroak's Palanquin floating above a sacrificial pit.  The pit would be located right in the center of the unit.


There would be significant obstacles to deal with, not the least of which is how tricky it can be to get Lizardman infantry of any kind to rank up.  I had to abandon the original plan to have multiple levels to the unit.

The bases would all have to be the same height.


So, I cut out a bunch of 25mm bases in the unbaked sculpey.  I also made the cutout for the pit on Kroak's base, and a bunch of snakes to put out around the movement tray for extra effect.


Once that was baked, I cut some foam core pieces which would give a little bit of height to the bases... hopefully just enough to make the pit viable.


The baked sculpey pieces were set out on the foamcore, and the hole for the pit was cut.  The shiny surface you see is the sheet metal used to attract the refrigerator magnets.


In the next part of this post, I will show some images of the weathering and magnetization of the bases and how the rest of the movement tray is formed.  Stay tuned!

Thursday, September 5, 2013

Knock Knock...


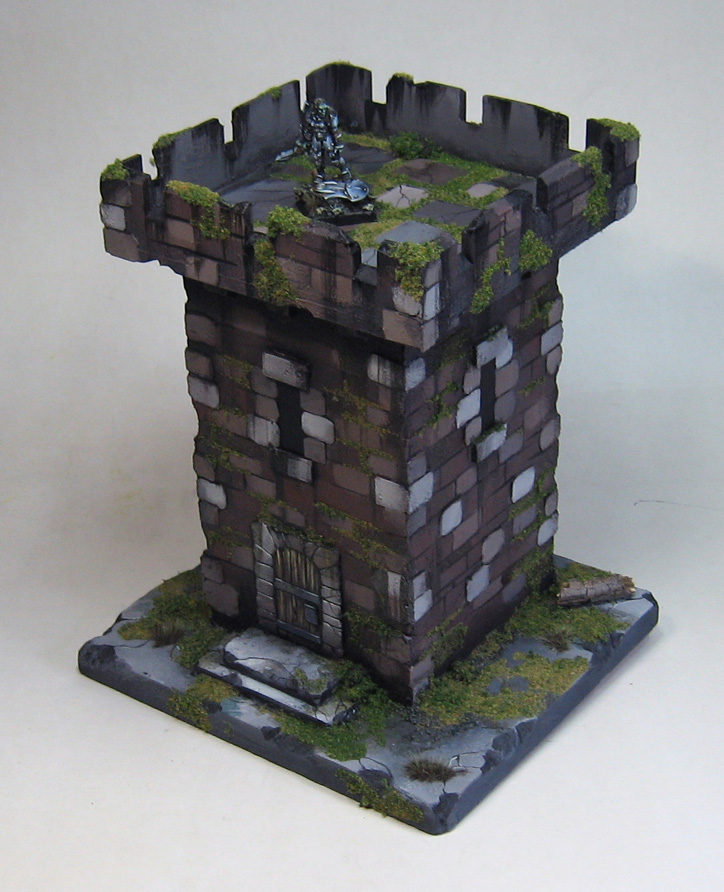
Who's there?  A tower!  Another piece painted for video credits and box art.


Each time I paint one of these, I learn a few little tidbits.


This one went faster than previous attempts, partly due to the craft paint that I used, rather than the acrylic paint from tubes and jars.


I was able to use various colors of paint to simulate additional blocks and bricks instead of having to carve them all in one by one.


When I put a few miniatures on the tower, it showed me that I had guessed right on the measurements to make it useful for actual games.


It is tall enough to block any line of sight, but wide enough at the top to allow a fair amount of figures to stand up there.


I keep getting more anxious to use these pieces of terrain in some games!


Look who;s coming to dinner...


Sneaking around the corner...


First of its kind


Well, here's a new kind of miniatures for me.  These are Mercs Miniatures.  I could not tell you the faction, or even what this guy is. :-)


I had done a lot of work on these guys during the White Scars project, and when the snow bases were being made.  I developed a few ways of approaching white, since that is a video I want to make in the future.  

I get asked about white and black so often, I knew I was going to have to get to those.


This particular white is very different from the recent White Scars white, since the snow would influence the overall mini in the same way that the bike bases did.  I needed a warmer white, but not anything yellowish.  The White Scars could have a more neutral/cool white, since the bases were a warmer color (and all the red/yellow markings).


Wednesday, September 4, 2013

They like their totem!


Once my trusty Lizards caught sight of the new totem, they immediately claimed it for themselves!


They even brought along some of the objective markers... and a swarm.


This makes me even more interested in seeing these things out on the gaming table with the Temple of Blood!


A close up of the little guys.  Blowpipes at the ready!


I forgot how much I used to love my skink blowpipes.  I had dozens of them, and they would roam all over the table creating havoc.  Perhaps I might start doing this again :-)


I wonder what sort of magical terrain this thing will represent in a given game.  Perhaps a Sinister Statue?


Chamber of Secrets


I dug out the Secret Weapon powders once again to make some dual purpose snow bases.


I needed to make some more of them for box art and credits, but also for some Merc figures.


These represent a variety of sculpting materials... sculpey, apoxy sculpt, and cork.


I will post some images of the Merc figures over the next week...


This base is for one of the Urban Warfare Viridians that I painted in snow camouflage as I worked on the jungle and desert camo for the video.


Here's the group shot!


Tuesday, September 3, 2013

Standing for all time...


The Obelisk!  Painted for the box art of the video, the credits, and such.


It will also make some nice Khemri terrain!


It is always a blast to see pink insulation foam transformed in this way :-)


The Tainted Pharaoh will be very happy!